PARKING ASSIST MONITOR SYSTEM ADJUSTMENT
-
SYSTEM ADJUSTMENT
-
This parking assist monitor system can be set from the diagnostic screen of the "NAVIGATION SYSTEM".
-
If the following operations are performed, adjustment and check on the diagnostic screen are required.
Part Name Operation Adjustment Item Television camera
-
Replacement
-
Installation angle of the television camera changes because of the removal and installation of the television camera, etc.
-
The actual path of the vehicle deviates from the anticipated path (yellow-colored guideline).
Television camera optical axis (camera position setting) Television camera ECU Replacement
-
Steering angle neutral point in memory
-
Store the left and right maximum steering angles
-
Television camera optical axis (camera position setting)
-
-
-
PREPARATION FOR ADJUSTMENT
Tech Tips
Only when adjusting the optical axis of the camera, install the target bar for adjustment.
-
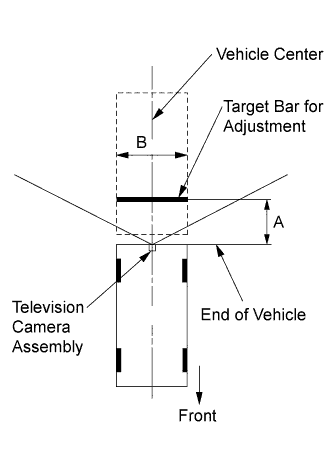
Park the vehicle with the steering wheel straight ahead.
-
Set the target bar for adjustment.
Standard A: 900 +/-5 mm (35.43 +/-0.20 in.) B: 2000 +/-5 mm (78.74 +/-0.20 in.) Tech Tips
-
The target bar for adjustment is a piece of tape stuck to the floor (25 +/-5 mm (0.98 +/-0.20 in.) wide by 2000 +/-5 mm (78.74 +/-0.20 in.) long). Check the color on the screen in the vehicle and choose a tape color which can be easily seen.
-
Before parking the vehicle, move the vehicle back and forth to check that the wheels and the steering wheel are facing straight ahead.
-
-
-
START DIAGNOSIS MODE
-
Start the engine.
-
Start the diagnostic system Click here.
-
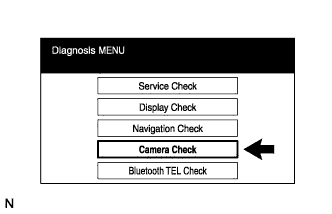
Select "Camera Check" on the Diagnosis MENU screen.
-
-
STEERING ANGLE SETTING
-
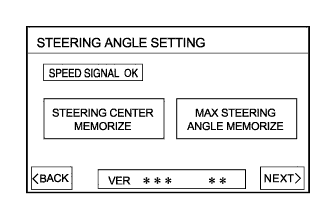
Check that the steering wheel is centered, and then press "STEERING CENTER MEMORIZE".
Note
After checking that the steering wheel is centered within +/-5° range of the center, conduct the "STEERING CENTER MEMORIZE" operation.
Tech Tips
-
When removing, installing, or replacing the television camera, adjustment of the steering angle is not required. Select "NEXT" on the steering angle setting.
-
Even when storing the steering angle neutral point only, the system cannot store it unless the operation is completed by following the prompts from "NEXT" to "OK".
-
When the system displays "SPEED SIGNAL CHECKING", first touch "SPEED SIGNAL CHECKING", and then "MAX STEERING ANGLE MEMORIZE". The display does not switch to the next screen if this process is not completed.
-
-

After adjusting the steering angle neutral point, fully turn the steering wheel clockwise and counterclockwise, and press "MAX STEERING ANGLE MEMORIZE". The maximum steering angle is then stored.
Note
Be sure to fully turn the steering wheel clockwise and counterclockwise.
Tech Tips
The key "NEXT" does not respond until the system stores the steering angle neutral point and maximum steering angle even if touched.
-
-
CAMERA POSITION SETTING
-
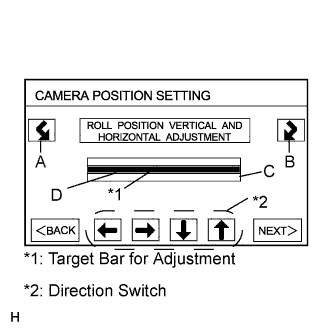
Press switches A and B to rotate C so that it is parallel to the target bar for adjustment (D).
-
Perform the vertical and horizontal position adjustment.
-
Press the direction switches to move C so that the target bar for adjustment (D) is centered in C.
-
-
VERIFY MODE
-
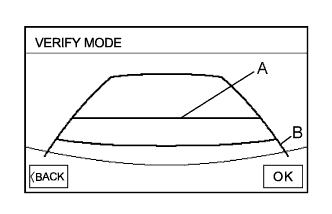
Check that "A" and the target bar for adjustment are almost lined up. If they are not lined up, perform STEERING CENTER MEMORIZE, MAX STEERING ANGLE MEMORIZE, and CAMERA POSITION SETTING procedures again.
-
With the steering wheel centered, check that the yellow and green frames overlap each other. If it is not lined up, perform STEERING CENTER MEMORIZE, MAX STEERING ANGLE MEMORIZE, and CAMERA POSITION SETTING procedures again.
-
Select "OK" to return to the Diagnosis MENU screen, and complete the adjustment.
Tech Tips
The update is not complete until the "OK" key is pressed.
-