REAR BUMPER INSTALLATION

Tech Tips
A bolt without a torque specification is shown in the standard bolt chart Click here.
-
ADJUST REAR MILLIMETER WAVE RADAR SENSOR ASSEMBLY (w/ Dynamic Radar Cruise Control System)
Tech Tips
If a metallic colored rear bumper is repaired, the rear millimeter wave radar sensor may not operate normally. As a result, be sure to perform the rear millimeter wave radar sensor adjustment Click here.
-
INSTALL REAR BUMPER LOWER RETAINER LH
-
Attach the 4 claws to install the rear bumper lower retainer LH.
-
Install the 4 screws and grommet.
-
-
INSTALL REAR BUMPER LOWER RETAINER RH
Tech Tips
Use the same procedure described for the LH side.
-
INSTALL REAR TIRE PRESSURE MONITOR INITIATOR
-
INSTALL REAR BUMPER SIDE SUPPORT LH
-
Attach the claw and clip to install the rear bumper side support LH.
-
Install the 5 clips.
-
-
INSTALL REAR BUMPER SIDE SUPPORT RH
Tech Tips
Use the same procedure described for the LH side.
-
INSTALL REAR BUMPER LOWER SIDE RETAINER LH
-
Attach the claw to install the rear bumper lower side retainer LH.
-
Install the clip.
-
-
INSTALL REAR BUMPER LOWER SIDE RETAINER RH
Tech Tips
Use the same procedure described for the LH side.
-
INSTALL BLIND SPOT MONITOR SENSOR
-
INSTALL REAR BUMPER UPPER RETAINER LH
-
Attach the 2 clips to install the rear bumper upper retainer LH.
-
-
INSTALL REAR BUMPER UPPER RETAINER RH
Tech Tips
Use the same procedure described for the LH side.
-
INSTALL REAR COMBINATION LIGHT ASSEMBLY LH
-
Move the rear combination light assembly LH in the direction of the arrow in the illustration and attach the clip, 2 claws and 2 guides to install the rear combination light assembly LH.
-
Install the 3 nuts.
- Torque:
- 4.5 N*m { 46 kgf*cm, 40 in.*lbf }
-
Connect the connector.
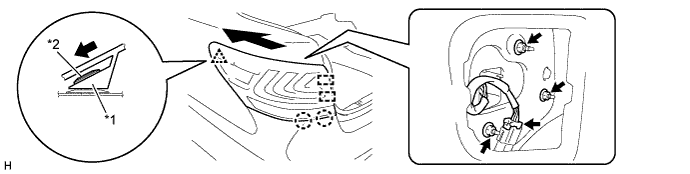
Text in Illustration *1 Rear Combination Light Assembly LH *2 Clip
-
-
INSTALL REAR COMBINATION LIGHT ASSEMBLY RH
Tech Tips
Use the same procedure described for the LH side.
-
INSTALL LUGGAGE TRIM SERVICE HOLE COVER
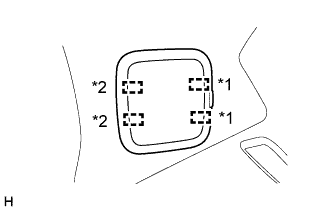
Text in Illustration *1 Fastener *2 Guide
-
Attach the 2 guides and 2 fasteners to install the luggage trim service hole cover.
-
-
INSTALL REAR BUMPER NO. 1 REINFORCEMENT
-
Install the rear bumper No. 1 reinforcement with the 8 bolts.
- Torque:
- 20 N*m { 204 kgf*cm, 15 ft.*lbf }
-
-
INSTALL REAR BUMPER ENERGY ABSORBER
-
Install the rear bumper energy absorber.
-
-
INSTALL REAR BUMPER COVER
-
Connect the No. 3 floor wire connector.
-
Attach the 14 claws and 4 guides to install the rear bumper cover.
-
Install the 2 screws.
-
Install the 6 clips.
-
Install the 2 screws.
-
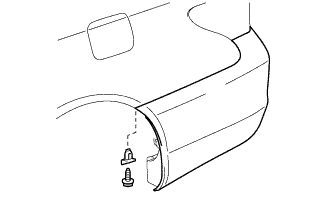
Install the rear bumper seal bracket and screw.
Tech Tips
Use the same procedure for both screws and rear bumper seal brackets.
-
-
INSTALL CENTER REAR BUMPER PLATE (w/ Dynamic Radar Cruise Control System)
-
Attach the 4 claws to install the center rear bumper plate.
-
-
INSTALL UPPER REAR BUMPER COVER LH
-
Attach the 3 claws to install the upper rear bumper cover LH.
-
-
INSTALL UPPER REAR BUMPER COVER RH
Tech Tips
Use the same procedure described for the LH side.