FRONT DOOR WINDOW FRAME MOULDING INSTALLATION

Tech Tips
-
Use the same procedures for the RH side and LH side.
-
The procedures listed below are for the LH side.
-
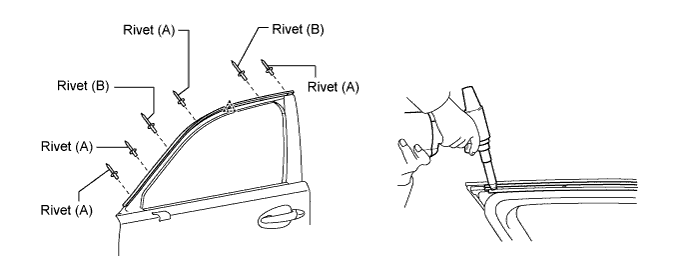
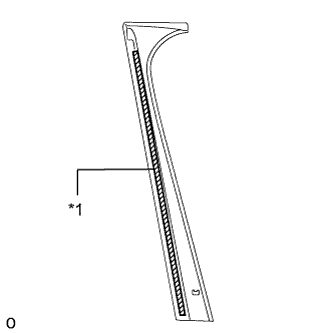
INSTALL FRONT DOOR WINDOW FRONT FRAME MOULDING LH
-
Attach the clip to install the window frame moulding.
-
Install a nose piece to an air riveter or hand riveter. Then insert the mandrel part of a new φ4 mm waterproof rivet into the nose piece.
-
Using the air riveter or hand riveter, install the 6 rivets shown in the illustration.
Tech Tips
-
Using the air riveter or hand riveter, install the 6 rivets shown in the illustration.
Rivet Rivet Type (A) Short Type or Long Type (B) Long Type -
If the rivet cannot be cut, pull it once and cut it.
Note
-
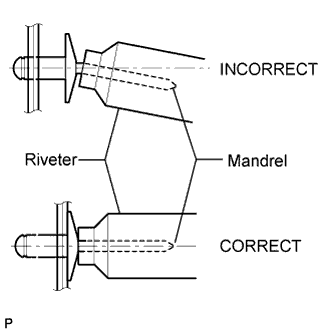
Do not pry the rivet with the riveter, as this will cause damage to the riveter and mandrel.
-
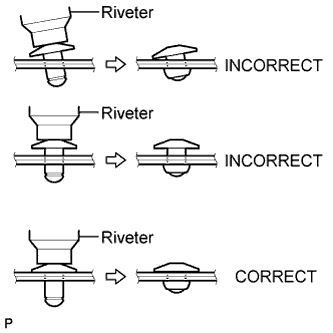
Confirm that the rivets are seated properly against the moulding.
-
Do not tilt the riveter when installing the rivet to the moulding.
-
Do not leave any space between the rivet head and moulding.
-
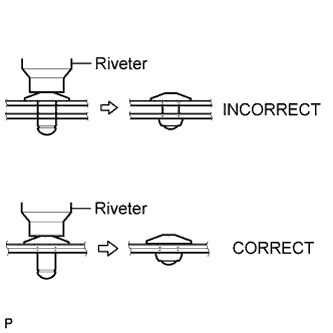
Do not leave any space between the moulding and door frame. Firmly hold together the 2 items while installing the rivet.
-
-
-
INSTALL FRONT DOOR WEATHERSTRIP LH
-
Clean the front door surface.
-
Remove the double-sided tape from the front door.
-
Wipe off any tape adhesive residue with cleaner.
-
-
Install a new front door weatherstrip.
-
Remove the peeling paper from the face of the front door weatherstrip.
Tech Tips
After removing the peeling paper, keep the exposed adhesive free from foreign matter.
-
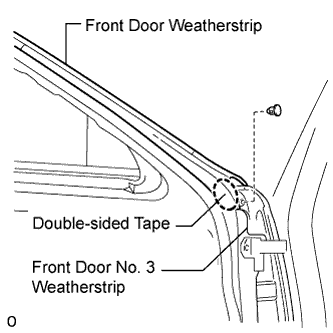
Install the front door weatherstrip with the clip.
Tech Tips
Lift up the front door No. 3 weather strip to install the front door weatherstrip, as the front door weatherstrip affixes to the inner side of the front door No. 3 weatherstrip.
-
-
-
INSTALL FRONT DOOR BELT MOULDING REAR END COVER LH
-
Text in Illustration *1 Double-sided Tape Place double-sided tape on the front door belt moulding end cover rear LH as shown in the illustration.
-
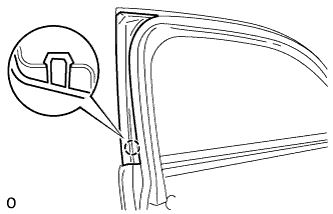
Attach the claw to install the front door belt moulding end cover rear LH.
-
-
INSTALL DOOR FRAME GARNISH LH
-
Install the door frame garnish LH with the 2 clips.
-
-
INSTALL FRONT DOOR TRIM COVER LH
-
Attach the 5 clips to install the front door trim cover LH.
-
Install the cushion.
-
-
INSTALL FRONT DOOR TRIM BOARD SUB-ASSEMBLY LH
-
Connect the connector.
-
Connect the 2 cables to the inside handle.
-
Attach the 13 clips to install the front door trim board sub-assembly LH.
-
Install the 3 screws.
-
-
INSTALL POWER WINDOW REGULATOR MASTER SWITCH ASSEMBLY WITH FRONT DOOR ARMREST BASE PANEL
-
Connect the connector.
-
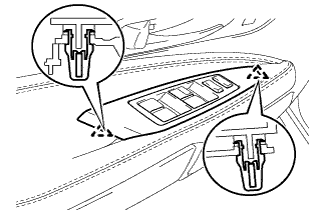
Attach the 2 claws to install the power window regulator master switch assembly with front door armrest base panel.
-
-
INSTALL FRONT DOOR INSIDE HANDLE BEZEL PLUG LH
-
Attach the 3 claws to install the front door inside handle bezel plug LH.
-