LUMBAR SUPPORT ADJUSTER ASSEMBLY (for Power Seat) INSTALLATION

CAUTION:
Wear protective gloves. Sharp areas on the parts may injure your hands.
Tech Tips
-
Use the same procedure for RHD and LHD vehicles.
-
The procedure listed below is for LHD vehicles.
-
INSTALL REAR SEATBACK SPRING ASSEMBLY LH
-
Set the rear seatback cover with pad LH in place.
-
Attach the seatback cover bracket with the nut.
- Torque:
- 5.6 N*m { 57 kgf*cm, 50 in.*lbf }
-
Connect the connector and install the wire harness clamp.
-
Attach the 8 hooks.
-
Using hog ring pliers, install the rear seatback spring assembly LH (lumbar support adjuster assembly LH) to the rear seatback cover with pad LH with 19 new hog rings.
Note
-
Be careful not to damage the rear seatback cover with pad LH.
-
Be sure to securely install the hog rings as shown in the illustration while preventing wrinkles from forming on the rear seatback cover with pad LH.
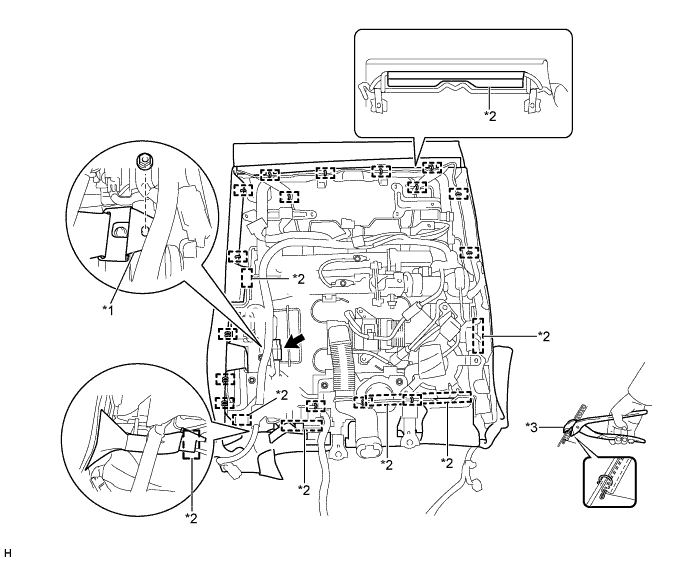
Text in Illustration *1 Seatback Cover Bracket *2 Hook *3 Hog Ring Pliers - - -
-
-
INSTALL REAR SEAT LOCK BASE LH
-
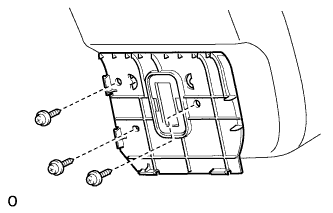
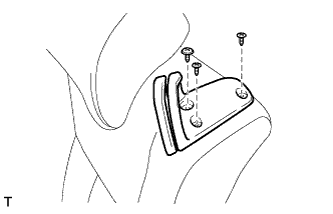
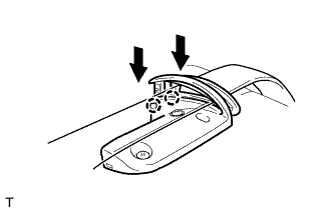
Install the rear seat lock base LH with the 3 screws.
-
-
INSTALL REAR SEAT COVER CAP LH
-
Attach the 5 claws to install the rear seat cover cap LH.
-
-
INSTALL SEAT HEATER CONTROL SUB-ASSEMBLY
-
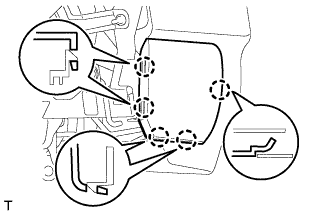
Attach the guide to install the seat heater control sub-assembly.
-
Connect the connector.
Tech Tips
Use the same procedure to install the seat heater control sub-assembly on the other side.
-
-
INSTALL REAR SEAT CLIMATE CONTROL ECU LH
-
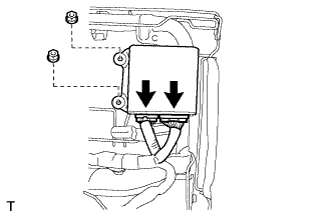
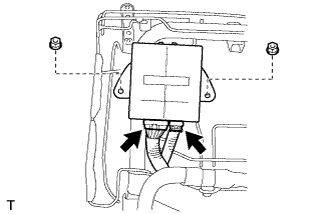
Install the rear seat climate control ECU LH with the 2 nuts.
-
Connect the 2 connectors.
-
-
INSTALL POSITION CONTROL ECU ASSEMBLY
-
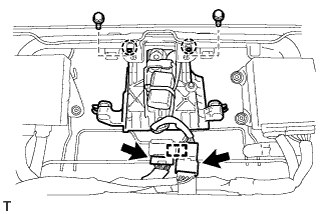
Install the position control ECU assembly with the 2 nuts.
-
Connect the 2 connectors.
Tech Tips
Use the same procedure to install the position control ECU assembly on the other side.
-
-
INSTALL REAR NO. 1 SEAT HEADREST ADJUSTER SUB-ASSEMBLY
-
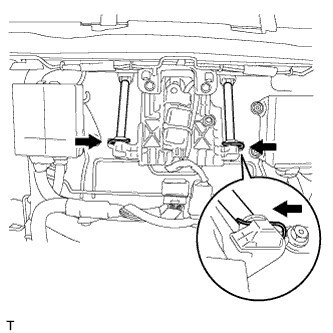
Attach the 2 claws to install the rear No. 1 seat headrest adjuster sub-assembly with the 2 bolts.
-
Connect the 2 connectors and attach the wire harness clamp.
Tech Tips
Use the same procedure to install the rear No. 1 seat headrest adjuster sub-assembly on the other side.
-
-
INSTALL REAR SEAT HEADREST SUPPORT
-
Attach the 4 claws to install the 2 rear seat headrest supports.
Tech Tips
Use the same procedure to install the rear seat headrest support on the other side.
-
-
INSTALL REAR SEAT HEADREST ASSEMBLY
-
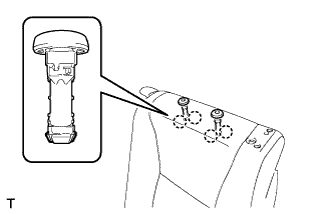
Install the rear seat headrest assembly with the 2 pins.
Tech Tips
Use the same procedure to install the rear seat headrest assembly on the other side.
-
-
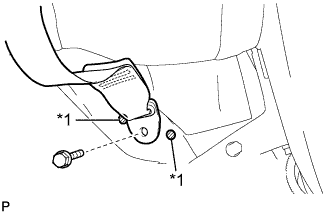
INSTALL REAR SEAT SHOULDER BELT GUIDE LH
-
Install the rear seat shoulder belt guide LH with the 3 screws.
-
-
INSTALL REAR SEATBACK SPRING ASSEMBLY RH
Tech Tips
Use the same procedures described for the LH side.
-
INSTALL REAR SEAT LOCK BASE RH
Tech Tips
Use the same procedures described for the LH side.
-
INSTALL REAR SEAT COVER CAP RH
Tech Tips
Use the same procedures described for the LH side.
-
INSTALL REAR SEAT CLIMATE CONTROL ECU RH
Tech Tips
Use the same procedures described for the LH side.
-
INSTALL REAR SEAT SHOULDER BELT GUIDE RH
Tech Tips
Use the same procedures described for the LH side.
-
INSTALL REAR SEATBACK ASSEMBLY LH
-
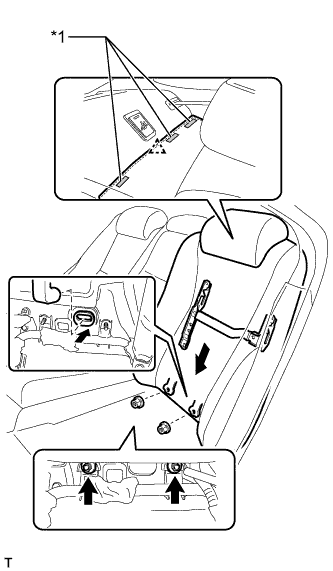
Connect the rear seatback assembly LH to the rear No. 2 seatback adjuster assembly, and press down on the rear seatback assembly LH to install it to the rear No. 2 seatback adjuster assembly. Then connect the air duct to the vehicle body.
Note
Be careful not to damage the vehicle body.
-
Install the 2 nuts.
- Torque:
- 20 N*m { 204 kgf*cm, 15 ft.*lbf }
-
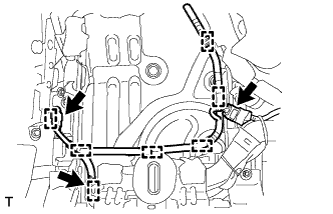
Install the clip and attach the 3 pieces of fastening tape.
Text in Illustration *1 Fastening Tape -
Connect the 3 connectors and attach the 7 wire harness clamps.
-
Connect the 2 connectors.
-
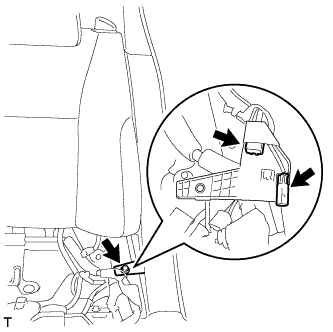
Install the junction block with the bolt.
- Torque:
- 30 N*m { 306 kgf*cm, 22 ft.*lbf }
-
Connect the seat belt to the shoulder belt guide.
-
Attach the 2 claws to close the 2 caps.
-
Text in Illustration *1 Protruding Part Connect the anchor part of the rear seat 3 point type belt assembly with the bolt.
- Torque:
- 42 N*m { 428 kgf*cm, 31 ft.*lbf }
Note
Do not allow the anchor part of the rear seat 3 point type belt assembly to overlap protruding parts of the floor panel.
-
-
INSTALL REAR SEATBACK ASSEMBLY RH
Tech Tips
Use the same procedures described for the LH side.
-
INSTALL REAR SEAT CUSHION ASSEMBLY LH
-
Connect the connector.
-
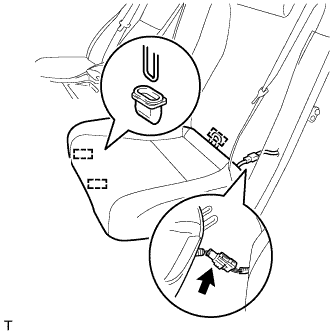
Attach the rear hook of the rear seat cushion assembly LH to the rear No. 2 seat adjuster assembly.
Note
Be careful not to damage the vehicle body.
-
Attach the 2 front hooks of the rear seat cushion assembly LH to the rear No. 2 seat adjuster assembly.
-
-
INSTALL REAR SEAT CUSHION ASSEMBLY RH
Tech Tips
Use the same procedures described for the LH side.
-
CONNECT CABLE TO NEGATIVE BATTERY TERMINAL
Note
When disconnecting the cable, some systems need to be initialized after the cable is reconnected Click here.
-
INSTALL COWL TOP VENTILATOR LOUVER RH
-

for LHD:
Install the 6 clips and cowl top ventilator louver RH.
Note
If the cowl top ventilator louver RH is not properly installed, water may leak into the engine room and cause malfunctions. Therefore, make sure the cowl top ventilator louver RH is installed properly.
-

for RHD:
Install the 6 clips and cowl top ventilator louver LH.
Note
If the cowl top ventilator louver LH is not properly installed, water may leak into the engine room and cause malfunctions. Therefore, make sure the cowl top ventilator louver LH is installed properly.
-
-
CHECK SRS WARNING LIGHT
-
CHECK REAR SEAT ASSEMBLY
-
Check the power seat operation:
-
Check the climate control seat system:
-
Check the seat vibration system:
-