REAR SEAT ASSEMBLY (for Fixed Seat Type) REASSEMBLY

CAUTION:
Wear protective gloves. Sharp areas on the parts may injure your hands.
Tech Tips
-
Use the same procedure for RHD and LHD vehicles.
-
The procedure listed below is for LHD vehicles.
-
A bolt without a torque specification is shown in the standard bolt chart Click here.
-
INSTALL BENCH TYPE REAR SEATBACK COVER
-
for LH Side:
-
Set the bench type rear seatback cover in place.
-
Using hog ring pliers, install the bench type rear seatback cover to the rear seatback pad sub-assembly with 30 new hog rings.
Note
-
Be careful not to damage the bench type rear seatback cover.
-
Be sure to securely install the hog rings as shown in the illustration while preventing wrinkles from forming on the bench type rear seatback cover.
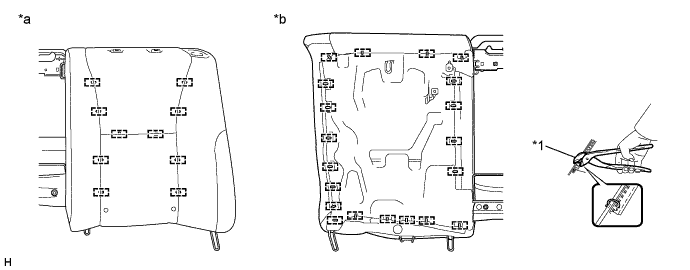
Text in Illustration *1 Hog Ring Pliers - - *a Front View *b Rear View -
-
-
for RH Side:
-
Set the bench type rear seatback cover in place.
-
Using hog ring pliers, install the bench type rear seatback cover to the rear seatback pad sub-assembly with 31 new hog rings.
Note
-
Be careful not to damage the bench type rear seatback cover.
-
Be sure to securely install the hog rings as shown in the illustration while preventing wrinkles from forming on the bench type rear seatback cover.
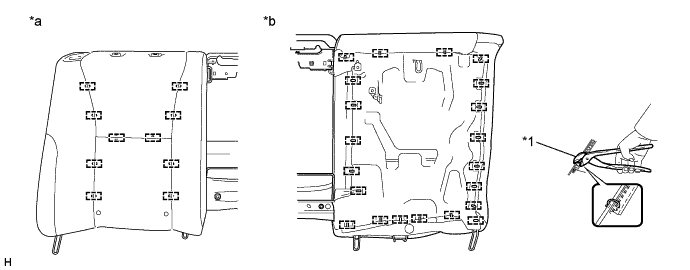
Text in Illustration *1 Hog Ring Pliers - - *a Front View *b Rear View -
-
-
-
INSTALL REAR SEAT WIRE RH
-
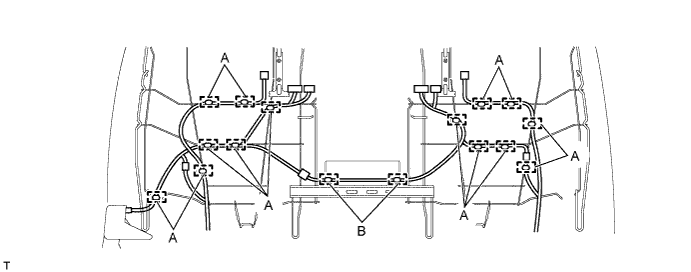
Attach the 2 wire harness clamps labeled B.
-
Install the 14 wire harness clamps labeled A to install the rear seat wire RH.
-
Connect the 2 connectors.
-
-
INSTALL SEAT HEATER CONTROL SUB-ASSEMBLY
-
Attach the guide to install the seat heater control sub-assembly.
-
Connect the connector.
Tech Tips
Use the same procedure to install the seat heater control sub-assembly on the other side.
-
-
INSTALL REAR SEAT CLIMATE CONTROL ECU LH
-
Install the rear seat climate control ECU LH with the 2 nuts.
-
Connect the 2 connectors.
-
-
INSTALL REAR SEAT CLIMATE CONTROL ECU RH
Tech Tips
Use the same procedures described for the LH side.
-
INSTALL REAR SEAT SHOULDER BELT GUIDE LH
-
Install the rear seat shoulder belt guide LH with the 3 screws.
-
-
INSTALL REAR SEAT SHOULDER BELT GUIDE RH
Tech Tips
Use the same procedures described for the LH side.
-
INSTALL REAR SEAT HEADREST SUPPORT
-
Attach the 4 claws to install the 2 rear seat headrest supports.
Tech Tips
Use the same procedure to install the rear seat headrest support on the other side.
-
-
INSTALL REAR SEAT ARMREST HOLE COVER
-
Attach the 2 clips to install the rear seat armrest hole cover.
-
-
INSTALL REAR CENTER SEAT HEADREST ASSEMBLY
-
Install the rear center seat headrest assembly with the 2 bolts.
- Torque:
- 20 N*m { 204 kgf*cm, 15 ft.*lbf }
-
-
INSTALL REAR SEAT HEADREST ASSEMBLY
-
Install the rear seat headrest assembly.
Tech Tips
Use the same procedure to install the rear seat headrest assembly on the other side.
-
-
INSTALL REAR SEAT CENTER ARMREST CUP HOLDER SUB-ASSEMBLY
-
Install the rear seat center armrest cup holder sub-assembly with the 2 screws.
-
-
INSTALL REAR POWER SEAT SWITCH (w/ Rear Power Seat Switch)
-
Install the rear power seat switch with the 4 screws.
-
-
INSTALL REAR NO. 1 SEAT CENTER ARMREST PANEL
-
Install the rear No. 1 seat center armrest panel to the rear seat armrest hole board with the 3 screws.
-
w/ Module Switch:
Connect the 2 connectors.
-
Attach the 8 claws and 3 guides to install the rear No. 1 seat center armrest panel together with the rear seat armrest hole board.
-
-
INSTALL REAR SEAT CENTER ARMREST ASSEMBLY
-
Install the rear seat center armrest assembly with the 2 nuts.
- Torque:
- 20 N*m { 204 kgf*cm, 15 ft.*lbf }
-
Attach the wire harness clamp.
-
-
INSTALL BENCH TYPE REAR SEAT CUSHION COVER
-
Set the bench type rear seat cushion cover in place.
-
Attach the fastening tape.
Note
Make sure that the fastening tape is securely attached to the cushion pad fastener at the rear seat cushion cover center seat belt placement area.
-
Using hog ring pliers, install the bench type rear seat cushion cover to the bench type rear seat cushion pad with 70 new hog rings.
Note
-
Be careful not to damage the bench type rear seat cushion cover.
-
Be sure to securely install the hog rings as shown in the illustration while preventing wrinkles from forming on the bench type rear seat cushion cover.
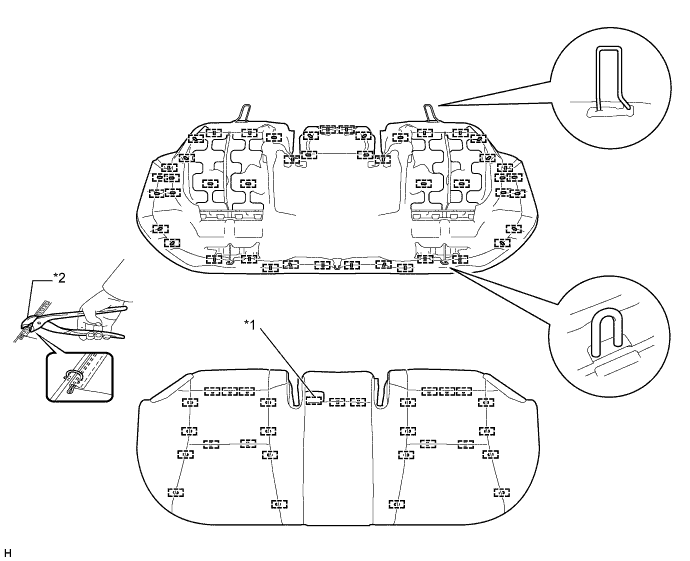
Text in Illustration *1 Fastening Tape *2 Hog Ring Pliers -
-