POWER OUTLET SOCKET (for Console Box Rear Side) INSTALLATION

-
INSTALL NO. 2 POWER OUTLET SOCKET COVER
-
w/o Rear Seat Entertainment System:
Attach the 2 claws to install the No. 2 power outlet socket cover to the rear console end panel sub-assembly.
-
w/ Disc Player:
Attach the 2 claws to install the No. 2 power outlet socket cover to the rear console end panel.
-
-
INSTALL POWER OUTLET SOCKET ASSEMBLY
-
w/o Rear Seat Entertainment System:
-
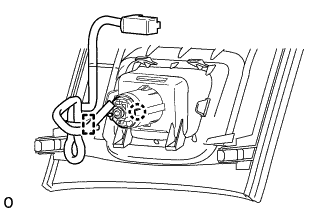
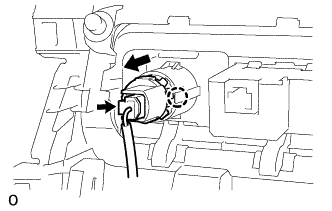
Attach the claw to install the power outlet socket assembly.
-
Attach the wire harness clamp.
-
-
w/ Disc Player:
-
Attach the claw to install the power outlet socket assembly.
-
Connect the connector to install the wire harness to the power outlet socket assembly.
-
-
w/o Rear Seat Entertainment System:
When replacing the power outlet socket assembly:
-
Install a new wire harness clamp as shown in the illustration.
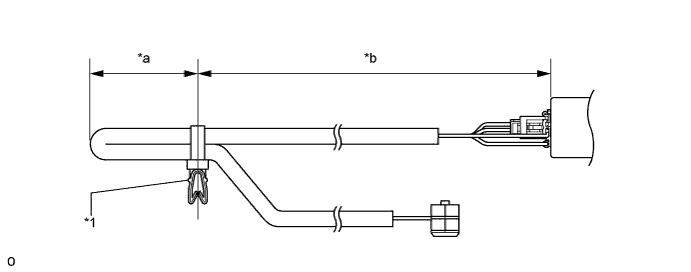
Text in Illustration *1 Wire Harness Clamp - - *a 30 to 40 mm (1.18 to 1.57 in.) *b 85 to 95 mm (3.35 to 3.74 in.) -

Text in Illustration *a 1 to 3 mm (0.0393 to 0.118 in.) *b Cut *c Correct *d Incorrect Cut off the wire harness clamp as shown in the illustration.
-
-
-
INSTALL REAR NO. 2 CONSOLE END PANEL SUB-ASSEMBLY (w/o Rear Seat Entertainment System)
-
When replacing the rear No. 2 console end panel sub-assembly:
-
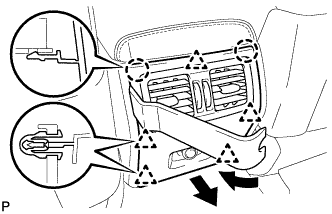
Attach the 2 guides and 4 claws to install the rear No. 2 console end panel sub-assembly.
-
Install a new wire harness clamp as shown in the illustration.
Text in Illustration *1 Wire Harness Clamp - - *a 30 to 40 mm (1.18 to 1.57 in.) *b 85 to 95 mm (3.35 to 3.74 in.) -
Text in Illustration *a 1 to 3 mm (0.0393 to 0.118 in.) *b Cut *c Correct *d Incorrect Cut off the wire harness clamp as shown in the illustration.
-
Attach the wire harness clamp.
-
-
-
INSTALL REAR CONSOLE END PANEL SUB-ASSEMBLY (w/o Rear Seat Entertainment System)
-
Using moulding remover B, detach the 5 clips and 2 claws and remove the rear console end panel sub-assembly.
-
Disconnect the connector.
-
-
INSTALL REAR CONSOLE END PANEL (w/ Disc Player)
-
Connect each connector and attach the wire harness clamp.
-
Attach the 2 hooks and 2 clips to install the rear console end panel.
-
-
INSTALL REAR CONSOLE END PANEL SUB-ASSEMBLY (w/ Disc Player)
-
Attach the 2 clips to install the rear console end panel sub-assembly.
-
Install the 2 screws.
-
-
INSTALL REAR NO. 1 CONSOLE END PANEL GARNISH (w/ Disc Player)
-
Attach the 3 guides and 3 clips to install the rear No. 1 console end panel garnish.
-
-
INSTALL REAR NO. 2 CONSOLE END PANEL GARNISH (w/ Disc Player)
-
Attach the 3 guides and 3 clips to install the rear No. 2 console end panel garnish.
-
-
INSTALL UPPER NO. 1 CONSOLE PANEL GARNISH (w/ Disc Player)
-
Attach the 4 clips to install the upper No. 1 console panel garnish.
-