YAW RATE AND ACCELERATION SENSOR INSTALLATION

Note
While the battery is connected, even if the engine switch is off, the brake control system activates when the brake pedal is depressed or the door courtesy switch turns on. Therefore during servicing of the brake system components, do not operate the brake pedal and open/close the doors while the battery is connected.
-
INSTALL YAW RATE SENSOR
Note
The yaw rate sensor has an identification number. Make sure of the identification number when replacing the yaw rate sensor.
Item Identification number Without slope determination function 9 With slope determination function 2
-

Text in Illustration *a Identification Number Connect the sensor connector.
-
Install the sensor with the 2 bolts.
- Torque:
- 9.0 N*m { 92 kgf*cm, 80 in.*lbf }
Note
-
Do not drop the yaw rate sensor. If it is dropped, do not use it.
-
Do not mistaken the installation direction of the yaw rate sensor.
-
When installing the yaw rate sensor, make sure to avoid impact to the sensor.
-
After the installation, check that the yaw rate sensor is not tilted due to the floor carpet or any foreign matter.
-
-
INSTALL NO. 1 CONSOLE BOX DUCT
-
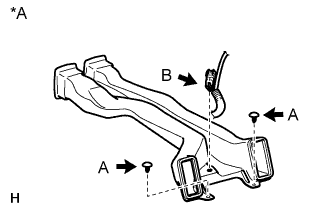
Text in Illustration *A for LHD Install the No. 1 duct with the 2 clips (labeled A).
-
for LHD:
Attach the connector clamp (labeled B).
-

Text in Illustration *A for RHD for RHD:
Attach the 2 connector clamps (labeled B).
-
-
INSTALL CONSOLE BOX ASSEMBLY
-
for 5-Passenger with Ottoman:
-
w/o Rear Seat Entertainment System:
-
w/ DVD Player:
-
-
CONNECT CABLE TO NEGATIVE BATTERY TERMINAL
Note
When disconnecting the cable, some systems need to be initialized after the cable is reconnected Click here.
-
INSTALL COWL TOP VENTILATOR LOUVER
-

for LHD:
Install the 6 clips and cowl top ventilator louver RH.
Note
If the cowl top ventilator louver RH is not properly installed, water may leak into the engine room and cause malfunctions. Therefore, make sure the cowl top ventilator louver RH is installed properly.
-

for RHD:
Install the 6 clips and cowl top ventilator louver LH.
Note
If the cowl top ventilator louver LH is not properly installed, water may leak into the engine room and cause malfunctions. Therefore, make sure the cowl top ventilator louver LH is installed properly.
-
-
PERFORM YAW RATE SENSOR ZERO POINT CALIBRATION
-
CHECK YAW RATE SENSOR SIGNAL