AIR SUSPENSION SYSTEM, Diagnostic DTC:C1761

| DTC Code | DTC Name |
|---|---|
| C1761 | Continuous Electric Current to Height Control Compressor Motor |
DESCRIPTION
The signal from the suspension control ECU operates the suspension control relay and the height control compressor motor starts. The height control compressor motor operates until the targeted vehicle height is reached. Then the height control sensor sends the signal to the suspension control ECU, and stops the height control compressor motor.
| DTC No. | Detection Condition | Trouble Area |
|---|---|---|
| C1761/61 | While suspension control relay is ON, vehicle height does not reach target for 3 minutes or more |
|
INSPECTION PROCEDURE
Note
-
Before performing troubleshooting, inspect the connectors of related circuits.
-
Before replacing the suspension control ECU, perform all of the following again: 1) symptom simulation Click here; 2) DTC inspection; and 3) intelligent tester inspection (ECU Data List or Active Test). If no malfunctions are found in other areas, replace the suspension control ECU.
-
If the suspension control ECU or height control sensor is replaced, the vehicle height offset calibration must be performed Click here.
-
The system may output DTC C1761/61 even when the system is normal if one of the following occurs: 1) the vehicle is full of passengers and the luggage compartment is full; 2) the vehicle is being driven or is stopped on an irregular surface; or 3) the air ducts are frozen.
PROCEDURE
-
CLEAR DTC
-
Clear the DTC Click here.
NEXT 
-
-
CHECK AIR LEAKAGE
-
Check for air leakage Click here.
OK No leaks.
NG 
REPAIR OR REPLACE AIR TUBE
OK
-
-
INSPECT IF NO. 1 HEIGHT CONTROL VALVE IS STUCK
-
Remove the No. 1 height control valve Click here.
-
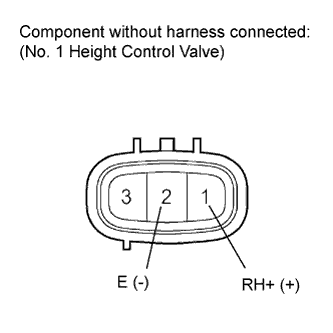
Check the No. 1 height control valve RH valve.
-
Connect terminal 1 (RH+) to the battery positive (+) terminal, and terminal 2 (E) to the battery negative (-) terminal.
-
Check the operating sound of the height control valve.
OK It makes an operating sound (click).
-
-
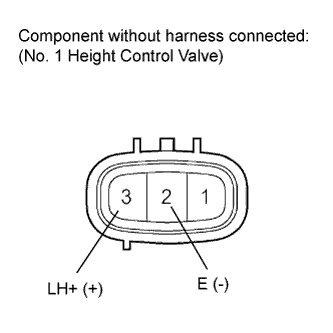
Check the No. 1 height control valve LH valve.
-
Connect terminal 3 (LH+) to the battery positive (+) terminal, and terminal 2 (E) to the battery negative (-) terminal.
-
Check the operating sound of the height control valve.
OK It makes an operating sound (click).
-
NG
REPLACE NO. 1 HEIGHT CONTROL VALVE Click here
OK
-
-
INSPECT IF NO. 2 HEIGHT CONTROL VALVE IS STUCK
-
Remove the No. 2 height control valve Click here.
-
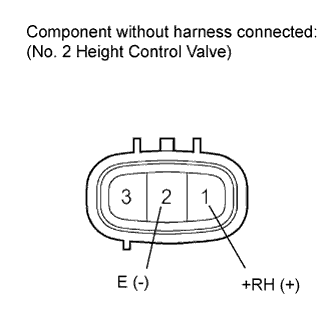
Check the No. 2 height control valve RH valve.
-
Connect terminal 1 (RH+) to the battery positive (+) terminal, and terminal 2 (E) to the battery negative (-) terminal.
-
Check the operating sound of the height control valve.
OK It makes an operating sound (click).
-
-

Check the No. 2 height control valve LH valve.
-
Connect terminal 3 (LH+) to the battery positive (+) terminal, and terminal 2 (E) to the battery negative (-) terminal.
-
Check the operating sound of the height control valve.
OK It makes an operating sound (click).
-
NG
REPLACE NO. 2 HEIGHT CONTROL VALVE Click here
OK
-
-
INSPECT IF HEIGHT CONTROL COMPRESSOR IS STUCK
-
Remove the height control compressor Click here.
-
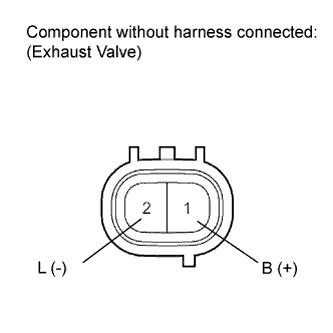
Inspect if exhaust valve is stuck:
-
Connect terminal 1 (B) to the battery positive (+) terminal, and terminal 2 (L) to the battery negative (-) terminal.
-
Check the operating sound of the height control valve.
OK It makes an operating sound (click).
-
-
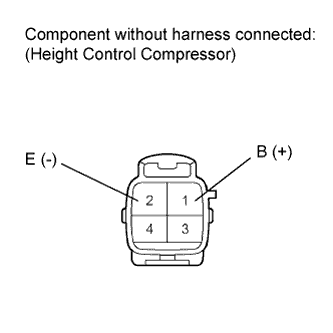
Inspect if compressor is stuck:
-
Connect terminal 1 (B) to the battery positive (+) terminal, and terminal 2 (E) to the battery negative (-) terminal.
-
Check that the motor rotates.
CAUTION:
If the compressor is shorted, locked, or has a similar type of malfunction, a large amount of voltage will be flowing. Therefore, if the motor does not operate, immediately stop this inspection.
Note
Do not allow the motor to operate for approximately 60 seconds or more.
OK Motor operates
-
NG
REPLACE HEIGHT CONTROL COMPRESSOR Click here
OK
-
-
INSPECT SUSPENSION CONTROL RELAY (AIR SUS)
-
Turn the engine switch off.
-
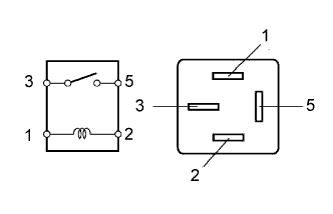
Remove the suspension control relay from the engine room No. 1 relay block.
-
Measure the resistance according to the value(s) in the table below.
Standard resistance Tester Connection Condition Specified Condition 3 - 5 When battery voltage is not applied to terminal 1 and 2 10 kΩ or higher When battery voltage is applied to terminal 1 and 2 Below 1 Ω Result Result Proceed to NG A OK (for LHD) B OK (for RHD) C
B
REPLACE SUSPENSION CONTROL ECU (for LHD) Click here
C
REPLACE SUSPENSION CONTROL ECU (for RHD) Click here
A 
REPLACE SUSPENSION CONTROL RELAY
-