EXHAUST PIPE REMOVAL

CAUTION:
-
The procedures should be performed by at least 2 people.
-
Wear protective gloves when removing the exhaust pipe.
-
The exhaust pipe is extremely hot immediately after the engine has stopped.
-
Confirm that the exhaust pipe has cooled down before removing it.
-
REMOVE NO. 2 DIFFERENTIAL SUPPORT PROTECTOR
-
Remove the 3 nuts and differential support protector.
-
-
REMOVE NO. 1 DIFFERENTIAL SUPPORT PROTECTOR
Tech Tips
Use the same procedure described for the No. 2 differential support protector.
-
REMOVE NO. 6 ROCKER PANEL MOULDING PROTECTOR
-
Remove the 2 clips, screw and No. 6 rocker panel moulding protector.
-
-
REMOVE NO. 5 ROCKER PANEL MOULDING PROTECTOR
-
Remove the 2 clips, screw and No. 5 rocker panel moulding protector.
-
-
REMOVE REAR FLOOR SIDE MEMBER COVER LH
-
Remove the 3 clips, 2 screws, nut, bolt and rear floor side member cover LH.
Text in Illustration 
Bolt 
Nut 
Screw
-
-
REMOVE REAR FLOOR SIDE MEMBER COVER RH
-
Remove the 3 clips, 2 screws, nut, bolt and rear floor side member cover RH.
Text in Illustration Bolt Nut Screw
-
-
REMOVE FRONT FENDER MAIN SEAL LH
-

Loosen the clip labeled A in the illustration, and then remove the 3 clips and front fender main seal LH.
Tech Tips
Clip A cannot be removed.
-
-
REMOVE FRONT FENDER MAIN SEAL RH
-
Loosen the clip labeled A in the illustration, and then remove the 3 clips and front fender main seal RH.
Tech Tips
Clip A cannot be removed.
-
-
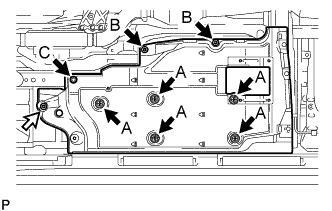
REMOVE FRONT FLOOR COVER LH (for 2WD)
-
Detach the 4 clips and remove the front floor service hole cover.
-
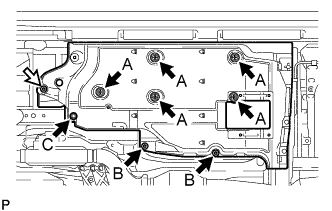
Remove the nut and the clip labeled C.
Text in Illustration Clip Nut -
Loosen the 7 clips labeled A and B in the illustration, and then remove the front floor cover LH.
Tech Tips
The clips labeled A and B cannot be removed.
-
-
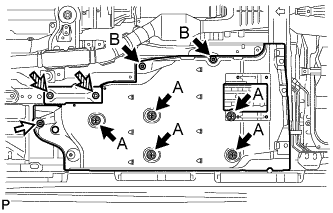
REMOVE FRONT FLOOR COVER LH (for AWD)
-
Detach the 4 clips and remove the front floor service hole cover.
-
Remove the nut and 2 bolts.
Text in Illustration Clip Nut Bolt -
Loosen the 7 clips labeled A and B in the illustration, and then remove the front floor cover LH.
Tech Tips
The clips labeled A and B cannot be removed.
-
-
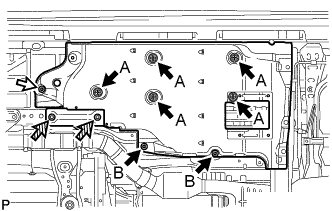
REMOVE FRONT FLOOR COVER RH (for 2WD)
-
Detach the 4 clips and remove the front floor service hole cover.
-
Remove the nut and the clip labeled C.
Text in Illustration Clip Nut -
Loosen the 7 clips labeled A and B in the illustration, and then remove the front floor cover RH.
Tech Tips
The clips labeled A and B cannot be removed.
-
-
REMOVE FRONT FLOOR COVER RH (for AWD)
-
Detach the 4 clips and remove the front floor service hole cover.
-
Remove the nut and 2 bolts.
Text in Illustration Clip Nut Bolt -
Loosen the 7 clips labeled A and B in the illustration, and then remove the front floor cover RH.
Tech Tips
The clips labeled A and B cannot be removed.
-
-
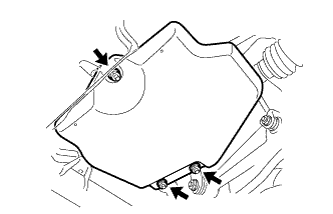
REMOVE FRONT CENTER FLOOR COVER (for AWD)
-

Remove the 3 screws, 2 bolts, clip and front center floor cover.
-
-
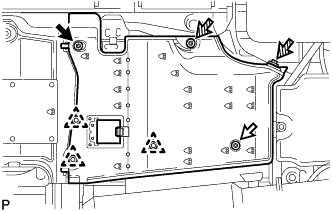
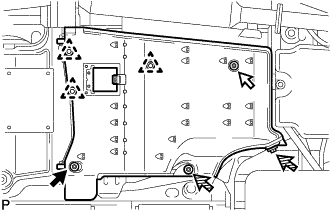
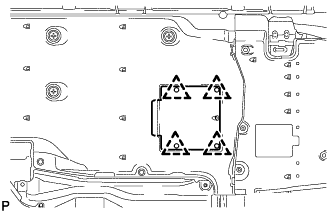
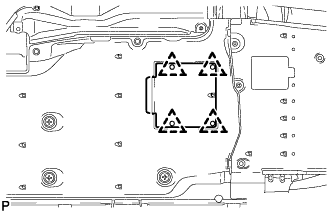
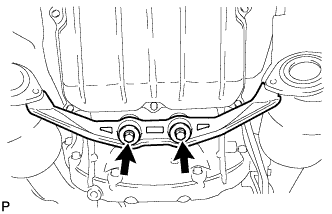
REMOVE FRONT CENTER FLOOR BRACE SUB-ASSEMBLY
-
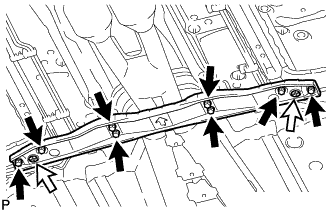
Loosen the 2 clips, and then remove the 8 bolts and front center floor brace sub-assembly.
Text in Illustration Bolt Clip Tech Tips
The clips cannot be removed.
-
-
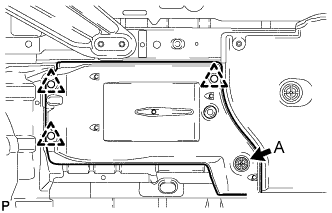
DISCONNECT HEATED OXYGEN SENSOR (for 2WD)
-
Disconnect the 2 grommets from the floor panel.
-
Text in Illustration *A for Bank 1 Sensor 2 *B for Bank 2 Sensor 2 Using SST, loosen the 2 heated oxygen sensors, and then disconnect the heated oxygen sensors by hand.
- SST
- 09224-00010
Note
Do not strike the metal part of the heated oxygen sensor.
Tech Tips
Rotate the heated oxygen sensor counterclockwise to remove it from the front exhaust pipe assembly, and record how many times it was rotated.
-
-
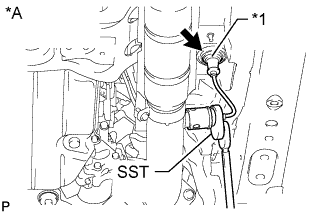
DISCONNECT HEATED OXYGEN SENSOR (for AWD)
-
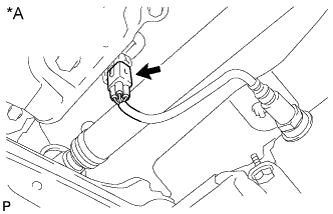
Text in Illustration *A for Bank 1 Sensor 2 for Bank 1 Sensor 2:
Disconnect the heated oxygen sensor connector.
-
Text in Illustration *A for Bank 2 Sensor 2 *1 Grommet for Bank 2 Sensor 2:
Disconnect the grommet from the floor panel.
-
for Bank 2 Sensor 2:
Using SST, loosen the heated oxygen sensor, and then disconnect the heated oxygen sensor by hand.
- SST
- 09224-00010
Note
Do not strike the metal part of the heated oxygen sensor.
Tech Tips
Rotate the heated oxygen sensor counterclockwise to remove it from the front exhaust pipe assembly, and record how many times it was rotated.
-
-
REMOVE FRONT EXHAUST PIPE ASSEMBLY
-
Temporarily loosen the 8 bolts on the tailpipe sides and manifold sides.
-
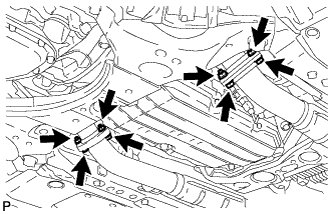
Remove the 4 nuts and 4 bolts from the exhaust manifold LH and exhaust manifold RH.
Tech Tips
During removal, hold the front exhaust pipe assembly.
-

Remove the 4 bolts from the tailpipe LH and tailpipe RH. Then remove the front exhaust pipe assembly.
Tech Tips
During removal, hold the front exhaust pipe assembly.
-
Remove the 2 gaskets from the exhaust manifold side and the 2 gaskets from the tailpipe side.
-
-
REMOVE HEATED OXYGEN SENSOR
Note
Do not strike the metal part of the heated oxygen sensor.
-
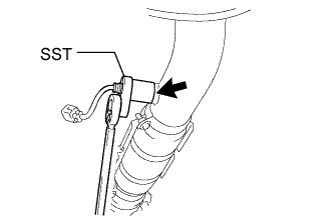
for Bank 1 Sensor 2:
Using SST, loosen the heated oxygen sensor and then remove the heated oxygen sensor by hand.
- SST
- 09224-00010
-
-
REMOVE TAILPIPE LH
-
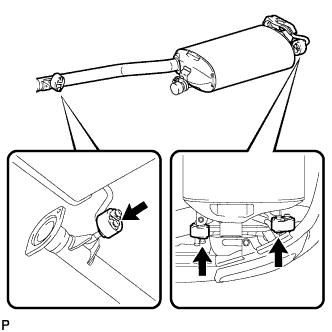
Disconnect the 3 exhaust pipe supports and remove the tailpipe LH.
-
-
REMOVE TAILPIPE RH
-
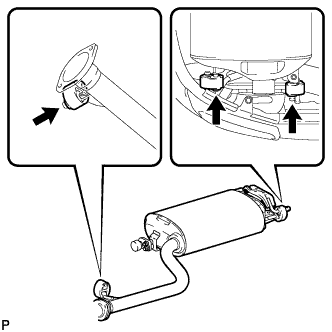
Disconnect the 3 exhaust pipe supports and remove the tailpipe RH.
-
-
REMOVE EXHAUST PIPE DAMPER
-
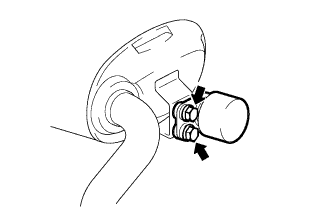
Remove the 2 bolts and exhaust pipe damper from the tailpipe LH.
-
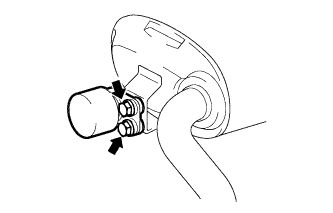
Remove the 2 bolts and exhaust pipe damper from the tailpipe RH.
-
-
REMOVE NO. 1 EXHAUST PIPE SUPPORT BRACKET SUB-ASSEMBLY (for 2WD)
-
Remove the 2 bolts and No. 1 exhaust pipe support bracket sub-assembly.
-