ECM INSTALLATION

-
INSTALL ECM
-
Install the ECM with the 2 nuts.
- Torque:
- 5.5 N*m { 56 kgf*cm, 49 in.*lbf }
-
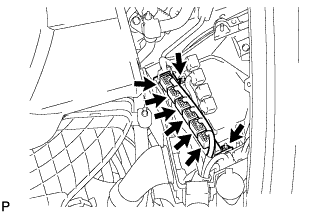
Connect the 6 ECM connectors.
-
-
CONNECT NO. 2 CONNECTOR HOLDER
-
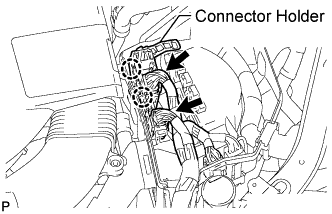
Attach the 2 claws to connect the connector holder.
-
Connect the 2 engine wire connectors.
-
-
INSTALL TCM
-
Install the TCM with the 2 nuts.
- Torque:
- 5.5 N*m { 56 kgf*cm, 49 in.*lbf }
-
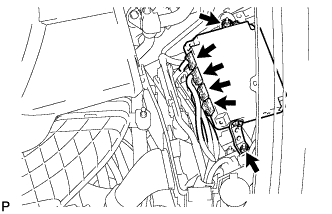
Connect the 4 TCM connectors.
-
-
INSTALL ENGINE ROOM ECU COVER
-
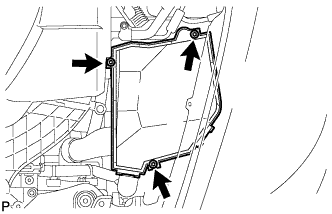
Install the engine room ECU cover with the 3 bolts.
- Torque:
- 5.5 N*m { 56 kgf*cm, 49 in.*lbf }
-
-
INSTALL ENGINE ROOM SIDE COVER LH
-
Install the engine room side cover LH with the 5 clips.
-
-
INSTALL AIR CLEANER INLET COVER SUB-ASSEMBLY
-
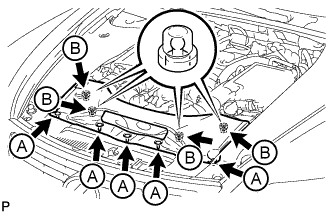
Attach the 4 clips labeled B.
Note
-
Make sure the clips are attached securely.
-
Attaching the clips forcefully or hitting the top of the clips may damage them.
-
-
Install the air cleaner inlet cover sub-assembly with the 5 clips labeled A.
-
-
CONNECT CABLE TO NEGATIVE BATTERY TERMINAL
Note
When disconnecting the cable, some systems need to be initialized after the cable is reconnected Click here.
-
INSTALL COWL TOP VENTILATOR LOUVER
-

for LHD:
Install the 6 clips and cowl top ventilator louver RH.
Note
If the cowl top ventilator louver RH is not properly installed, water may leak into the engine room and cause malfunctions. Therefore, make sure the cowl top ventilator louver RH is installed properly.
-

for RHD:
Install the 6 clips and cowl top ventilator louver LH.
Note
If the cowl top ventilator louver LH is not properly installed, water may leak into the engine room and cause malfunctions. Therefore, make sure the cowl top ventilator louver LH is installed properly.
-
-
PERFORM RESET MEMORY
Note
Perform the RESET MEMORY (AT initialization) when replacing the automatic transmission assembly, engine assembly or ECM.
-
for 2WD: Click here
-
for AWD: Click here
Tech Tips
Initialization cannot be completed by only removing the battery.
-
-
SHIFT CONTROL SYNCHRONIZATION (for Sport Package)
Tech Tips
-
Use this procedure to force the ECM to store the vehicle information output by the steering control ECU using the intelligent tester.
-
Perform this procedure only when the shift lever position name and S or M shift lever indicator display in the combination meter do not match. If they match, the system is normal.
-
Connect the GTS to the DLC3.
-
Turn the engine switch on and GTS on.
-
Enter the following menus: Powertrain / Engine / Utility / Shift Control Synchronization.
-
Follow the instructions on the tester screen and perform "Shift Control Synchronization".
-