UNDER HOOD GENERAL MAINTENANCE

-
GENERAL NOTES
-
Maintenance requirements vary depending on the country.
-
Check the maintenance schedule in the owner's manual supplement.
-
Following the maintenance schedule is mandatory.
-
Determine the appropriate time to service the vehicle using either miles driven or time elapsed, whichever reaches the specification first.
-
Maintain similar intervals between periodic maintenance, unless otherwise noted.
-
Failing to check each vehicle part could lead to poor engine performance and increase exhaust emissions.
-
-
WINDSHIELD WASHER FLUID
-
Check that there is sufficient fluid in the tank.
-
-
ENGINE COOLANT LEVEL
-
Check that the coolant level is between the "FULL" and "LOW" lines on the see-through reservoir.
-
-
RADIATOR AND HOSES
-
Check that the front of the radiator is clean and not blocked by leaves, dirt or bugs.
-
Check the hoses for cracks, kinks, rotting or loose connections.
-
-
BATTERY ELECTROLYTE LEVEL
-
Check that the electrolyte level of all the battery cells is between the upper and lower level lines on the case.
-
-
BRAKE FLUID LEVEL
-
Check that the brake fluid levels are near the upper level lines on the see-through reservoirs.
-
-
ENGINE DRIVE BELT
-
Check the drive belt for fraying, cracks, wear or oiliness.
-
-
ENGINE OIL LEVEL
-
Check the oil level on the dipstick with the engine stopped.
-
-
AUTOMATIC TRANSMISSION FLUID LEVEL (for AA80E)
-
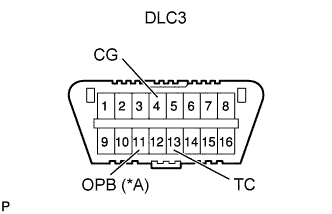
Text in Illustration *A w/ Air Suspension w/o Air Suspension:
Using SST, connect terminals 13 (TC) and 4 (CG) of the DLC3.
- SST
- 09843-18040
-
w/ Air Suspension:
Using SST, connect terminals 13 (TC), 11 (OPB) and 4 (CG) of the DLC3.
- SST
- 09843-18040
-
Start the engine.
Note
Air conditioning switch must be turned off.
-
w/o Shift Paddle Switch:
Slowly move the shift lever from P to S, then move the shift lever from the 1 to 8. Then return the shift lever to P.
-
w/ Shift Paddle Switch:
Slowly move the shift lever from P to M, then move the shift lever from the 1 to 8. Then return the shift lever to P.
-
Move the shift lever to the D position, and quickly move back and forth between N and D (once per less than 1.5 seconds) for at least 6 seconds.
This will activate the fluid temperature detection mode.
Standard Indicator light (D) remains illuminated for 2 seconds and then goes off. -
w/o Air Suspension:
Return the shift lever to the P position and disconnect terminals 13 (TC) and 4 (CG).
-
w/ Air Suspension:
Return the shift lever to the P position and disconnect terminal 13 (TC).
-
Idle the engine to raise the temperature of the ATF.
-
When the indicator light (D) turns on, lift the vehicle up immediately.
Indicator light will indicate the ATF temperature Lower than proper temp Proper temp Higher than proper temp Turn off Turn on Blinking Note
Perform fluid level inspection while the indicator light turns on.
-
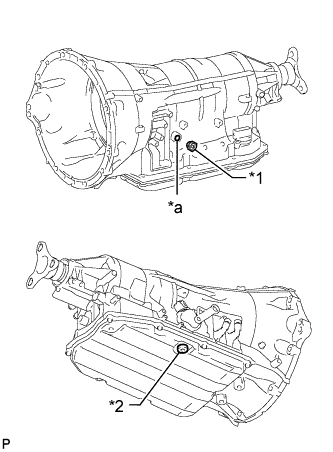
Text in Illustration *1 Refill Plug *2 Overflow Plug *a Refill Hole 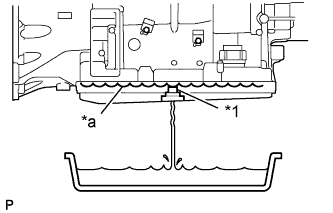
Text in Illustration *1 Overflow Tube *a Specified Fluid Level Remove the overflow plug. At the proper fluid inspection temperature, check the fluid amount.
If the ATF flows from the overflow tube and the ATF flows in a thin stream, the fluid amount is normal.
If the ATF does not flow from the overflow tube, add ATF into the refill hole until ATF flows from the overflow tube. If the ATF flows in a thin stream, the fluid amount is normal.
-
Install a new gasket and the overflow plug.
- Torque:
- 20 N*m { 204 kgf*cm, 15 ft.*lbf }
-
Install a new O-ring and the refill plug.
- Torque:
- 39 N*m { 398 kgf*cm, 29 ft.*lbf }
-
Lower the vehicle down.
-
Turn the engine switch off.
-
w/ Air Suspension:
Disconnect terminals 11 (OPB) and 4 (CG) of the DLC3.
-
-
AUTOMATIC TRANSMISSION FLUID LEVEL (for AA80F)
-
Text in Illustration *A w/ Air Suspension w/o Air Suspension:
Using SST, connect terminals 13 (TC) and 4 (CG) of the DLC3.
- SST
- 09843-18040
-
w/ Air Suspension:
Using SST, connect terminals 13 (TC), 11 (OPB) and 4 (CG) of the DLC3.
- SST
- 09843-18040
-
Start the engine.
Note
Make sure the air conditioning switch is turned off.
-
Slowly move the shift lever from P to S, and then change the gear from 1st to 8th. Then return the shift lever to P.
-
Move the shift lever to D, and quickly move the shift lever back and forth between N and D (perform each movement in less than 1.5 seconds) for at least 6 seconds.
This activates the fluid temperature detection mode.
Standard Indicator light (D) remains illuminated for 2 seconds and then turns off. -
w/o Air Suspension:
Return the shift lever to P and disconnect terminals 13 (TC) and 4 (CG).
-
w/ Air Suspension:
Return the shift lever to P and disconnect terminal 13 (TC).
-
Idle the engine to raise the temperature of the ATF.
-
When the indicator light (D) turns on, raise the vehicle immediately.
Indicator Light Indicates the ATF Temperature Below Proper Temperature Proper Temperature Higher than Proper Temperature Turns off Turns on Blinks Note
Perform the fluid level inspection while the indicator light is on.
-
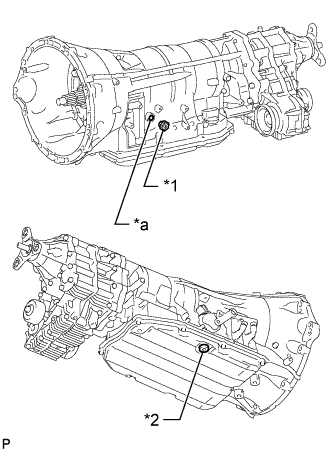
Text in Illustration *1 Refill Plug *2 Overflow Plug *a Refill Hole
Text in Illustration *1 Overflow Tube *a Specified Fluid Level Remove the overflow plug. At the proper fluid inspection temperature, check the fluid amount.
If the ATF flows from the overflow tube in a thin stream, the fluid amount is normal.
If the ATF does not flow from the overflow tube, remove the refill plug, and then add ATF into the refill hole until ATF flows from the overflow tube.
-
Install a new gasket and the overflow plug.
- Torque:
- 20 N*m { 204 kgf*cm, 15 ft.*lbf }
-
Install a new O-ring and the refill plug.
- Torque:
- 39 N*m { 398 kgf*cm, 29 ft.*lbf }
-
Lower the vehicle.
-
Turn the engine switch off.
-
w/ Air Suspension:
Disconnect the terminals 11 (OPB) and 4 (CG) of the DLC3.
-
-
EXHAUST SYSTEM
-
Visually inspect for cracks, holes or loose supports.
Tech Tips
If any change in the sound of the exhaust or smell of the exhaust fumes is noticed, have the cause inspected and repaired.
-