АВТОМАТИЧЕСКАЯ ТРАНСМИССИЯ В БЛОКЕ С ГЛАВНОЙ ПЕРЕДАЧЕЙ УСТАНОВКА

-
INSPECT TORQUE CONVERTER CLUTCH ASSEMBLY
-
INSTALL TORQUE CONVERTER CLUTCH ASSEMBLY
-
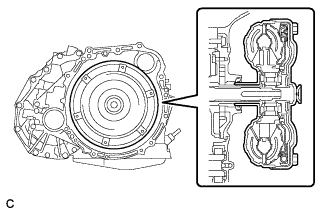
Engage the splines of the input shaft and turbine runner.
-
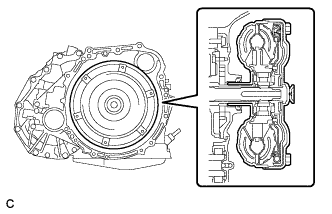
Engage the splines of stator shaft and the stator while turning the torque converter clutch assembly.
Tech Tips
If the stator shaft splines are difficult to engage with the stator splines, move the torque converter clutch assembly back approximately 10 mm and engage the splines while rotating the torque converter clutch assembly.
-
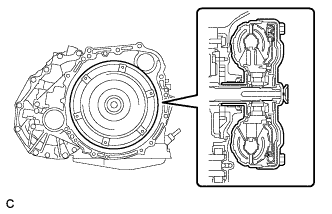
Turn the torque converter clutch assembly to engage the key of the oil pump drive gear into the slot on the torque converter clutch assembly.
-
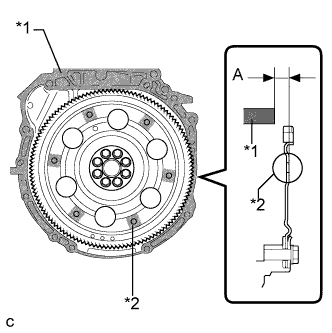
Using a vernier caliper and a straightedge, measure dimension "A" between the transaxle contact surface of the engine *1 and the torque converter clutch assembly contact surface of the drive plate *2. (#)
-
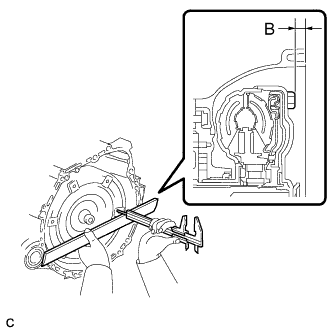
Using a vernier caliper and a straightedge, measure dimension "B" shown in the illustration and check that "B" is greater than "A" which was measured in step (#).
Standard A + 1.0 mm (0.0394 in.) or more Note
-
Make sure to deduct the thickness of the straightedge.
-
If the transaxle is installed to the engine with the torque converter clutch assembly not sufficiently inserted, the torque converter clutch assembly may be damaged.
-
-
-
INSTALL TRANSMISSION CONTROL CABLE SUPPORT
-
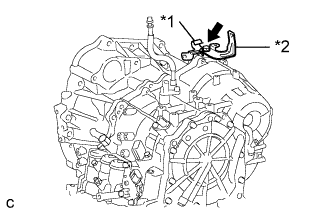
Text in Illustration *1 transmission control cable support *2 wire harness clamp bracket Install the transmission control cable support and wire harness clamp bracket with the bolt.
- Torque:
- 12 N*m { 122 kgf*cm, 9 ft.*lbf }
-
-
INSTALL NO. 1 TRANSMISSION CONTROL CABLE BRACKET
-
Install the No. 1 transmission control cable bracket with the 2 bolts.
- Torque:
- 12 N*m { 122 kgf*cm, 9 ft.*lbf }
-
-
INSTALL TRANSMISSION OIL FILLER TUBE SUB-ASSEMBLY
-
Coat a new O-ring with ATF, and install it to the transmission oil filler tube sub-assembly.
-
Install the transmission oil filler tube sub-assembly with the bolt.
- Torque:
- 5.5 N*m { 56 kgf*cm, 49 in.*lbf }
-
Install the ATF dipstick to the transmission oil filler tube sub-assembly.
-
-
INSTALL AUTOMATIC TRANSAXLE ASSEMBLY
-
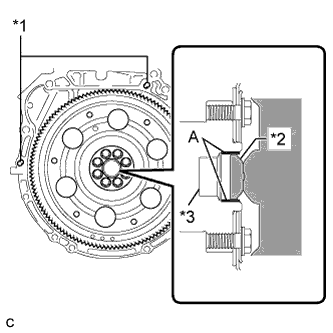
Text in Illustration *1 Knock Pin *2 Torque Converter Centerpiece *3 Crankshaft Confirm that 2 knock pins are on the transaxle contact surface of the engine cylinder block before transaxle installation.
-
Apply clutch spline grease to the round of the crankshaft surface (A) with the torque converter centerpiece.
Clutch spline grease Toyota Genuine Clutch Spline Grease or equivalent Maximum spread About 1 g (0.0353 oz) -
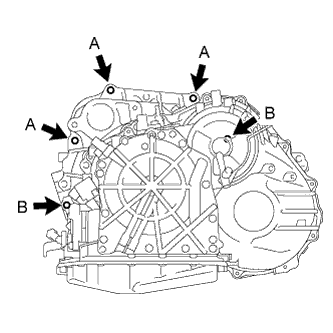
Install the automatic transaxle to the engine with the 5 upper side mounting bolts.
- Torque:
- 64 N*m { 653 kgf*cm, 47 ft.*lbf, for bolt A }
- 46 N*m { 469 kgf*cm, 34 ft.*lbf, for bolt B }
-
Install the 4 lower side mounting bolts.
- Torque:
- 44 N*m { 448 kgf*cm, 32 ft.*lbf }
-
-
INSTALL DRIVE PLATE AND TORQUE CONVERTER CLUTCH SETTING BOLT
-
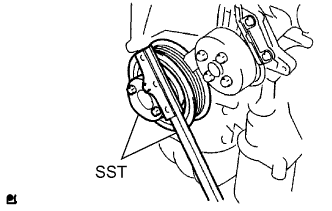
Удерживайте шкив коленчатого вала с помощью SST.
- SST
- 09213-54015 ( 91651-60855 )
- 09330-00021
-
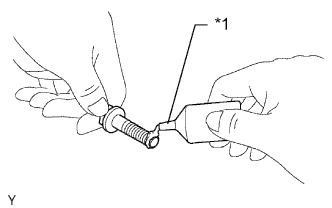
Обозначения на рисунке *1 Герметик Нанесите несколько капель герметика на каждую из 2-3 нитки резьбы на концах 6 установочных болтов ведущего диска и муфты гидротрансформатора.
Герметик Фирменный герметик 1324 от компании Toyota, Three Bond 1324 или аналогичный. -
Затяните 6 установочных болтов ведущего диска и муфты гидротрансформатора.
- Torque:
- 41 Н*м { 418 кгс*см, 30 фунт-сила-футов }
Note
Сначала установите болт черного цвета, а затем – оставшиеся 5 болтов серебристого цвета.
-
-
INSTALL FLYWHEEL HOUSING UNDER COVER
-
Установите нижнюю крышку картера маховика.
-
-
INSTALL ENGINE MOUNTING BRACKET LH
-
Install the engine mounting bracket LH with the 3 bolts.
- Torque:
- 64 N*m { 653 kgf*cm, 47 ft.*lbf }
-
-
INSTALL FRONT ENGINE MOUNTING BRACKET
-
Install the front engine mounting bracket with the 3 bolts.
- Torque:
- 64 N*m { 653 kgf*cm, 47 ft.*lbf }
-
-
INSTALL REAR ENGINE MOUNTING BRACKET
-
Install the rear engine mounting bracket with the 3 bolts.
- Torque:
- 45 N*m { 459 kgf*cm, 33 ft.*lbf }
-
-
CONNECT OIL COOLER HOSE
-
Connect the 2 oil cooler hoses to the automatic transaxle.
-
-
CONNECT WIRE HARNESS
-
Connect the wire harness clamps.
-
Connect the speed sensor connectors.
-
Connect the transaxle wire connector.
-
Connect the park/neutral position switch connector.
-
-
INSTALL STARTER ASSEMBLY (for 1.6 kW Type)
-
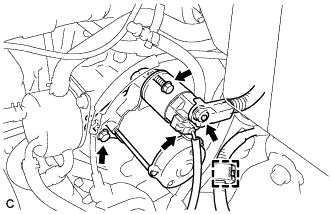
Установите стартер и закрепите его 2 болтами.
- Torque:
- 37 Н*м { 377 кгс*см, 27 фунт-сила-футов }
-
Подсоедините разъем стартера.
-
Подсоедините зажим.
-
Заверните гайку контакта и закройте ее колпачком.
- Torque:
- 9,8 Н*м { 100 кгс*см, 87 фунт-сила-дюймов }
-
-
INSTALL ENGINE ASSEMBLY WITH TRANSAXLE
-
ADD AUTOMATIC TRANSAXLE FLUID
Fluid type Toyota Genuine ATF WS -
INSPECT AUTOMATIC TRANSAXLE FLUID
-
PERFORM RESET MEMORY
-
Perform Reset Memory (AT initialization) when replacing the automatic transaxle assembly Click here.
-