FRONT SEAT ASSEMBLY INSTALLATION

CAUTION:
Some of these service operations affect the SRS airbag system. Be sure to read the precautionary notices concerning the SRS airbag system before servicing (w/ front seat airbag) Click here
-
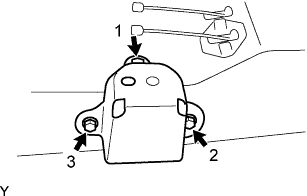
INSTALL FRONT INNER SEAT TRACK BRACKET LOWER REAR
-
Using several steps, install and tighten the 3 bolts uniformly in the sequence shown in the illustration.
- Torque:
- 32 N*m { 325 kgf*cm, 24 ft.*lbf }
-
-
INSTALL FRONT FLOOR CARPET ASSEMBLY FRONT
-
Install the front floor carpet.
-
-
INSTALL PARKING BRAKE LEVER SUB-ASSEMBLY
-
Install the parking brake lever with the 2 bolts.
- Torque:
- 14.5 N*m { 148 kgf*cm, 11 ft.*lbf }
-
Connect the parking brake switch connector.
-
-
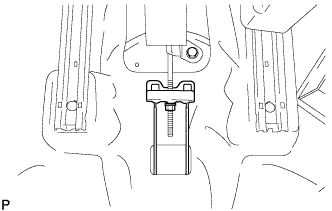
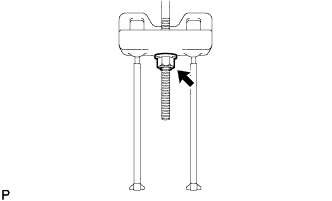
INSTALL PARKING BRAKE EQUALIZER
-
Install the equalizer with a new adjusting nut.
-
-
INSPECT PARKING BRAKE LEVER TRAVEL
-
Slowly pull the parking brake lever to the fully applied position, counting the number of clicks.
Parking brake lever travel 5 to 8 clicks at 196 N (20 kgf, 44 lbf)
-
-
ADJUST PARKING BRAKE LEVER TRAVEL
-
Turn the adjusting nut until the parking brake lever travel is corrected to within the specified range.
Parking brake lever travel 5 to 8 clicks at 196 N (20 kgf, 44 lbf) -
Operate the parking brake lever 3 to 4 times, and check the parking brake lever travel.
-
Check whether the parking brake drags or not.
-
When operating the parking brake lever, check that the brake warning light comes on.
Standard Brake warning light always comes on at the first notch.
-
-
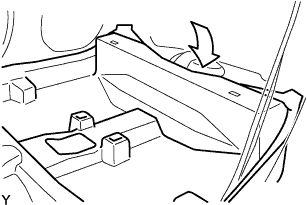
INSTALL CONSOLE BOX SUB-ASSEMBLY REAR

-
Install the console box with the 2 bolts.
-
-
INSTALL REAR SEAT SIDE GARNISH RH (for 5 Door)
-
Engage the clip and 6 claws, and install the rear seat side garnish.
-
Install the clip.
-
-
INSTALL REAR SEAT SIDE GARNISH LH (for 5 Door)
Tech Tips
Use the same procedure as for the RH side.
-
INSTALL QUARTER INSIDE TRIM BOARD RH (for 3 Door)
-
Engage the 7 claws and 7 clips, and install quarter trim board.
-
Install the clip.
-
-
INSTALL QUARTER INSIDE TRIM BOARD LH (for 3 Door)
Tech Tips
Use the same procedure as for the RH side.
-
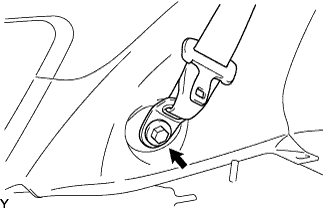
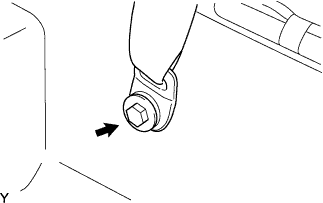
INSTALL REAR SEAT OUTER BELT ASSEMBLY RH (for 5 Door)
-
Install the lap outer anchor plate of the rear seat outer belt with the bolt.
- Torque:
- 42 N*m { 430 kgf*cm, 31 ft.*lbf }
-
-
INSTALL REAR SEAT OUTER BELT ASSEMBLY LH (for 5 Door)
Tech Tips
Use the same procedure as for the RH side.
-
INSTALL REAR SEAT OUTER BELT ASSEMBLY RH (for 3 Door)
-
Install the lap outer anchor plate of the rear seat outer belt with the bolt.
- Torque:
- 42 N*m { 430 kgf*cm, 31 ft.*lbf }
-
-
INSTALL REAR SEAT OUTER BELT ASSEMBLY LH (for 3 Door)
Tech Tips
Use the same procedure as for the RH side.
-
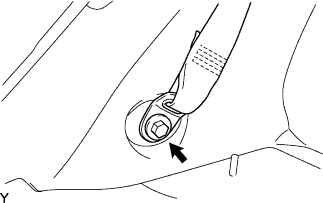
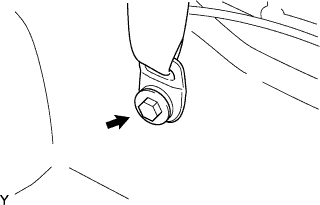
INSTALL FRONT SEAT OUTER BELT ASSEMBLY RH (for 5 Door)
-
Install the lap outer anchor plate of the front seat outer belt with the bolt.
- Torque:
- 42 N*m { 430 kgf*cm, 31 ft.*lbf }
-
-
INSTALL FRONT SEAT OUTER BELT ASSEMBLY LH (for 5 Door)
Tech Tips
Use the same procedure as for the RH side.
-
INSTALL FRONT SEAT OUTER BELT ASSEMBLY RH (for 3 Door)
-
Install the lap outer anchor plate of the front seat outer belt with the bolt.
- Torque:
- 42 N*m { 430 kgf*cm, 31 ft.*lbf }
-
-
INSTALL FRONT SEAT OUTER BELT ASSEMBLY LH (for 3 Door)
Tech Tips
Use the same procedure as for the RH side.
-
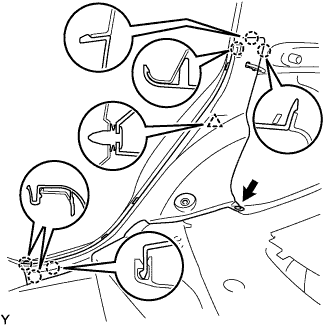
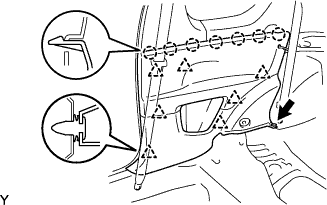
INSTALL REAR DOOR OPENING TRIM WEATHERSTRIP RH (for 5 Door)
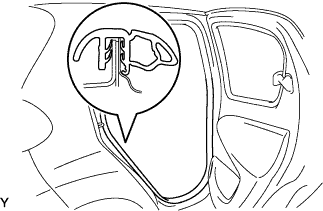
-
Install the rear door opening trim weatherstrip.
-
-
INSTALL REAR DOOR OPENING TRIM WEATHERSTRIP LH (for 5 Door)
Tech Tips
Use the same procedure as for the RH side.
-
INSTALL FRONT DOOR OPENING TRIM WEATHERSTRIP RH (for 5 Door)
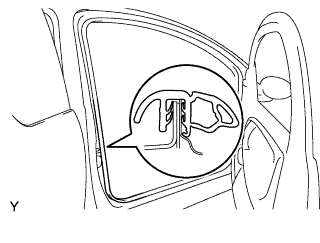
-
Install the front door opening trim weatherstrip.
-
-
INSTALL FRONT DOOR OPENING TRIM WEATHERSTRIP LH (for 5 Door)
Tech Tips
Use the same procedure as for the RH side.
-
INSTALL FRONT DOOR OPENING TRIM WEATHERSTRIP RH (for 3 Door)
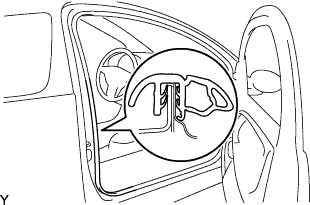
-
Install the front door opening trim weatherstrip.
-
-
INSTALL FRONT DOOR OPENING TRIM WEATHERSTRIP LH (for 3 Door)
Tech Tips
Use the same procedure as for the RH side.
-
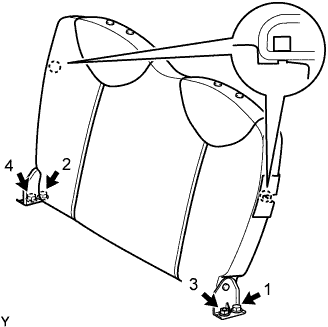
INSTALL REAR SEAT BACK ASSEMBLY (for Separate Seat Type)
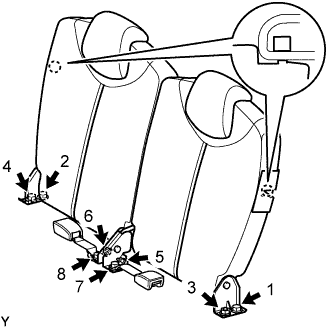
-
Place the rear seat back in the cabin.
-
Using several steps, install and tighten the 4 nuts, 4 bolts and 2 rear seat inner belts uniformly in the sequence shown in the illustration.
- Torque:
- 22 N*m { 225 kgf*cm, 16 ft.*lbf, for 1, 2, 3 and 4 }
- 33.8 N*m { 345 kgf*cm, 25 ft.*lbf, for 5 and 6 }
- 42 N*m { 430 kgf*cm, 31 ft.*lbf, for 7 and 8 }
-
Lock the 2 hooks.
-
-
INSTALL REAR SEAT BACK ASSEMBLY (for Bench Seat Type)
-
Place the rear seat back in the cabin.
-
Using several steps, install and tighten the 2 nuts and 2 bolts uniformly in the sequence shown in the illustration.
- Torque:
- 22 N*m { 225 kgf*cm, 16 ft.*lbf }
-
Engage the 2 hooks.
-
-
INSTALL REAR SEAT CUSHION ASSEMBLY (for Separate Seat Type)
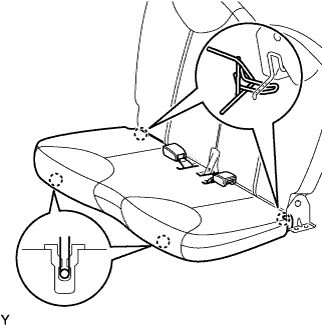
-
Engage the 4 hooks and install the rear seat cushion.
-
-
INSTALL REAR SEAT CUSHION ASSEMBLY (for Bench Seat Type)
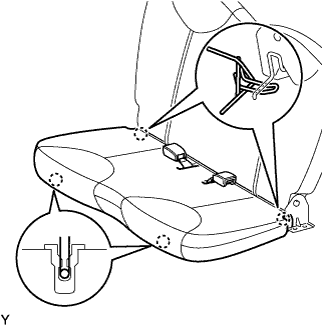
-
Engage the 4 hooks and install the rear seat cushion.
-
-
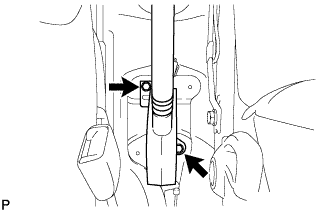
INSTALL FRONT SEAT ASSEMBLY LH
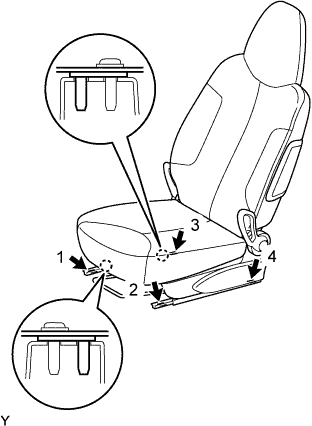
-
Place the front seat in the cabin.
-
Using several steps, install and tighten the 4 bolts uniformly in the sequence shown in the illustration.
- Torque:
- 22 N*m { 225 kgf*cm, 16 ft.*lbf }
-
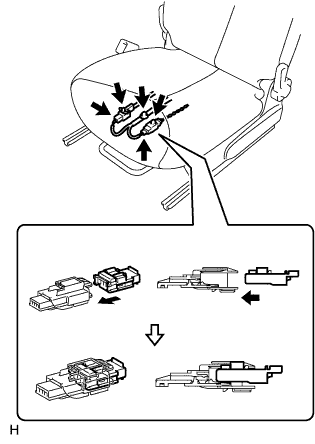
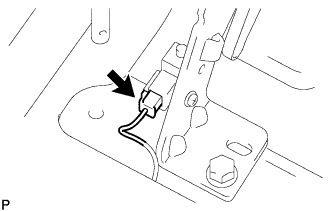
Connect the airbag connector, as shown in the illustration (w/ front seat side airbag).
-
Connect the buckle switch connector (driver seat only).
-
Install the wire harness clamp.
-
-
INSTALL FRONT SEAT ASSEMBLY RH
Tech Tips
Use the same procedure as for the LH side.
-
CONNECT CABLE TO NEGATIVE BATTERY TERMINAL
- Torque:
- 5.4 N*m { 55 kgf*cm, 48 in.*lbf }
-
INSPECT SRS WARNING LIGHT (w/ Front Seat Side Airbag)