FRONT DOOR WINDOW REGULATOR REMOVAL

Tech Tips
-
Use the same procedure for both the RH and LH sides.
-
The procedure described below is for the LH side.
-
PRECAUTION
-
Using a piece of cloth or similar material, rub off any double-sided tape remaining on the windshield glass.
Note
Installing the front fender to cowl side seal with any double-sided tape remaining on the windshield glass may cause adhesion failure.
Therefore, completely remove the double-sided tape.
-
Using a non-residue solvent, clean the attachment surface.
-
Remove the double-sided tape backing of the new front fender to cowl side seal LH.
-
Engage the 3 guides and 2 claws and install a new front fender to cowl side seal LH.
Note
Thoroughly press the front fender to cowl side seal to ensure that it adheres.
-
-
DISCONNECT CABLE FROM NEGATIVE BATTERY TERMINAL
-
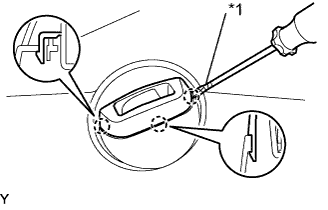
REMOVE DOOR ASSIST GRIP COVER
-
Text in Illustration *1 Protective Tape Using a screwdriver with its tip wrapped in protective tape, disengage the 2 claws and remove the door assist grip cover.
-
-
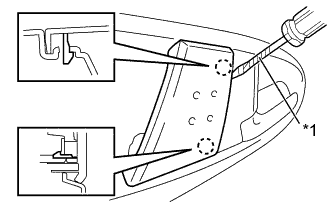
REMOVE ASSIST GRIP ASSEMBLY

-
Remove the 2 screws.
-
Disengage the 4 claws and remove the assist grip assembly.
-
-
REMOVE FRONT ARMREST UPPER BASE PANEL
-
Text in Illustration *1 Protective Tape Using a screwdriver with its tip wrapped in protective tape, disengage the 3 claws and remove the front armrest upper base panel.
-
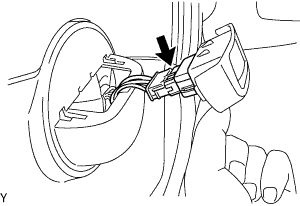
Disconnect the connector and remove the front armrest upper base panel.
-
-
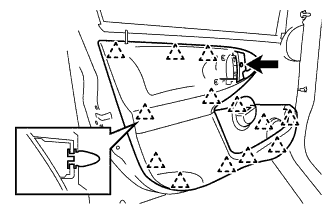
REMOVE FRONT DOOR TRIM BOARD SUB-ASSEMBLY (for 5 Door)
-
Remove the screw.
-
Disengage the 13 clips and remove the front door trim board sub-assembly.
-
Disconnect the connector.
CAUTION:
When removing the front door trim board sub-assembly, take care not to damage the rear No. 3 speaker assembly wire harness.
-
-
REMOVE FRONT DOOR TRIM BOARD SUB-ASSEMBLY (for 3 Door)
-
Remove the screw.
-
Disengage the 15 clips and remove the front door trim board sub-assembly.
-
Disconnect the connector.
CAUTION:
When removing the front door trim board sub-assembly, take care not to damage the rear No. 3 speaker assembly wire harness.
-
-
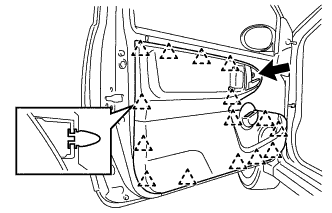
REMOVE FRONT DOOR SERVICE HOLE COVER
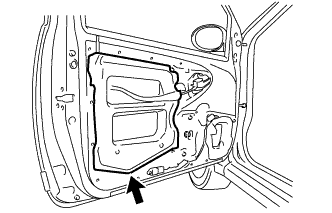
-
Remove the front door service hole cover.
Tech Tips
Remove any tape remaining on the door side.
-
-
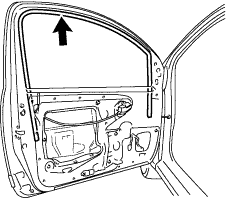
REMOVE FRONT DOOR FRONT LOWER FRAME UPPER COVER
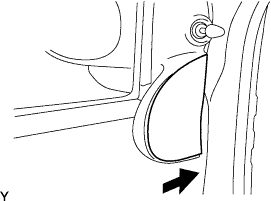
-
Remove the front door front lower frame upper cover by sliding it in the direction indicated by the arrow in the illustration.
-
-
REMOVE FRONT DOOR LOWER FRAME BRACKET GARNISH
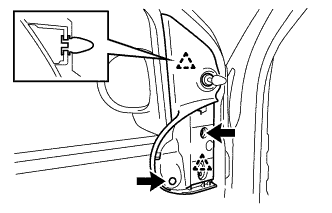
-
Remove the 2 screws.
-
Disengage the 2 clips and remove the front door lower frame bracket garnish.
-
-
REMOVE OUTER REAR VIEW MIRROR ASSEMBLY
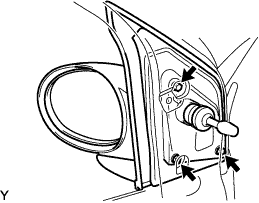
-
Remove the 3 screws and outer rear view mirror assembly LH.
-
-
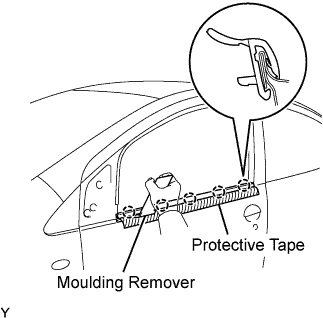
REMOVE FRONT DOOR GLASS OUTER WEATHERSTRIP ASSEMBLY (for 5 Door)
-
Apply protective tape to the outer circumference of the front door belt moulding, as shown in the illustration.
-
Using a moulding remover, disengage the 5 claws and remove the front door belt moulding.
-
-
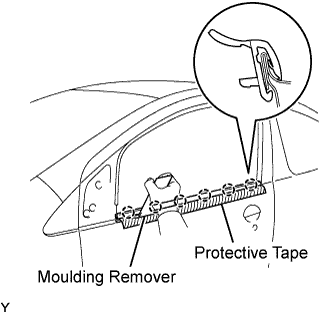
REMOVE FRONT DOOR GLASS OUTER WEATHERSTRIP ASSEMBLY (for 3 Door)
-
Apply protective tape to the outer circumference of the front door belt moulding, as shown in the illustration.
-
Using a moulding remover, disengage the 6 claws and remove the front door belt moulding.
-
-
REMOVE FRONT DOOR GLASS INNER WEATHERSTRIP ASSEMBLY
-
REMOVE FRONT DOOR GLASS RUN
-
Remove the front door glass run.
-
-
REMOVE FRONT DOOR GLASS SUB-ASSEMBLY
-
Connect the power window regulator switch.
-
Connect cable to the negative (-) battery terminal.
-
Remove the hole plug.
-
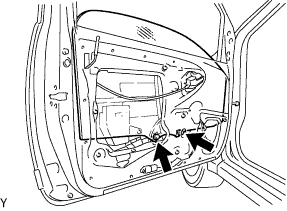
Move the door glass until the 2 bolts can be seen through the service holes.
-
Disconnect the cable front the negative (-) battery terminal.
-
Remove the 2 bolts and front door glass sub-assembly.
Note
Do not allow the front door glass sub-assembly to fall or be damaged when removing the screw.
-
Disconnect the power window regulator switch.
-
-
REMOVE FRONT DOOR WINDOW REGULATOR SUB-ASSEMBLY
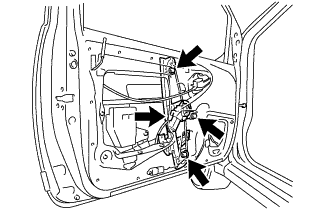
-
Disconnect the connector.
-
Remove the 3 nuts and front door window regulator sub-assembly.
Note
Do not drop the front door window regulator sub-assembly when removing the nuts.
Tech Tips
Remove the front door window regulator sub-assembly through the service hole.
-