RADIO ANTENNA CORD REMOVAL

CAUTION:
Some of these service operations affect the SRS airbag system. Be sure to read the precautionary notices concerning the SRS airbag system before servicing (w/ front seat airbag and curtain shield airbag) Click here.
-
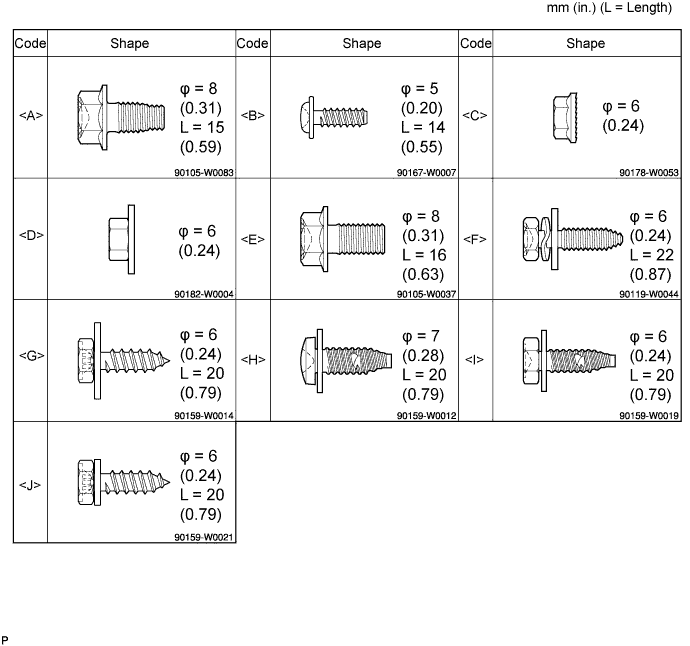
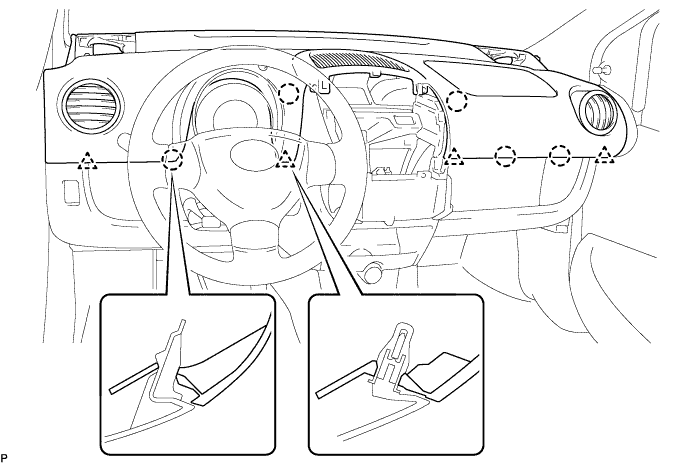
TABLE OF BOLTS, SCREWS AND NUTS
Tech Tips
All bolts, screws and nuts relevant to installing and removing the instrument panel are shown, along with their alphabetic codes, in the table below.
-
DISCONNECT CABLE FROM NEGATIVE BATTERY TERMINAL
-
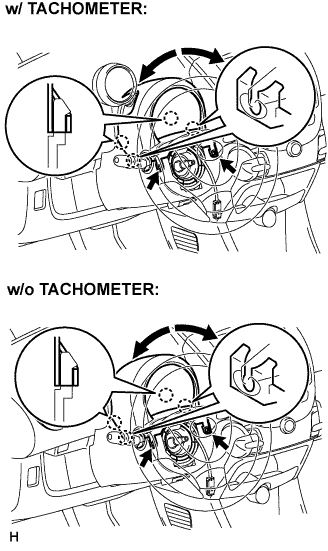
REMOVE STEERING COLUMN UPPER COVER
-
Remove the 2 screws while turning the steering wheel to the right and left.
-
Disengage the 4 claws and remove the steering column cover upper.
-
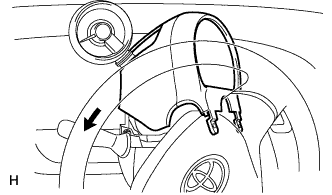
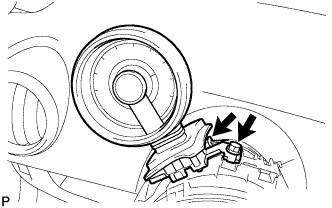
Remove the steering column cover upper, as shown in the illustration (w/ tachometer).
-
If the steering column cover upper is difficult to remove, loosen the screw behind the tachometer, pull up and extend the tachometer, and then remove the steering cover upper (w/ tachometer).
-
-
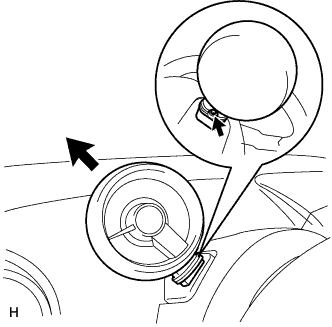
REMOVE TACHOMETER ASSEMBLY (w/ Tachometer)
-
Disconnect the connector.
-
Remove the bolt and tachometer.
-
-
REMOVE FRONT DOOR OPENING TRIM WEATHERSTRIP RH
-
Remove the front door opening trim weatherstrip.
-
-
REMOVE FRONT DOOR OPENING TRIM WEATHERSTRIP LH
Tech Tips
Use the same procedure as for the RH side.
-
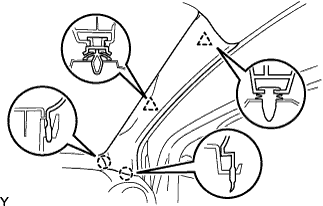
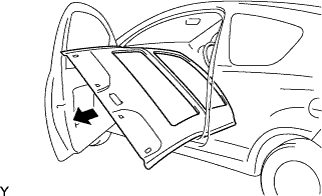
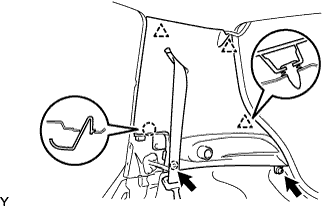
REMOVE FRONT PILLAR GARNISH RH
-
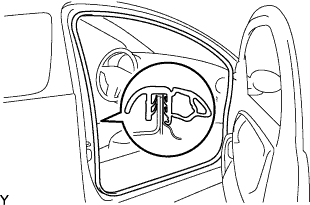
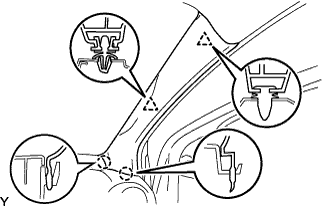
Disengage the 2 clips and 2 claws, and remove the front pillar garnish.
-
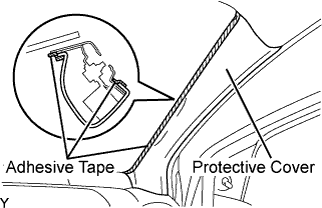
Completely cover the airbag with a piece of cloth or nylon of 700 mm (27.56 in.) x 120 mm (4.72 in.) and fix the ends of the cover with adhesive tape, as shown in the illustration.
Note
Cover the curtain shield airbag with the protective cover as soon as the front pillar garnish is removed.
-
-
REMOVE FRONT PILLAR GARNISH LH
Tech Tips
Use the same procedure as for the RH side.
-
REMOVE FRONT PILLAR GARNISH RH
-
Disengage the 2 clips and 2 claws, and remove the front pillar garnish.
-
-
REMOVE FRONT PILLAR GARNISH LH
Tech Tips
Use the same procedure as for the RH side.
-
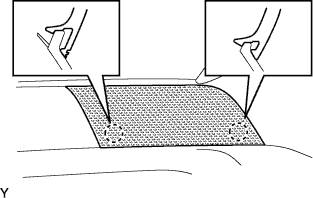
REMOVE INSTRUMENT PANEL SPEAKER PANEL SUB-ASSEMBLY NO. 1
-
Disengage the 2 claws.
-
-
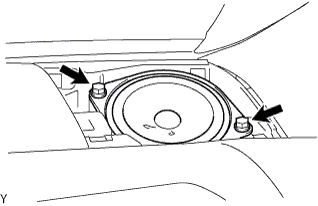
REMOVE FRONT NO. 1 SPEAKER
-
Remove the 2 screws.
-
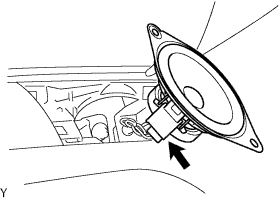
Disconnect the connector.
-
-
REMOVE INSTRUMENT PANEL SPEAKER PANEL SUB-ASSEMBLY NO. 2
Tech Tips
Use the same procedure as for the RH side.
-
REMOVE FRONT NO. 1 SPEAKER
Tech Tips
Use the same procedure as for the RH side.
-
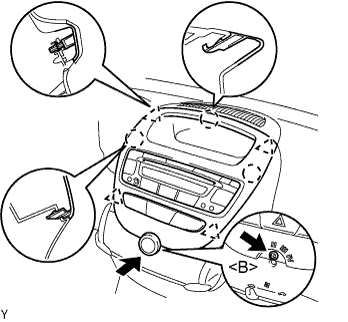
REMOVE INSTRUMENT CLUSTER FINISH PANEL SUB-ASSEMBLY CENTER
-
Remove the control knob.
-
Remove the screw <B>.
-
Disengage the 4 clips and 3 claws and remove the cluster finish panel by pulling it up from underneath.
-
Disconnect the connectors and remove the instrument cluster finish panel center.
-
-
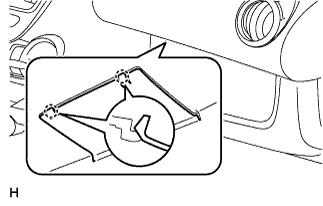
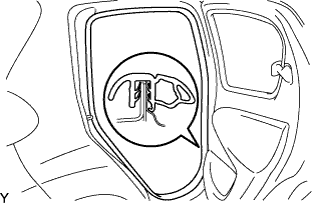
REMOVE INSTRUMENT PANEL ASSEMBLY
-
Disengage the 2 claws and open the cover.
-
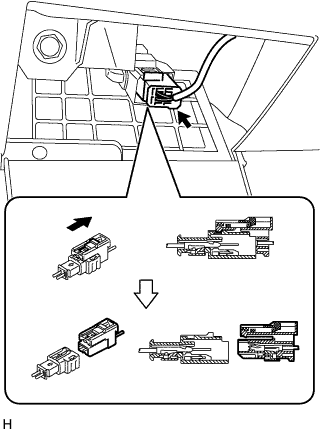
Disconnect the airbag connector, as shown in the illustration.
-
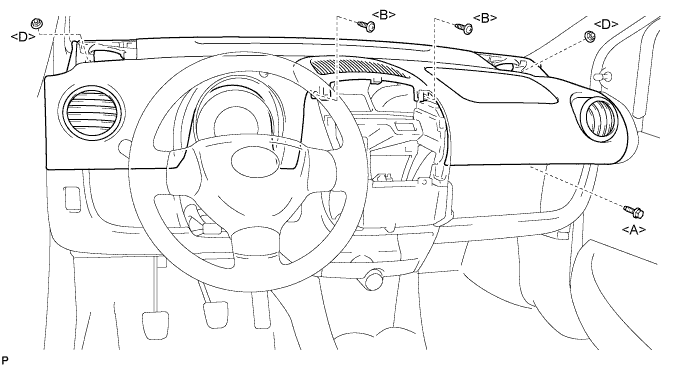
Remove the bolt <A>, 2 nuts <D> and 2 screws <B>.
-
Disengage the 4 clips and 5 claws and remove the instrument panel assembly.
-
-
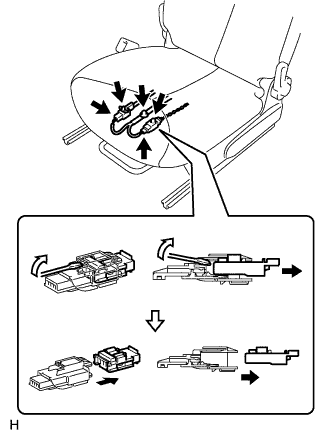
REMOVE FRONT SEAT ASSEMBLY LH (for 3 Door)
-
Using a clip remover, remove the wire harness clamp and connector clamp.
-
Disconnect the buckle switch connector (driver seat only).
-
Disconnect the front seat side airbag connector, as shown in the illustration (w/ front seat side airbag).
-
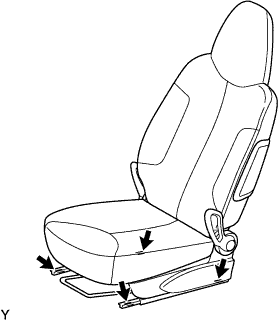
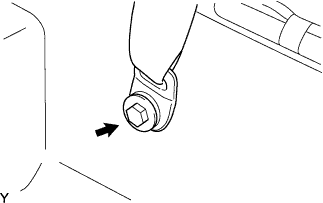
Using "Torx" socket wrench T40, remove the 4 bolts and front seat.
-
-
REMOVE FRONT SEAT ASSEMBLY RH (for 3 Door)
Tech Tips
Use the same procedure as for the LH side.
-
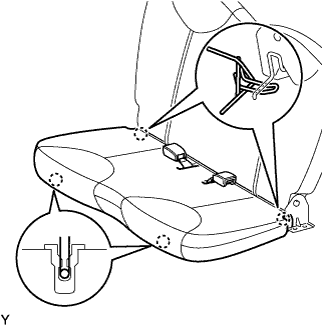
REMOVE REAR SEAT CUSHION ASSEMBLY (for Bench Seat Type)
-
Disengage the 4 hooks and remove the rear seat cushion.
-
-
REMOVE REAR SEAT CUSHION ASSEMBLY (for Separate Seat Type)
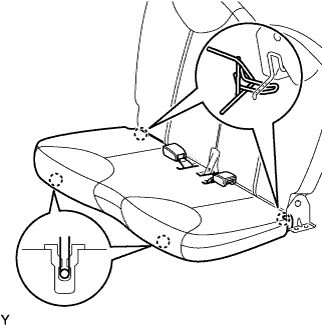
-
Disengage the 4 hooks and remove the rear seat cushion.
-
-
REMOVE REAR SEAT BACK ASSEMBLY (for Bench Seat Type)
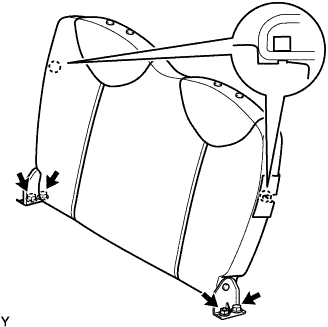
-
Disengage the 2 hooks.
-
Remove the 2 nuts, 2 bolts and rear seat back.
-
-
REMOVE REAR SEAT BACK ASSEMBLY (for Separate Seat Type)
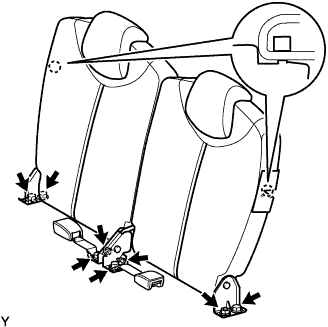
-
Release the 2 hooks.
-
Remove the 4 nuts, 4 bolts, 2 rear seat inner belts and rear seat back.
-
-
REMOVE COWL SIDE TRIM BOARD RH (for 3 Door)
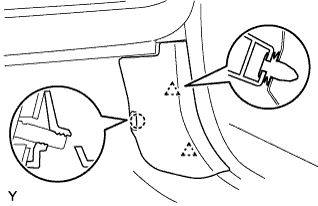
-
Disengage the 2 clips and stud bolt, and remove the cowl side trim board.
-
-
REMOVE COWL SIDE TRIM BOARD LH (for 3 Door)
Tech Tips
Use the same procedure as for the RH side.
-
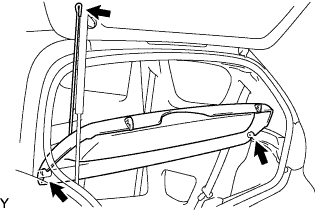
REMOVE PACKAGE TRAY TRIM PANEL ASSEMBLY (for 3 Door)
-
Remove the package tray trim panel.
-
-
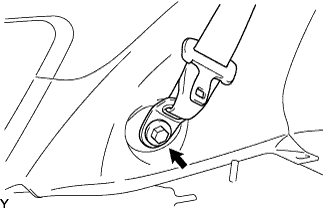
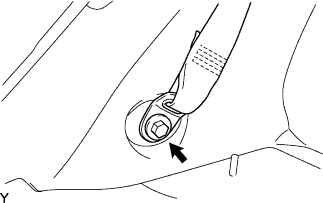
REMOVE REAR SEAT OUTER BELT ASSEMBLY RH (for 3 Door)
-
Remove the bolt and lap outer anchor plate of the rear seat outer belt.
-
-
REMOVE REAR SEAT OUTER BELT ASSEMBLY LH (for 3 Door)
Tech Tips
Use the same procedure as for the RH side.
-
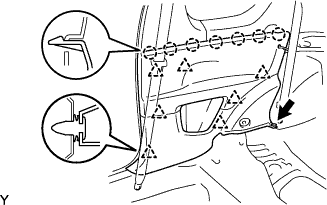
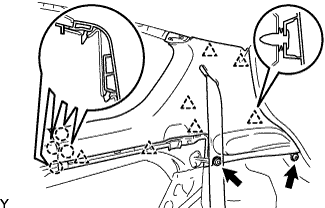
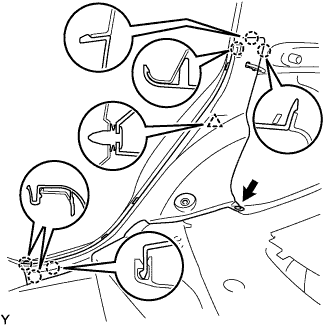
REMOVE QUARTER INSIDE TRIM BOARD RH (for 3 Door)
-
Using a clip remover, remove the clip.
-
Disengage the 7 claws and 7 clips, and remove the quarter inside trim board.
-
-
REMOVE QUARTER INSIDE TRIM BOARD LH (for 3 Door)
Tech Tips
Use the same procedure as for the RH side.
-
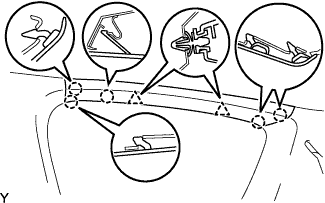
REMOVE ROOF SIDE RAIL GARNISH REAR RH (for 3 Door)
-
Disengage the 5 claws and 2 clips, and remove the roof side rail garnish.
-
-
REMOVE ROOF SIDE RAIL GARNISH REAR LH (for 3 Door)
Tech Tips
Use the same procedure as for the RH side.
-
REMOVE ROOF SIDE GARNISH INNER RH (for 3 Door)
-
Remove the clip and screw.
-
Disengage the 4 claws and 7 clips, and remove the roof side garnish.
-
-
REMOVE ROOF SIDE GARNISH INNER LH (for 3 Door)
Tech Tips
Use the same procedure as for the RH side.
-
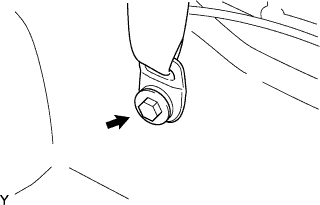
REMOVE FRONT SEAT OUTER BELT ASSEMBLY RH (for 3 Door)
-
Remove the bolt and lap outer anchor plate of the front seat outer belt.
-
-
REMOVE FRONT SEAT OUTER BELT ASSEMBLY LH (for 3 Door)
Tech Tips
Use the same procedure as for the RH side.
-
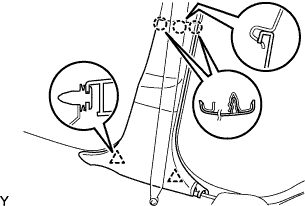
REMOVE CENTER PILLAR GARNISH UPPER RH (for 3 Door)
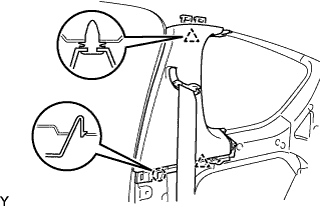
-
Disengage the claw and 2 clips, and remove the center pillar garnish.
-
-
REMOVE CENTER PILLAR GARNISH UPPER LH (for 3 Door)
Tech Tips
Use the same procedure as for the RH side.
-
REMOVE VISOR ASSEMBLY RH (for 3 Door)
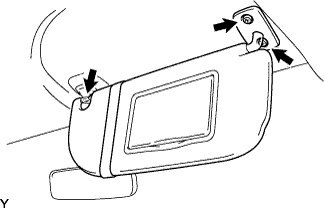
-
Remove the visor from the visor holder.
-
Remove the 2 screws and visor.
-
-
REMOVE VISOR ASSEMBLY LH (for 3 Door)
Tech Tips
Use the same procedure as for the RH side.
-
REMOVE VISOR HOLDER (for 3 Door)
Tech Tips
Use the same procedure as for the opposite side.
-
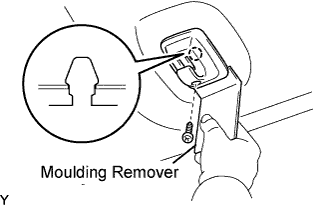
Remove the screw.
-
Using a moulding remover, disengage the claw and remove the visor holder.
-
-
REMOVE ROOM LIGHT ASSEMBLY (for 3 Door)
-
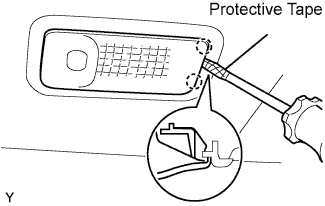
Using a screwdriver with its tip wrapped in protective tape, disengage the 2 claws and remove room light assembly No. 1.
-

Remove the connector cover.
-
Remove the bulb.
-
-
REMOVE ROOF HEADLINING ASSEMBLY (for 3 Door)
-
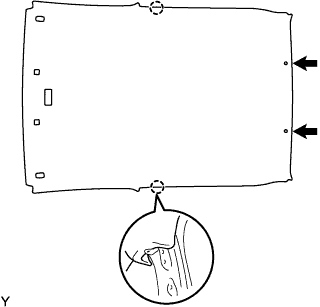
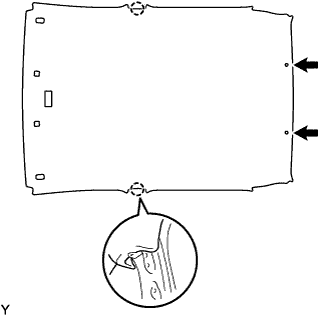
Using a clip remover, remove the 2 clips.
-
Disengage the 2 hooks.
-
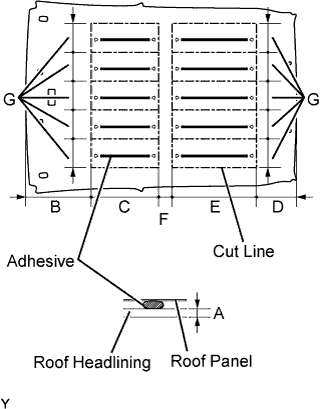
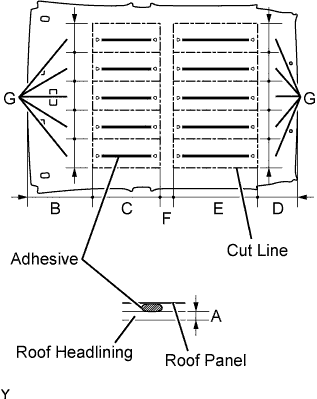
Cut slits in the roof headlining, using a knife, as shown by the lines in the illustration.
Specification Area Measurement A 6 mm (0.236 in.) B 380 mm (14.961 in.) C 390 mm (15.354 in.) D 230 mm (9.055 in.) E 495 mm (19.488 in.) F 76 mm (2.992 in.) G 167 mm (8.575 in.) Note
Do not cut the roof headlining to a depth of more than 6 mm (0.236 in.) to avoid damaging the roof panel.
-
Insert a finger between the roof headlining and roof panel, and gently pull down and remove the roof headlining and each adhesive line, one by one.
Note
Do not pull the roof headlining downward with excessive force in order to avoid damaging the roof panel.
-
Remove the roof headlining from the vehicle.
-
-
REMOVE FRONT SEAT ASSEMBLY LH (for 5 Door)
-
Using a clip remover, remove the wire harness clamp and connector clamp.
-
Disconnect the buckle switch connector (driver seat only).
-
Disconnect the front seat side airbag connector, as shown in the illustration (w/ front seat side airbag).
-
Using "Torx" socket wrench T40, remove the 4 bolts and front seat.
-
-
REMOVE FRONT SEAT ASSEMBLY RH (for 5 Door)
Tech Tips
Use the same procedure as for the LH side.
-
REMOVE REAR SEAT CUSHION ASSEMBLY (for Bench Seat Type)
-
Disengage the 4 hooks and remove the rear seat cushion.
-
-
REMOVE REAR SEAT CUSHION ASSEMBLY (for Separate Seat Type)
-
Disengage the 4 hooks and remove the rear seat cushion.
-
-
REMOVE REAR SEAT BACK ASSEMBLY (for Bench Seat Type)
-
Disengage the 2 hooks.
-
Remove the 2 nuts, 2 bolts and rear seat back.
-
-
REMOVE REAR SEAT BACK ASSEMBLY (for Separate Seat Type)
-
Release the 2 hooks.
-
Remove the 4 nuts, 4 bolts, 2 rear seat inner belts and rear seat back.
-
-
REMOVE COWL SIDE TRIM BOARD RH (for 5 Door)
-
Disengage the 2 clips and stud bolt, and remove the cowl side trim board.
-
-
REMOVE COWL SIDE TRIM BOARD LH (for 5 Door)
Tech Tips
Use the same procedure as for the RH side.
-
REMOVE REAR DOOR OPENING TRIM WEATHERSTRIP RH (for 5 Door)
-
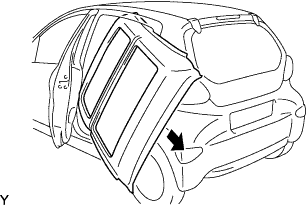
Remove the rear door opening trim weatherstrip.
-
-
REMOVE REAR DOOR OPENING TRIM WEATHERSTRIP LH (for 5 Door)
Tech Tips
Use the same procedure as for the RH side.
-
REMOVE PACKAGE TRAY TRIM PANEL ASSEMBLY (for 5 Door)

-
Remove the package tray trim panel.
-
-
REMOVE REAR SEAT OUTER BELT ASSEMBLY RH (for 5 Door)
-
Remove the bolt and lap outer anchor plate of the rear seat outer belt.
-
-
REMOVE REAR SEAT OUTER BELT ASSEMBLY LH (for 5 Door)
Tech Tips
Use the same procedure as for the RH side.
-
REMOVE REAR SEAT SIDE GARNISH RH (for 5 Door)
-
Using a clip remover, remove the clip.
-
Disengage the 6 claws and clip, and remove the rear seat side garnish.
-
-
REMOVE REAR SEAT SIDE GARNISH LH (for 5 Door)
Tech Tips
Use the same procedure as for the RH side.
-
REMOVE ROOF SIDE GARNISH INNER RH (for 5 Door)
-
Remove the clip and screw.
-
Disengage the 3 clips and claw, and remove the roof side inner garnish.
-
-
REMOVE ROOF SIDE GARNISH INNER LH (for 5 Door)
Tech Tips
Use the same procedure as for the RH side.
-
REMOVE CENTER PILLAR GARNISH LOWER RH (for 5 Door)
-
Disengage the 3 claws and 2 clips, and remove the center pillar garnish.
-
-
REMOVE CENTER PILLAR GARNISH LOWER LH (for 5 Door)
Tech Tips
Use the same procedure as for the RH side.
-
REMOVE FRONT SEAT OUTER BELT ASSEMBLY RH (for 5 Door)
-
Remove the bolt and lap outer anchor plate of the front seat outer belt.
-
-
REMOVE FRONT SEAT OUTER BELT ASSEMBLY LH (for 5 Door)
Tech Tips
Use the same procedure as for the RH side.
-
REMOVE CENTER PILLAR GARNISH UPPER RH (for 5 Door)
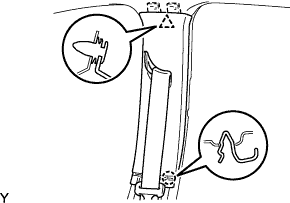
-
Disengage the claw and clip, and remove the center pillar garnish.
-
-
REMOVE CENTER PILLAR GARNISH UPPER LH (for 5 Door)
Tech Tips
Use the same procedure as for the RH side.
-
REMOVE VISOR ASSEMBLY RH (for 5 Door)
-
Remove the visor from the visor holder.
-
Remove the 2 screws and visor.
-
-
REMOVE VISOR ASSEMBLY LH (for 5 Door)
Tech Tips
Use the same procedure as for the RH side.
-
REMOVE VISOR HOLDER (for 5 Door)
Tech Tips
Use the same procedure as for the opposite side.
-
Remove the screw.
-
Using a moulding remover, disengage the claw and remove the visor holder.
-
-
REMOVE ROOM LIGHT ASSEMBLY (for 5 Door)
-
Using a screwdriver with its tip wrapped in protective tape, disengage the 2 claws and remove room light assembly No. 1.
-
Remove the connector cover.
-
Remove the bulb.
-
-
REMOVE ROOF HEADLINING ASSEMBLY (for 5 Door)
-
Using a clip remover, remove the 2 clips.
-
Disengage the 2 hooks.
-
Cut slits in the roof headlining, using a knife, as shown by the lines in the illustration.
Specification Area Measurement A 6 mm (0.236 in.) B 380 mm (14.961 in.) C 390 mm (15.354 in.) D 230 mm (9.055 in.) E 495 mm (19.488 in.) F 76 mm (2.992 in.) G 167 mm (8.575 in.) Note
Do not cut the roof headlining to a depth of more than 6 mm (0.236 in.) to avoid damaging the roof panel.
-
Insert a finger between the roof headlining and roof panel, and gently pull down and remove the roof headlining and each adhesive line, one by one.
Note
Do not pull the roof headlining downward with excessive force in order to avoid damaging the roof panel.
-
Remove the roof headlining from the vehicle.
-
-
REMOVE ANTENNA CORD
-
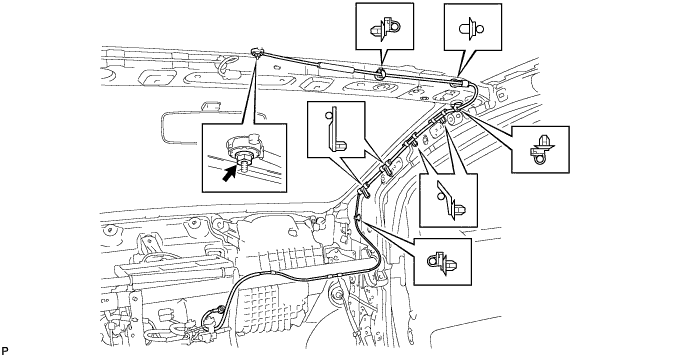
Remove the nut.
-
Remove the 8 clamps and antenna cord.
-