WINDSHIELD GLASS INSTALLATION

-
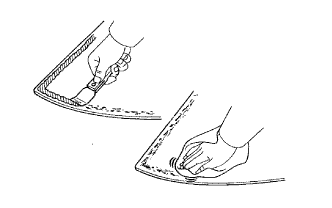
CLEAN WINDSHIELD GLASS
-
Using a scraper, remove the damaged stoppers, dam and adhesive sticking to the windshield glass.
-
Clean the outer circumference of the windshield glass with non-residue solvent.
Note
-
Do not touch the windshield glass surface after cleaning it.
-
Even if using a new windshield glass, clean the windshield glass with non-residue solvent.
-
-
-
CLEAN VEHICLE BODY
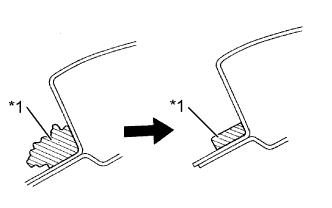
Text in Illustration *1 Adhesive
-
Clean and shape the contact surface of the vehicle body.
-
Using a knife, cut away any rough adhesive on the contact surface of the vehicle body to ensure the appropriate surface shape.
Note
Do not damage the vehicle body.
Tech Tips
Leave as much adhesive on the vehicle body as possible.
-
Clean the contact surface of the vehicle body with a piece of cloth saturated with cleaner.
Tech Tips
Clean the vehicle body even if all the adhesive has been removed.
-
-
-
INSTALL NO. 2 WINDSHIELD GLASS STOPPER
-
Apply Primer G to the installation part of the stoppers.
Note
-
Allow the primer to dry for 3 minutes or more.
-
Throw away any leftover Primer G.
-
Do not apply too much Primer G.
-
-
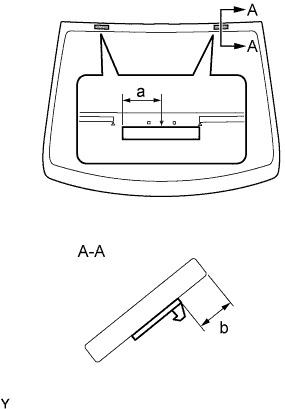
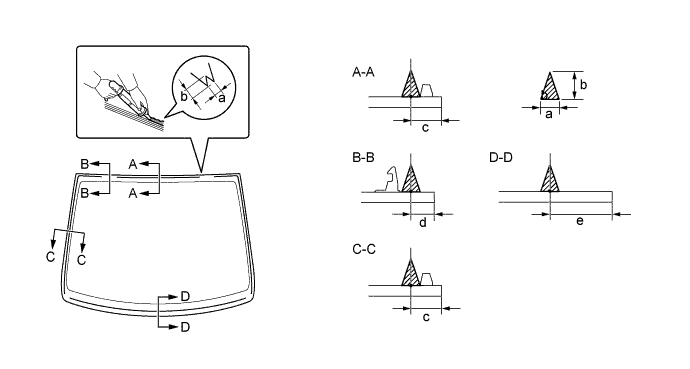
Install 2 new stoppers onto the windshield glass, as shown in the illustration.
Specification Area Measurement a 40 mm (1.575 in.) b 14 mm (0.551 in.)
-
-
INSTALL NO. 1 WINDSHIELD GLASS STOPPER
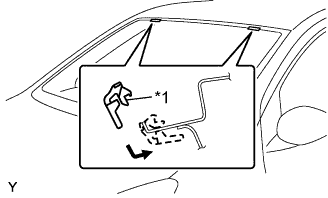
Text in Illustration *1 Stopper
-
Install 2 new stoppers onto the vehicle body, as shown in the illustration.
-
-
INSTALL WINDSHIELD GLASS ADHESIVE DAM
-
Apply Primer G to the part of the dam shown in the illustration.
Note
-
Allow the primer to dry for 3 minutes or more.
-
Throw away any leftover Primer G.
-
Do not apply too much Primer G.
-
-
Install 3 new dams. Install the 3 dams by applying double-sided tape all the way around the windshield glass except where the stoppers are installed, as shown in the illustration.
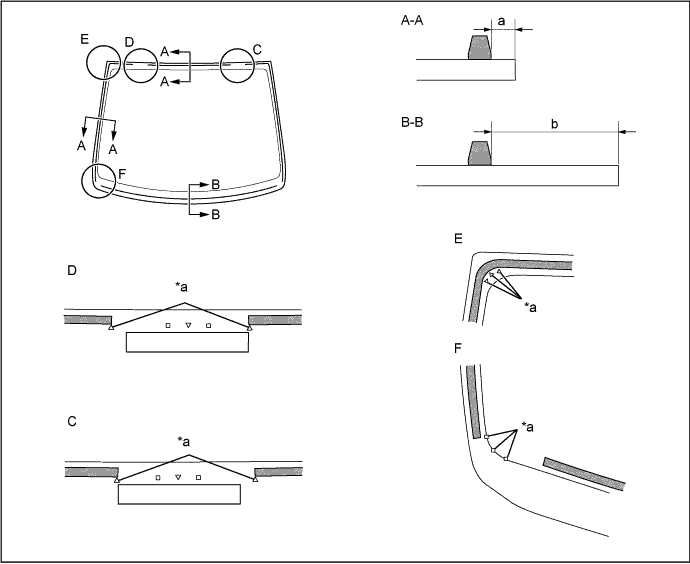
Specification Area Measurement a 14 mm (0.551 in.) b 31.5 mm (1.240 in.) Text in Illustration *a Ceramic Notches
-
-
INSTALL WINDSHIELD GLASS
-
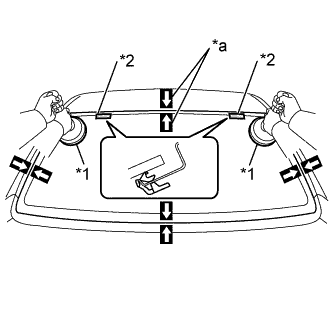
Position the windshield glass.
-
Using suction cups, place the windshield glass in the correct position.
-
Check that the entire contact surface of the windshield glass rim is even.
-
Place matchmarks over the windshield glass and vehicle body.
Note
Check that the stoppers are correctly attached to the vehicle body.
Tech Tips
When reusing a windshield glass, check and correct the matchmark positions.
-
Using suction cups, remove the windshield glass.
Text in Illustration *1 Suction Cups *2 Stopper *a Matchmarks
-
-
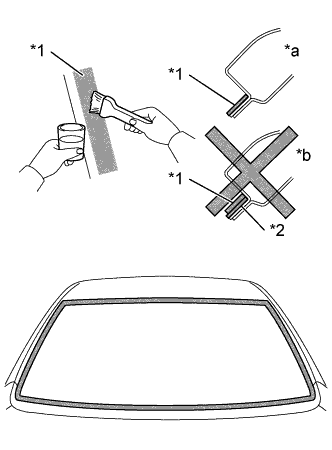
Text in Illustration *1 Primer M *2 Adhesive *a Correct *b Incorrect Using a brush, apply Primer M to the exposed part of the vehicle body.
Note
-
Allow the primer to dry for 3 minutes or more.
-
Do not apply Primer M to the adhesive.
-
Throw away any leftover Primer M.
-
Do not apply too much Primer M.
-
-
Text in Illustration *1 Primer G Using a brush or sponge, apply Primer G to the edge of the windshield glass and the contact surface.
Note
-
Allow the primer to dry for 3 minutes or more.
-
Throw away any leftover Primer G.
-
Do not apply too much Primer G.
Tech Tips
If Primer G is applied to any areas other than those specified, wipe off the primer with a piece of cloth before it dries.
-
-
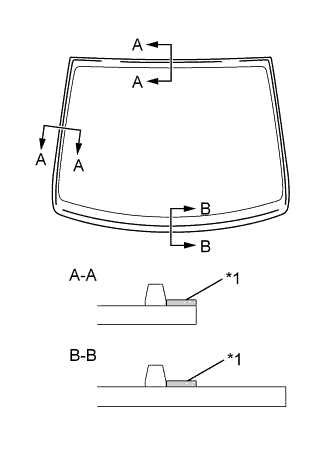
Apply adhesive.
Adhesive Toyota Genuine Windshield Glass Adhesive or equivalent
-
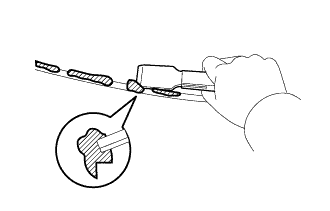
Cut the tip off the cartridge nozzle, as shown in the illustration.
Tech Tips
After cutting off the tip, use all adhesive within the times indicated in the table below.
Usage Time Frame Temperature Usage Time Frame 35°C (95°F) 15 minutes 20°C (68°F) 1 hour 40 minutes 5°C (41°F) 8 hours -
Load the sealer gun with the cartridge.
-
Apply adhesive to the windshield glass, as shown in the illustration.
Specification Area Measurement a 8 mm (0.315 in.) b 12 mm (0.472 in.) c 13 mm (0.512 in.) d 10.3 mm (0.406 in.) e 27.5 mm (1.083 in.)
-
-
Install the windshield glass onto the vehicle body.
-
Using suction cups, position the windshield glass so that the matchmarks are aligned. Gently press it in along the rim.
Note
-
Allow the primer to dry for 3 minutes or more.
-
Check that the stoppers are attached to the vehicle body correctly.
-
Check that there is a small gap between the vehicle body and windshield glass.
Text in Illustration *1 Suction Cups *2 Stopper *a Matchmarks -
-
Gently press the front surface of the windshield glass to ensure that the windshield glass is securely fitted to the vehicle body.
-
Using a scraper, remove any excessive or protruding adhesive.
Tech Tips
Apply adhesive to the windshield glass rim.
-
-
-
INSPECT FOR LEAK AND REPAIR
-
Conduct a leak test after the adhesive has completely hardened.
-
Seal any leaks with auto glass sealer.
-
-
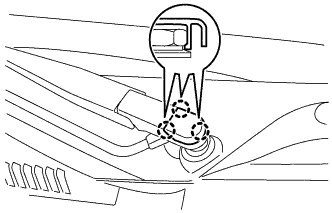
INSTALL INNER REAR VIEW MIRROR ASSEMBLY
-
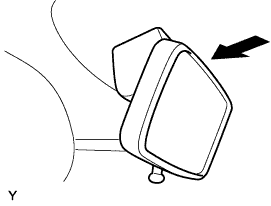
Install the inner rear view mirror assembly, as shown in the illustration.
-
-
INSTALL ROOF HEADLINING ASSEMBLY (for 5 Door)
-
INSTALL ROOF HEADLINING ASSEMBLY (for 3 Door)
-
INSTALL COWL TOP VENTILATOR LOUVER
-
Connect the washer hose.
-
Engage the 11 guides, 6 claws and install the cowl top ventilator louver.
-
Install the 2 clips.
-
-
INSTALL HOOD TO COWL TOP SEAL
-
Install the 5 clips and hood to cowl top seal.
-
-
INSTALL FRONT FENDER TO COWL SIDE SEAL LH
-
Using a piece of cloth or similar material, rub off any double-sided tape remaining on the windshield glass.
Note
Installing the front fender to cowl side seal with any double-sided tape remaining on the windshield glass may cause adhesion failure.
Therefore, completely remove the double-sided tape.
-
Using a non-residue solvent, clean the attachment surface.
-
Remove the double-sided tape backing of the new front fender to cowl side seal LH.
-
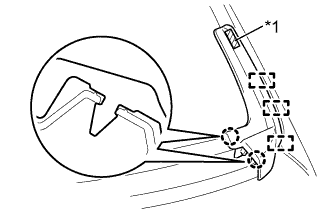
Text in Illustration *1 Double-sided Tape Engage the 3 guides and 2 claws and install a new front fender to cowl side seal LH.
Note
Thoroughly press the front fender to cowl side seal to ensure that it adheres.
-
-
INSTALL FRONT FENDER TO COWL SIDE SEAL RH
Tech Tips
Use the same procedure as for the LH side.
-
INSTALL FRONT WIPER ARM
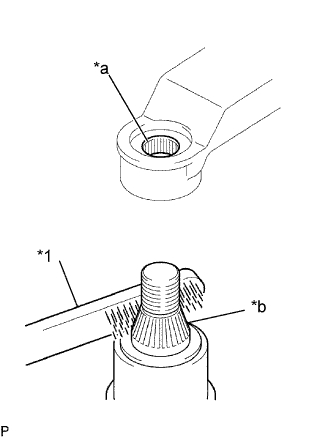
Text in Illustration *1 Wire Brush *a Wiper Arm Serrations *b Wiper Pivot Serrations
-
Scrape any metal powder off the serrated part of the wiper arm with a round file or equivalent (when reinstalling).
-
Clean the wiper pivot serrations with a wire brush.
-
Clean the wiper arm.
-
Operate the wiper, then stop the windshield wiper motor assembly in the automatic stop position.
-
Provisionally install the front wiper main arm with the nut.
-
Install the front wiper secondary arm.
-
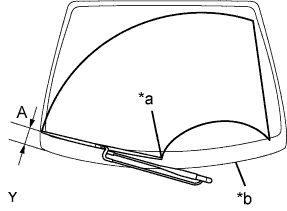
Text in Illustration *a Mark For Blade Position *b Cowl Top Ventilator Louver Lip Align the blade tip with the mark on the windshield glass, as shown in the illustration.
Standard Area Standard Condition A 71 to 86 mm (2.795 to 3.386 in.) -
Tighten the nut of the front wiper main arm.
- Torque:
- 21 N*m { 209 kgf*cm, 15 ft.*lbf }
-
-
INSTALL FRONT WIPER ARM HEAD CAP
-
Engage the 3 claws and install the front wiper arm head cap.
-