SIDE AIRBAG SENSOR (for 5 Door) INSTALLATION

CAUTION:
Some of these service operations affect the SRS airbag system. Be sure to read the precautionary notices concerning the SRS airbag system before servicing Click here.
Tech Tips
-
Use the same procedure for both the RH and LH sides.
-
The procedure listed below is for the RH side.
-
INSTALL SIDE AIRBAG SENSOR ASSEMBLY
-
Check that the ignition switch is turned to OFF.
-
Check that the cable is disconnected from the negative battery terminal.
CAUTION:
After disconnecting the cable from the negative battery terminal, wait for at least 90 seconds before starting the operation.
-
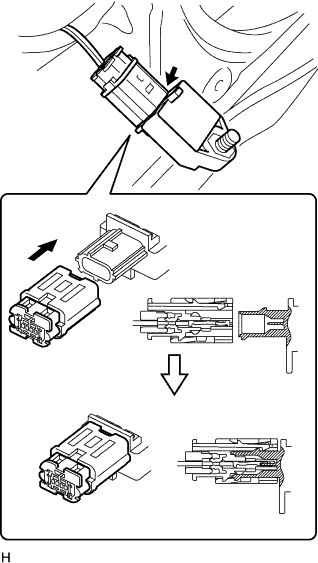
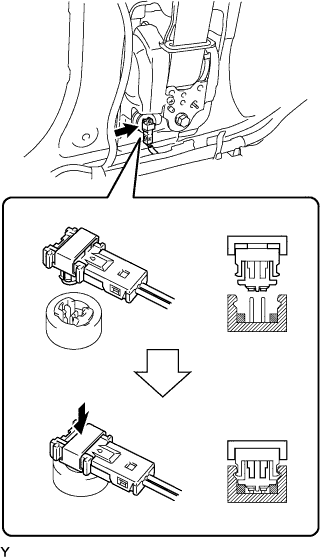
Connect the airbag connector, as shown in the illustration.
-
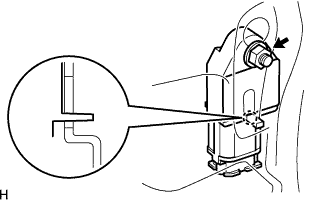
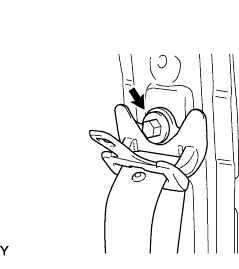
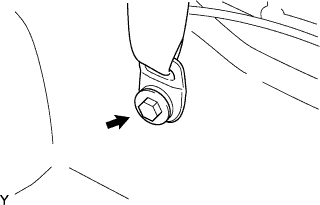
Install the side airbag sensor with the nut.
- Torque:
- 9.0 N*m { 90 kgf*cm, 80 in.*lbf }
-
-
INSTALL FRONT SEAT OUTER BELT ASSEMBLY
-
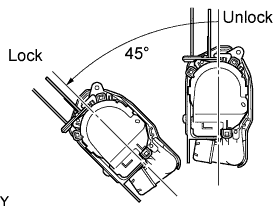
Check the angle of inclination required to lock the retractor.
-
Gently incline the retractor from its initial position. Check that the belt does not lock when the retractor is inclined 15° or less in any direction. Also, check that the belt locks when the inclination of the retractor is 45° or more.
Note
Do not disassemble the retractor.
If the operation is not as specified, replace the front seat outer belt.
-
-
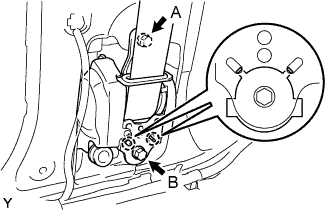
Hook the lower stay of the retractor onto the 2 body hooks.
-
Tighten bolt A, and then tighten bolt B.
- Torque:
- 4.9 N*m { 50 kgf*cm, 43 in.*lbf, for bolt A }
- 42 N*m { 430 kgf*cm, 31 ft.*lbf, for bolt B }
-
Install the through anchor with the bolt.
- Torque:
- 42 N*m { 430 kgf*cm, 31 ft.*lbf }
-
Check that the through anchor rotates smoothly.
-
Install the lap outer anchor plate with the bolt.
- Torque:
- 42 N*m { 430 kgf*cm, 31 ft.*lbf }
-
Check that the ELR locks.
Note
-
The check should be performed with the front seat outer belt installed.
-
Do not allow the anchor part of the front seat outer belt and the protruding parts of the floor panel to overlap.
-
With the belt installed, check that the belt locks when it is pulled out quickly.
If the operation is not as specified, replace the front seat outer belt.
-
-
Remove the bolt and lap outer anchor plate.
-
Connect the pretensioner connector, as shown in the illustration.
-
-
INSTALL CENTER PILLAR GARNISH UPPER
-
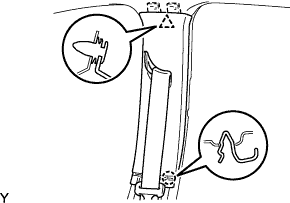
Engage the clip and claw, and install the center pillar garnish.
-
Install the lap outer anchor plate of the front seat outer belt with the bolt.
- Torque:
- 42 N*m { 430 kgf*cm, 31 ft.*lbf }
-
-
INSTALL CENTER PILLAR GARNISH LOWER
-
Engage the 2 clips and 3 claws, and install the center pillar garnish lower.
-
-
INSTALL REAR SEAT SIDE GARNISH
-
Engage the clip and 6 claws, and install the rear seat side garnish.
-
Install the clip.
-
-
INSTALL REAR SEAT OUTER BELT ASSEMBLY
-
Install the lap outer anchor plate of the rear seat outer belt with the bolt.
- Torque:
- 42 N*m { 430 kgf*cm, 31 ft.*lbf }
-
-
INSTALL REAR DOOR OPENING TRIM WEATHERSTRIP
-
Install the rear door opening trim weatherstrip.
-
-
INSTALL FRONT DOOR OPENING TRIM WEATHERSTRIP
-
Install the front door opening trim weatherstrip.
-
-
INSTALL REAR SEAT BACK ASSEMBLY (for Separate Seat Type)
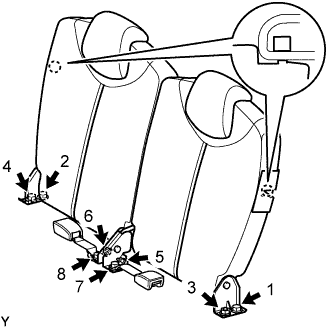
-
Place the rear seat back in the cabin.
-
Using several steps, install and tighten the 4 nuts, 4 bolts and 2 rear seat inner belts uniformly in the sequence shown in the illustration.
- Torque:
- 22 N*m { 225 kgf*cm, 16 ft.*lbf, for 1, 2, 3 and 4 }
- 33.8 N*m { 345 kgf*cm, 25 ft.*lbf, for 5 and 6 }
- 42 N*m { 430 kgf*cm, 31 ft.*lbf, for 7 and 8 }
-
Lock the 2 hooks.
-
-
INSTALL REAR SEAT BACK ASSEMBLY (for Bench Seat Type)
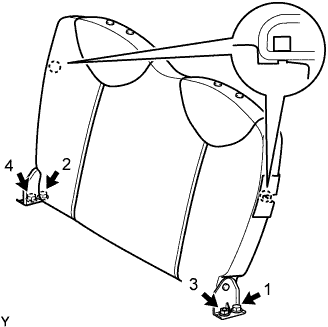
-
Place the rear seat back in the cabin.
-
Using several steps, install and tighten the 2 nuts and 2 bolts uniformly in the sequence shown in the illustration.
- Torque:
- 22 N*m { 225 kgf*cm, 16 ft.*lbf }
-
Engage the 2 hooks.
-
-
INSTALL REAR SEAT CUSHION ASSEMBLY (for Separate Seat Type)
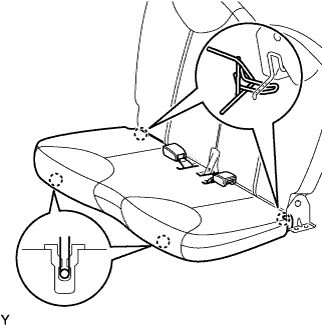
-
Engage the 4 hooks and install the rear seat cushion.
-
-
INSTALL REAR SEAT CUSHION ASSEMBLY (for Bench Seat Type)
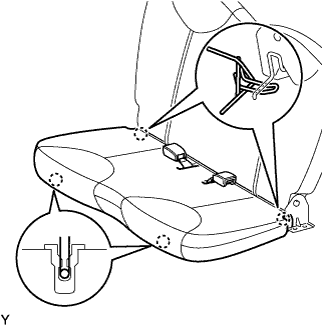
-
Engage the 4 hooks and install the rear seat cushion.
-
-
CONNECT CABLE TO NEGATIVE BATTERY TERMINAL
- Torque:
- 5.4 N*m { 55 kgf*cm, 48 in.*lbf }
-
INSPECT SRS WARNING LIGHT