MULTI-MODE MANUAL TRANSAXLE ASSEMBLY INSTALLATION

-
INSTALL MULTI-MODE MANUAL TRANSAXLE ASSEMBLY
-
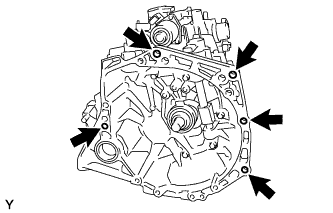
Align the input shaft with the clutch disc and install the manual transaxle onto the engine.
-
Install the 5 bolts.
- Torque:
- 64 N*m { 653 kgf*cm, 47 ft.*lbf }
Note
-
Insert dowel pins into dowel holes securely so that the end face of transaxle assembly fits close against engine assembly before tightening the bolts between the engine and transaxle.
-
Make sure that the dowel pins are not loose, bent, damaged or scratched and then install the transaxle onto the engine with the contact surfaces of the engine and transaxle flat against each other.
-
-
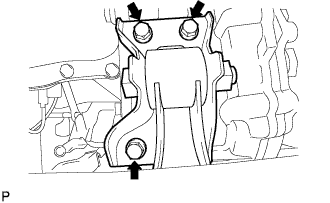
INSTALL TRANSVERSE ENGINE ENGINE MOUNTING INSULATOR
-
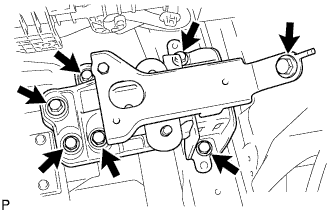
Install the engine mounting insulator and engine mounting bracket with the 7 bolts.
- Torque:
- 52 N*m { 530 kgf*cm, 38 ft.*lbf }
-
-
INSTALL FLYWHEEL HOUSING UNDER COVER
-
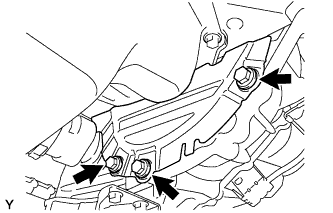
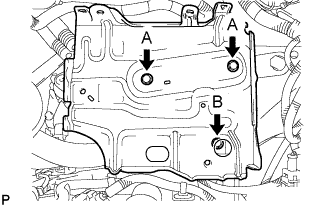
Install the flywheel housing under cover with the 3 bolts.
- Torque:
- 40 N*m { 408 kgf*cm, 30 ft.*lbf }
-
-
INSTALL FRONT SUSPENSION CROSSMEMBER SUB-ASSEMBLY
-
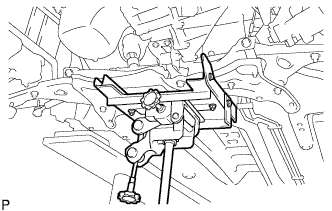
Using a transmission jack, support the front suspension crossmember sub-assembly.
-
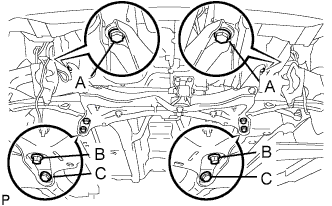
Install the 6 bolts and the front suspension crossmember sub-assembly.
- Torque:
- 85 N*m { 867 kgf*cm, 63 ft.*lbf, for bolt A }
- 128 N*m { 1,305 kgf*cm, 95 ft.*lbf, for bolt B }
- 48 N*m { 489 kgf*cm, 35 ft.*lbf, for bolt C }
-
Install the 3 bolts onto the engine mounting control bracket (for 1KR-FE).
- Torque:
- 52 N*m { 530 kgf*cm, 38 ft.*lbf }
-
Install the control rod onto the engine mounting control bracket with the bolt (2WZ-TV).
- Torque:
- 120 N*m { 1,224 kgf*cm, 89 ft.*lbf }
-
Remove the engine sling device.
-
Remove the No. 1 and No. 2 engine hangers (for 1KR-FE).
-
-
INSTALL FRONT DRIVE SHAFT ASSEMBLY LH
-
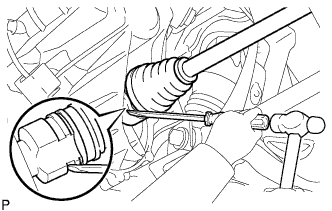
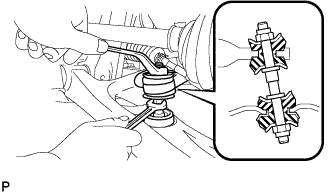
Coat the spline of the inboard joint shaft assembly with transaxle oil.
-
Align the shaft splines and install the drive shaft assembly with a screwdriver and hammer.
Note
-
Face the snap ring cut area downward.
-
Do not damage the oil seal.
-
Do not damage the front drive shaft assembly boot.
Tech Tips
Whether the front drive shaft assembly is securely driven in or not can be confirmed from the brass bar reaction force or sound.
-
-
-
INSTALL FRONT DRIVE SHAFT ASSEMBLY RH
Tech Tips
The installation procedure for the RH side is the same as that for the LH side.
-
INSTALL FRONT AXLE ASSEMBLY LH
-
Push the front axle assembly out of the vehicle to align the spline of the front drive shaft assembly with the front axle assembly and insert the front axle assembly.
Note
-
Do not push the front axle assembly further out of the vehicle than is necessary.
-
Do not damage the oil seal.
-
Do not damage the front drive shaft assembly boot.
-
Do not damage the speed sensor rotor.
-
Check for any foreign matter on the speed sensor rotor and insertion part.
-
-
-
INSTALL FRONT AXLE ASSEMBLY RH
Tech Tips
The installation procedure for the RH side is the same as that for the LH side.
-
INSTALL FRONT SUSPENSION ARM SUB-ASSEMBLY LOWER NO.1 LH
-
Push the front suspension lower arm No. 1 downward, install the front lower ball joint and tighten the castle nut and a new clip.
- Torque:
- 98 N*m { 1,000 kgf*cm, 72 ft.*lbf }
Note
Retighten the castle nut and clip within a turning angle of 60° after aligning the hole of the clip with the castle nut.
-
-
INSTALL FRONT SUSPENSION ARM SUB-ASSEMBLY LOWER NO.1 RH
Tech Tips
The installation procedure for the RH side is the same as that for the LH side.
-
INSTALL STABILIZER BAR FRONT
-
Install the stabilizer bar front with the 2 cushion retainers, 2 cushions and a nut, as shown in the illustration.
Note
Be sure to install the cushion and retainer in the correct direction.
-
Tighten the nut with a spanner (10 mm).
- Torque:
- 18 N*m { 184 kgf*cm, 13 ft.*lbf }
-
-
INSTALL TIE ROD END SUB-ASSEMBLY LH

-
Connect the tie rod end to the steering knuckle and install it with the castle nut and a new cotter pin.
- Torque:
- 33 N*m { 336 kgf*cm, 24 ft.*lbf }
Note
Retighten the castle nut and cotter pin within a turning angle of 60° after aligning the hole of the cotter pin with the castle nut.
-
-
INSTALL TIE ROD END SUB-ASSEMBLY RH
Tech Tips
The installation procedure for the RH side is the same as that for the LH side.
-
INSTALL FRONT AXLE SHAFT LH NUT
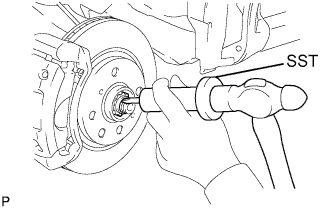
-
Install a new front axle hub nut.
- Torque:
- 216 N*m { 2,202 kgf*cm, 160 ft.*lbf }
-
Using a hammer and chisel, stake the front axle hub nut.
-
-
INSTALL FRONT AXLE SHAFT RH NUT
Tech Tips
The installation procedure for the RH side is the same as that for the LH side.
-
INSTALL EXHAUST PIPE ASSEMBLY FRONT
-
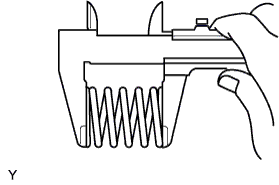
Using vernier calipers, measure the free length of the compression spring.
Minimum length 40.5 mm (1.594 in.)
-
If the length is not as specified, replace the compression spring.
-
-
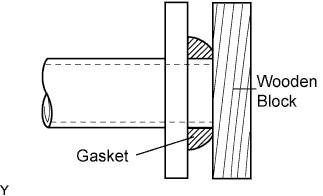
Using a plastic hammer and a wooden block, tap in a new exhaust pipe gasket until its surface is flush with the exhaust manifold.
Note
-
Be sure to install the exhaust pipe gasket in the correct direction.
-
Do not damage the outer surface of the exhaust pipe gasket.
-
Do not reuse the exhaust pipe gasket.
-
Do not push in the gasket with the exhaust pipe when connecting it.
-
-
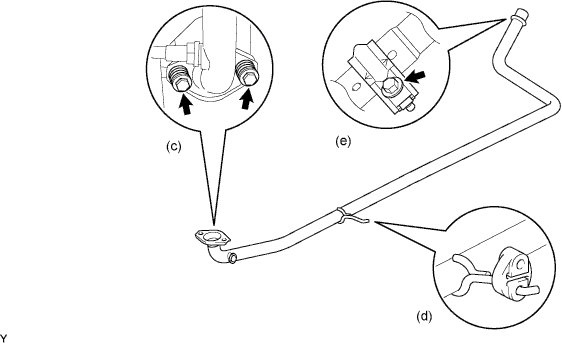
Install the exhaust front pipe assembly and a new exhaust pipe gasket with the 2 compression springs and 2 bolts.
- Torque:
- 45 N*m { 459 kgf*cm, 33 ft.*lbf }
-
Install the exhaust pipe No.4 support.
-
Install the bolt and clamp.
- Torque:
- 32 N*m { 326 kgf*cm, 24 ft.*lbf }
Note
-
Clamp marks and stamping should be aligned.
-
-
INSTALL STARTER ASSEMBLY
-
Install the starter with the 2 bolts.
- Torque:
- 37 N*m { 380 kgf*cm, 27 ft.*lbf }
-
Connect the wire harness to terminal 30 and install the nut.
- Torque:
- 9.5 N*m { 97 kgf*cm, 84 in.*lbf }
-
Connect the wire harness to terminal 50 and install the nut.
- Torque:
- 5.0 N*m { 51 kgf*cm, 44 in.*lbf }
-
Install the wire harness clamp with the bolt.
- Torque:
- 8.4 N*m { 85 kgf*cm, 74 in.*lbf }
-
-
CONNECT CONNECTOR
-
Connect the shift and select motor connectors.
-
Connect the neutral start switch connector.
-
Connect the back-up light switch connector.
-
Connect the transmission revolution sensor connector.
-
Connect the select stroke sensor connector.
-
Connect the shift stroke sensor connector.
-
-
CONNECT ENGINE WIRE NO.3
-
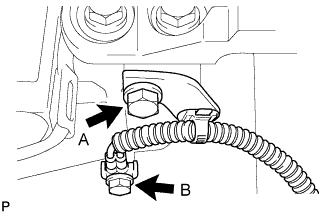
Connect engine wire No. 3 (ground cable) onto the transaxle with the 2 bolts.
- Torque:
- 26 N*m { 260 kgf*cm, 19 ft.*lbf, for bolt A }
- 13 N*m { 130 kgf*cm, 9 ft.*lbf, for bolt B }
-
-
CLUTCH POSITION ADJUSTMENT
Note
Perform the following procedure ((a) to(e)) to set a new clutch actuator in the clutch clamp position because it is not originally placed in that position.
Tech Tips
-
The multi-mode manual transmission system has a load controlled clutch cover (adjustment system). The pressure plate moves depending on the wear quantity of the clutch disc lining.
-
When removing or installing any parts related to the multi-mode manual transmission system, move the clutch actuator to the clutch clamp position. This is for normal operation of the load controlled clutch cover (adjustment system).
-
If the clutch position adjustment operation input fails, perform the operation again from step (1) more than 15 seconds after turning the ignition switch to OFF.
Note
Do not depress the brake pedal while performing the clamp position adjustment using an intelligent tester.
-
Connect the clutch stroke sensor connector and motor connector to the clutch actuator.
-
Connect the battery negative terminal.
-
Perform clutch position adjustment (clutch clamp position)
-
Prepare the vehicle:
-
Stop the vehicle.
-
Shift the lever into the N position.
-
Turn the ignition switch to OFF.
-
Apply the parking brake.
-
-
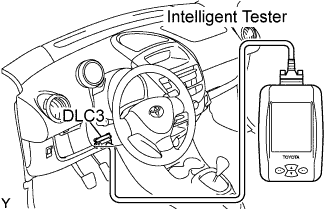
Connect the intelligent tester to the DLC3.
-
Turn the ignition switch to ON.
-
Turn the intelligent tester ON.
-
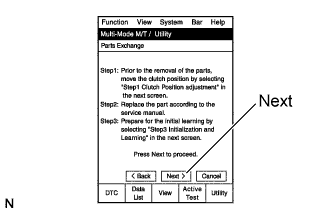
Select the following menu items: Powertrain / Multi-Mode M/T / Utility / Parts Exchange.
-
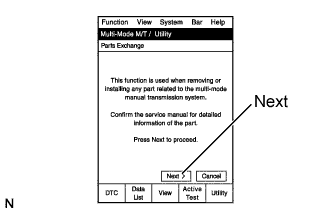
Read the information.
-
Press the Next key.
-
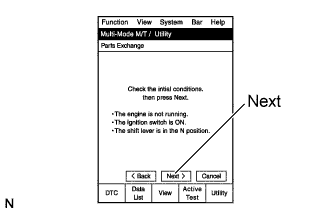
Read the information.
-
After checking the vehicle condition, press the Next key.
-
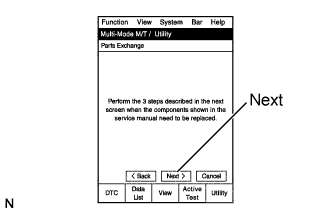
Read the information.
-
Press the Next key.
-
Read the information.
-
Press the Next key.
-
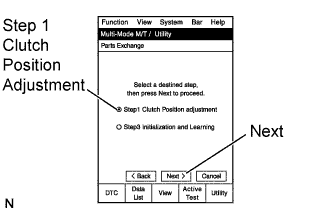
On the Multi-Mode M/T / Utility screen, select Step 1 Clutch Position Adjustment (Clamp Position Adjustment).
-
Press the Next key.
-
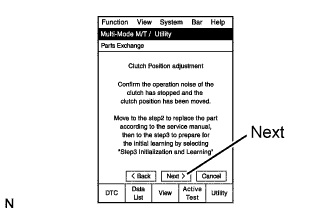
Read the information.
-
Press the Next key.
-
Complete Clutch Position Adjustment.
-
Turn the intelligent tester OFF.
-
Turn the ignition switch to OFF.
-
-
Disconnect the battery negative terminal.
-
Disconnect the clutch stroke sensor connector and motor connector.
-
-
INSTALL CLUTCH ACTUATOR ASSEMBLY
-
Apply grease to the clutch release lever.
-
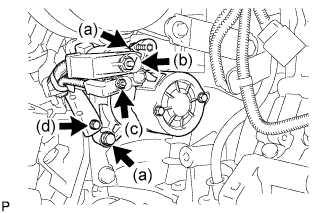
Set the clutch actuator to the transaxle and provisionally tighten the 3 bolts.
Note
Keep the clearance between the bolt head and actuator flange.
-
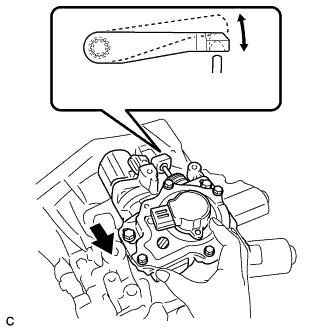
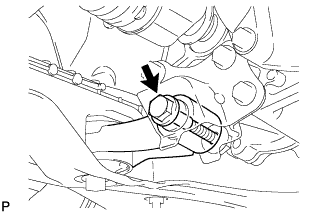
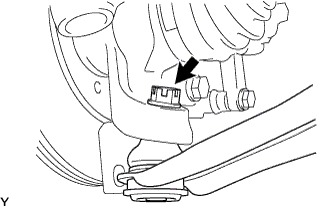
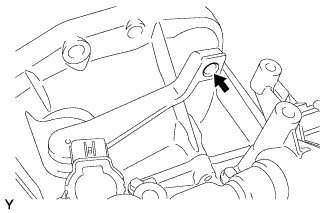
Move the clutch actuator through the bolt hole in the direction indicated by the arrow in the illustration.
-
Check that the clutch release lever moves smoothly in the direction indicated by the arrow in the illustration.
-
Move the clutch actuator in the direction indicated by the arrow in the illustration until the clutch actuator rod end (rounded part) is fully inserted into the groove.

Note
-
Make sure that the clutch actuator rod end is fully inserted into the groove in the clutch release lever.
-
Make sure that the clutch actuator rod end comes into contact with the groove in the clutch release lever so that there is no clearance.
-
-
Tighten the 3 bolts by hand while holding the clutch actuator assembly.
Note
-
Support the clutch actuator assembly until all the 3 bolts are tightened.
-
Make sure that the clutch actuator rod end is fully inserted into the groove in the clutch release lever.
-
Make sure that the clutch actuator rod end comes into contact with the groove in the clutch release lever so that there is no clearance.
-
-
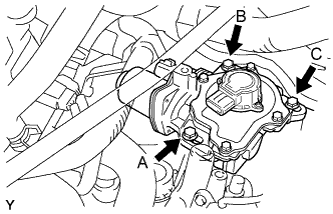
Tighten the 3 bolts to the specified torque in the order A, B, and C, as shown.
- Torque:
- 17 N*m { 173 kgf*cm, 13 ft.*lbf }
-
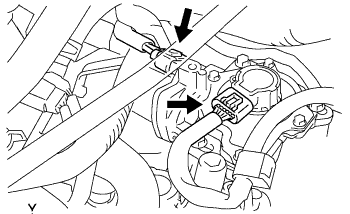
Connect the clutch stroke sensor connector and motor connector.
-
-
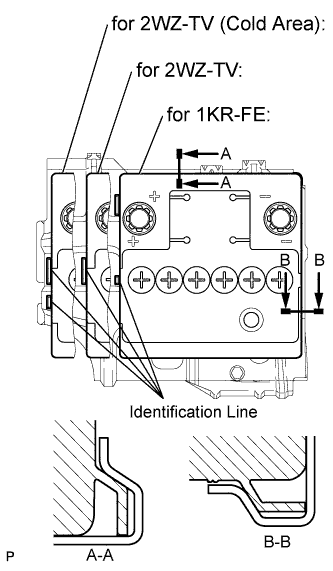
INSTALL BATTERY CLAMP SUB-ASSEMBLY
-
Install the battery clamp with the 3 bolts.
- Torque:
- Bolt A
- 7.4 N*m { 75 kgf*cm, 65 in.*lbf }
- Bolt B
- 17 N*m { 175 kgf*cm, 13 ft.*lbf }
-
Engage the 2 wire harness clamps.
-
-
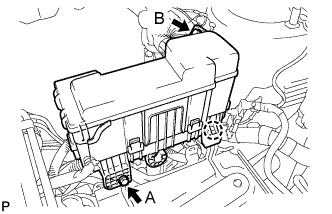
INSTALL ENGINE ROOM RELAY BLOCK
-
Engage the claw and install the relay block.
-
Install the 2 bolts.
- Torque:
- Bolt A
- 5.4 N*m { 55 kgf*cm, 48 in.*lbf }
- Bolt B
- 8.4 N*m { 85 kgf*cm, 74 in.*lbf }
-
-
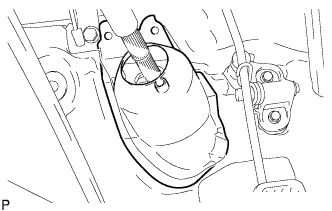
INSTALL BATTERY
-
Install the battery onto the battery clamp, as shown in the illustration.
Note
-
The identification line should be seen after installing the battery.
-
The battery clamp should be in contact with the battery after the installation.
-
-
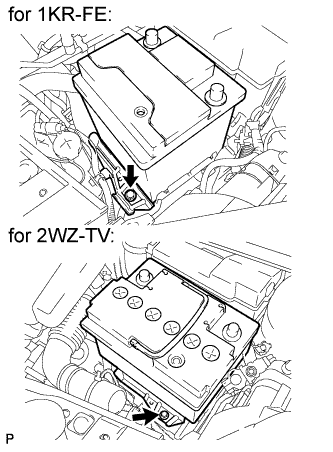
Install the battery clamp with the bolt.
- Torque:
- 15 N*m { 154 kgf*cm, 11 ft.*lbf }
-
Connect the battery positive terminal with the nut.
- Torque:
- 5.4 N*m { 55 kgf*cm, 48 in.*lbf }
-
-
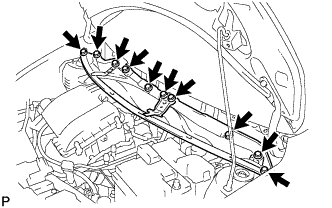
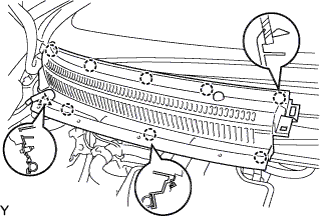
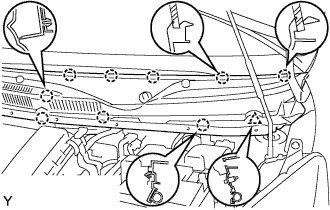
INSTALL COWL TOP PANEL OUTER
-
Install the cowl top panel with the 10 bolts.
- Torque:
- 9.2 N*m { 94 kgf*cm, 81 in.*lbf }
-
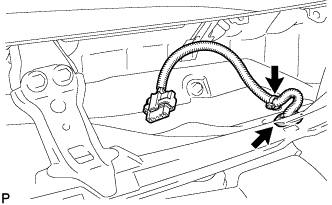
Install the grommet of the wire harness.
-
Install the clamp of the wire harness.
-
-
INSTALL FR WIPER MOTOR AND LINK ASSEMBLY
-
Connect the connector.
-
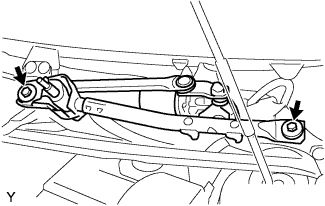
Install the front wiper motor and link assembly with the 2 bolts.
- Torque:
- 13 N*m { 127 kgf*cm, 9 ft.*lbf }
-
-
INSTALL COWL TOP VENTILATOR LOUVER RH
-
Connect the washer hose.
-
Engage the 8 claws and install the cowl top ventilator louver RH.
-
Install the clip.
-
-
INSTALL COWL TOP VENTILATOR LOUVER LH
-
Connect the washer hose.
-
Engage the 9 claws and install the cowl top ventilator louver LH.
-
Install the clip.
-
-
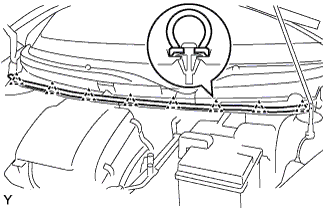
INSTALL HOOD TO COWL TOP SEAL
-
Engage the 8 clips and install the hood to cowl top seal.
-
-
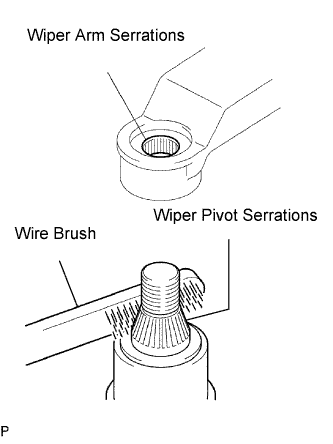
INSTALL FR WIPER ARM LH
-
Scrape any metal powder off the serrated part of the wiper arm with a round file or equivalent (when reinstalling).
-
Clean the wiper pivot serrations with a wire brush.
-
Operate the wiper, then stop the windshield wiper motor assembly in the automatic stop position.
-
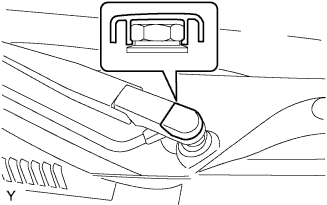
Provisionally install the front wiper main arm with the nut.
-
Install the front wiper secondary arm onto the front wiper motor and link assembly.
-
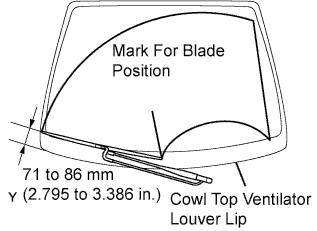
Align the blade tip with the mark on the windshield glass, as shown in the illustration.
-
Tighten the nut of the front wiper main arm.
- Torque:
- 21 N*m { 209 kgf*cm, 15 ft.*lbf }
-
-
INSTALL WINDSHIELD WIPER ARM COVER
-
Engage the claw and install the front wiper arm head cap.
-
-
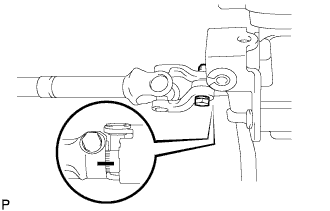
INSTALL STEERING INTERMEDIATE SHAFT ASSEMBLY NO.2
-
Align the matchmarks on the steering intermediate shaft assembly No. 2 and steering column assembly.
-
Install the steering intermediate shaft assembly No. 2 onto the steering column assembly with the bolt.
- Torque:
- 35 N*m { 360 kgf*cm, 26 ft.*lbf }
-
-
INSTALL STEERING COLUMN HOLE COVER PLATE
-
Engage the steering hole plate.
-
-
ADD TRANSAXLE OIL
-
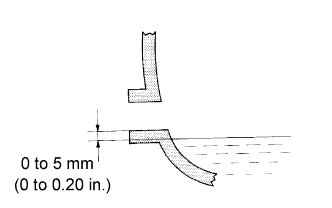
INSPECT AND ADJUST TRANSAXLE OIL
-
Stop the vehicle on a level place.
-
Remove the filler plug and gasket.
-
Check that the oil surface is within 5 mm (0.20 in.) of the lowest position of the filler plug opening.
Note
-
An excessively large or small amount of oil may cause problems.
-
After replacing the oil, drive the vehicle and check the oil level again.
-
-
When the oil level is low, check for oil leakage.
-
Install the filler plug and a new gasket.
- Torque:
- 39 N*m { 400 kgf*cm, 29 ft.*lbf }
-
-
INSTALL FRONT WHEELS
-
CONNECT CABLE TO NEGATIVE BATTERY TERMINAL
- Torque:
- 5.4 N*m { 55 kgf*cm, 48 in.*lbf }
-
INITIALIZATION OF MULTI-MODE MANUAL TRANSAXLE ECU
-
LEARNING OF MULTI-MODE MANUAL TRANSAXLE SYSTEM
-
SYNCHRONIZATION POSITION CALIBRATION
-
INSPECT FRONT WHEEL ALIGNMENT
-
CHECK FOR EXHAUST GAS LEAKAGE