RADIATOR DISASSEMBLY

-
ASSEMBLE SST
-
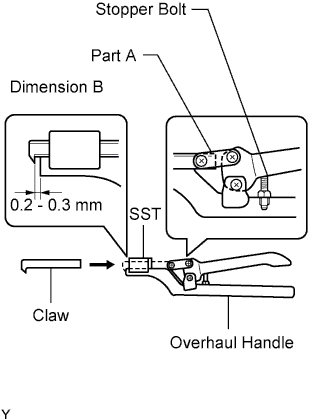
Assemble the SST.
- SST
- 09230-01010
-
Attach the claw to the overhaul handle at the hole on part A as shown in the illustration.
-
While gripping the handle, adjust the stopper bolt so that dimension B is as shown in the illustration.
Note
If this adjustment is not performed, the claw will be damaged.
Dimension B 0.2 to 0.3 mm (0.008 to 0.012 in.)
-
-
UNCAULK LOCK PLATE
-
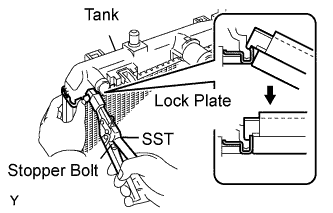
Using SST to release the caulking, grip the handle until the SST is stopped by the stopper bolt.
- SST
- 09230-01010 ( 09231-01010, 09231-01030 )
-
-
REMOVE RADIATOR TANK UPPER AND TANK LOWER
-
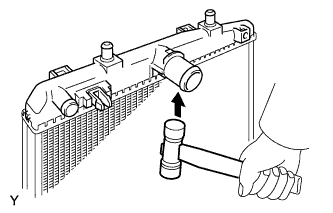
Lightly tap the bracket of the radiator (or radiator hose inlet or outlet) with a plastic hammer and remove the tank.
-
Remove the O-ring.
-
-
INSPECT LOCK PLATE FOR DAMAGE
-
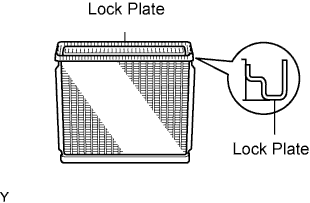
Inspect the lock plate for damage.
Tech Tips
-
If the sides of the lock plate groove are deformed, reassembly of the tank will be impossible. Correct any deformations with pliers.
-
Water leakage will result if the bottom of the lock plate groove is damaged or dented. Repair or replace the lock plate if necessary.
Note
The radiator assembly can be recaulked only twice. After the 2nd recaulking, the radiator core must be replaced.
-
-