- Click here
CHECK ENGINE OIL LEVEL
-
Warm up the engine and then wait for 5 minutes after turning the engine off. The oil level should be between the low level and full level marks of the dipstick.
-
If low, check for leakage and add oil up to the full level mark.
Note:Do not fill with engine oil above the full level mark.
-
-
- Click here
CHECK ENGINE OIL QUALITY
-
Check the oil for deterioration, traces of water, discoloring, or thinning.
-
If the quality is visibly poor, replace the oil.
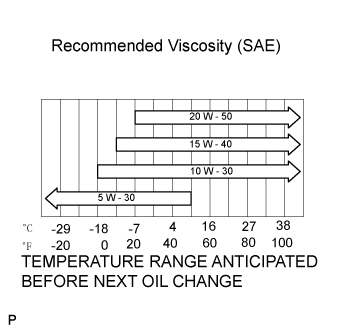
Oil grade API grade CF - 4 or CF (You may also use API CE or CD) SAE 5W - 30 is the best choice for your vehicle, for good fuel economy, and good starting in cold weather.
-
- Click here
REMOVE OIL PRESSURE SWITCH ASSEMBLY
-
Disconnect the oil pressure switch connector.
-
Using a 24 mm deep socket wrench, remove the oil pressure switch.
-
- Click here
INSTALL OIL PRESSURE GAUGE
-
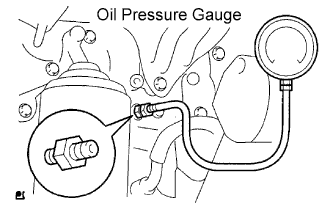
Install the oil pressure gauge.
-
- Click here
WARM UP ENGINE
- Click here
CHECK OIL PRESSURE
Oil pressure Engine rpm Oil pressure At idle 29 kPa (0.3 kgf*cm2, 4.3 psi) or more
At 3,000 rpm 294 to 539 kPa (3.0 to 5.5 kgf*cm2, 43 to 78 psi)
- Click here
INSTALL OIL PRESSURE SWITCH
-
Remove the oil pressure gauge.
-
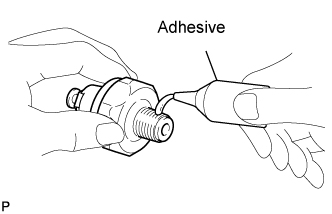
Apply adhesive to 2 or 3 threads of the oil pressure switch.
Adhesive Toyota Genuine Adhesive 1344, Three Bond 1344 or equivalent -
Using a 24 mm deep socket wrench, install the oil pressure switch.
15 N*m 152 kgf*cm 11 ft.*lbf Note:Do not start the engine 1 hour after the installation.
-
Connect the oil pressure switch connector.
-
- Click here
START ENGINE AND CHECK FOR LEAKS