РАДИАТОР УСТАНОВКА

-
INSTALL WATER BY-PASS PIPE SUB-ASSEMBLY
-
Install the water by-pass pipe sub-assembly to the radiator assembly, and slide the hose clamp to secure the pipe.
-
-
INSTALL OIL COOLER HOSE
-
Install the outlet oil cooler hose to the radiator assembly, and slide the hose clamp to secure the hose.
-
Install the inlet oil cooler hose to the radiator assembly, and slide the hose clamp to secure the hose.
-
-
INSTALL RADIATOR ASSEMBLY
-
Install the 4 grommets to the radiator assembly.
-
Install the radiator assembly to the vehicle.
Note
Do not drop the radiator assembly.
-
-
INSTALL NO. 2 FAN SHROUD
-
Install the No. 2 fan shroud with the 2 bolts.
- Torque:
- 13 N*m { 127 kgf*cm, 9 ft.*lbf }
Note
-
Do not drop the radiator assembly.
-
Do not damage the radiator assembly when installing the No. 2 fan shroud.
-
Connect the water by-pass pipe sub-assembly to the radiator assembly with the bolt.
- Torque:
- 13 N*m { 127 kgf*cm, 9 ft.*lbf }
-
Install the No. 2 water by-pass hose to the water by-pass pipe sub-assembly, and slide the hose clamp to secure the hose.
-
-
INSTALL FAN SHROUD
-
Install the fan shroud with the 6 bolts.
- Torque:
- 5.4 N*m { 55 kgf*cm, 48 in.*lbf }
Note
Do not drop the radiator assembly.
-
-
CONNECT NO. 3 RADIATOR HOSE
-
Connect the No. 3 radiator hose to the radiator assembly, and slide the hose clamp to secure the hose.
-
-
CONNECT NO. 2 RADIATOR HOSE
-
Connect the No. 2 radiator hose to the radiator assembly, and slide the hose clamp to secure the hose.
-
-
CONNECT OIL COOLER HOSE
-
Connect the outlet oil cooler hose to the oil cooler tube, and slide the hose clamp to secure the hose.
-
Connect the inlet oil cooler hose to the oil cooler tube, and slide the hose clamp to secure the hose.
-
Attach the 2 oil cooler hose clamps.
-
-
INSTALL FAN BRACKET ASSEMBLY
-
Install the fan bracket assembly together with the No. 1 and No. 2 cooling fan ECUs with the 2 bolts and 2 nuts.
- Torque:
- 20 N*m { 199 kgf*cm, 14 ft.*lbf }
-
Connect the 4 connectors to the No.1 and No. 2 cooling fan ECUs.
-
-
INSTALL UPPER RADIATOR SUPPORT SUB-ASSEMBLY
-
Install the upper radiator support sub-assembly with the 6 bolts.
- Torque:
- 5.5 N*m { 56 kgf*cm, 49 in.*lbf }
-
Attach the 2 clamps to connect the hood lock control cable assembly to the upper radiator support sub-assembly.
-
Connect the water by-pass hose to the radiator assembly, and slide the hose clamp to secure the hose.
-
-
INSTALL HOOD LOCK ASSEMBLY
-
Connect the hood lock control cable assembly to the hood lock assembly.
-
Install the hood lock assembly with the 3 bolts.
- Torque:
- 12 N*m { 122 kgf*cm, 9 ft.*lbf }
-
-
INSTALL WINDSHIELD WASHER MOTOR AND PUMP ASSEMBLY
-
w/ Rear Wiper:
Connect the 2 connectors and 2 washer hoses.
-
w/o Rear Wiper:
Connect the connector and washer hose.
-
Attach the hose clamp.
-
Install the windshield washer motor and pump assembly with the 2 bolts.
- Torque:
- 5.4 N*m { 55 kgf*cm, 48 in.*lbf }
-
Connect the connector to the windshield washer motor and pump assembly.
-
-
INSTALL RADIATOR RESERVOIR ASSEMBLY
-
Install the radiator reservoir assembly with the bolt.
- Torque:
- 8.0 N*m { 82 kgf*cm, 71 in.*lbf }
-
Connect the No. 2 water by-pass hose to the radiator reservoir assembly, and slide the hose clamp to secure the hose.
-
Connect the water by-pass hose to the radiator reservoir assembly, and slide the hose clamp to secure the hose.
-
-
INSTALL UPPER RADIATOR SUPPORT SEAL
-
Install the upper radiator support seal with the 2 clips and 4 bolts.
- Torque:
- 5.5 N*m { 56 kgf*cm, 49 in.*lbf }
-
-
INSTALL CONDENSER WITH RECEIVER ASSEMBLY
-
ADD ENGINE COOLANT
-
Tighten the radiator drain cock plug by hand.
-
Tighten the cylinder block water drain cock plug.
- Torque:
- 13 N*m { 130 kgf*cm, 9 ft.*lbf }
-
Fill the radiator reservoir assembly with engine coolant to the top of the inlet.
Standard Capacity 11.2 liters (11.8 US qts, 9.9 Imp. qts) Note
Never use water as a substitute for engine coolant.
Tech Tips
TOYOTA vehicles are filled with TOYOTA SLLC at the factory. In order to avoid damage to the engine cooling system and other technical problems, only use TOYOTA SLLC or similar high quality ethylene glycol based non-silicate, non-amine, non-nitrite, non-borate coolant with long-life hybrid organic acid technology (coolant with long-life hybrid organic acid technology is a combination of low phosphates and organic acids).
-
Remove the 2-way that is located near the throttle body assembly.
-
When air is bleed and the engine coolant drains out, install the 2-way.
-
Add coolant through the radiator reservoir assembly filler opening until the coolant reaches the B line and install the radiator reservoir cap sub-assembly. [*1]
-
Warm up the engine until the thermostat opens. While the thermostat is open, circulate the coolant for several minutes. [*2]
CAUTION:
-
Wear protective gloves.
-
Be careful as the radiator hoses are hot.
-
Keep your hands away from the radiator fans.
Note
-
Immediately after starting the engine, if the radiator reservoir assembly does not have any engine coolant, perform the following: 1) stop the engine, 2) wait until the engine coolant has cooled down, and 3) add engine coolant.
-
Do not start the engine when there is no engine coolant in the radiator reservoir assembly.
-
Make sure that the needle does not show an abnormally high temperature.
-
If there is not enough engine coolant, the engine may overheat.
Tech Tips
-
Press the No. 2 and No. 3 radiator hoses several times by hand, and then check the level of the engine coolant.
-
The thermostat open timing can be confirmed by pressing the No. 3 radiator hose by hand, and checking when the engine coolant starts to flow inside the hose.
-
-
Stop the engine, and wait until the engine coolant cools down to ambient temperature. [*3]
-
Check the engine coolant level in the radiator reservoir assembly. [*4]
Tech Tips
-
If the engine coolant level is below the LOW line, repeat steps *1 through *4.
-
If the engine coolant level is above the FULL line, drain engine coolant until the engine coolant level is between the FULL and LOW line.
-
-
-
CHARGE REFRIGERANT
-
Используя вакуумный насос, выполните вакуумную очистку.
-
Заправьте хладагент HFC-134a (R134a).
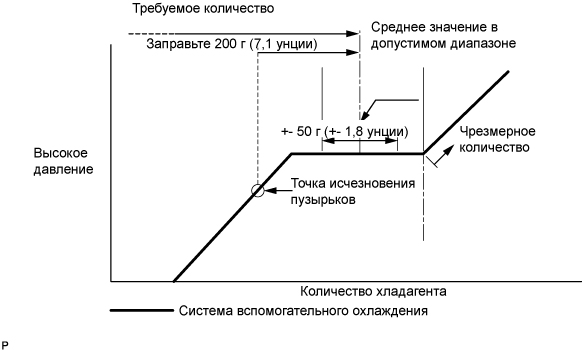
Номинальное значение Одиночный кондиционер 520-580 г (18,3-20,5 унции) Двойной кондиционер 670-730 г (23,0-25,7 унции) - SST
- 07110-58060 ( 07117-58090, 07117-78050, 07117-58070, 07117-58060, 07117-58080, 07117-88060, 07117-88070, 07117-88080 )
Note
-
Не включайте компрессор системы кондиционирования, пока не заправите ее хладагентом, иначе компрессор перегреется, поскольку без хладагента он не может функционировать правильно.
-
Приблизительно 100 г (3,5 унции) После исчезновения пузырьков может потребоваться заправить ... хладагента. В процессе заправки необходимо контролировать количество хладагента, не обращая внимания на смотровое окошко.
Tech Tips
В случае использования газообразного хладагента, собираемого с помощью устройства сбора/восстановления фреона, необходимо приготовить дополнительную тару для заправки хладагента, поскольку производительность устройства сбора составляет приблизительно 90% от расхода.
-
-
WARM UP ENGINE
-
После заправки хладагента в течение, по крайней мере, 2 мин прогрейте двигатель при частоте вращения коленчатого вала 1850 об/мин.
Note
Во избежание повреждения компрессора при включении системы кондиционирования после снятия и установки трубопроводов хладагента кондиционера (включая компрессор) обязательно прогревайте компрессор.
-
-
INSPECT FOR COOLANT LEAK
CAUTION:
Do not remove the radiator reservoir cap sub-assembly while the engine and radiator are still hot. Pressurized, hot engine coolant and steam may be released and cause serious burns.
-
Remove the radiator reservoir cap sub-assembly.
-
Fill the radiator reservoir assembly with engine coolant, and then attach a radiator cap tester.
-
Warm up the engine.
-
Using the radiator cap tester, increase the pressure inside the radiator to 137 kPa (1.4 kgf/cm2, 20 psi), and then check that the pressure does not drop.
If the pressure drops, check the hoses, radiator assembly and engine water pump assembly for leakage.
If there are no signs or traces of external engine coolant leakage, check the heater core, cylinder block assembly and cylinder head sub-assembly.
-
Install the radiator reservoir cap sub-assembly.
-