REAR DIFFERENTIAL CARRIER OIL SEAL INSTALLATION
-
INSTALL REAR DIFFERENTIAL DRIVE PINION BEARING SPACER
-
Install a new rear differential drive pinion bearing spacer.
-
-
INSTALL REAR DRIVE PINION FRONT TAPERED ROLLER BEARING
-
Install the rear drive pinion front tapered roller bearing.
-
-
INSTALL REAR DIFFERENTIAL DRIVE PINION OIL SLINGER
-
Install the differential drive pinion oil slinger.
-
-
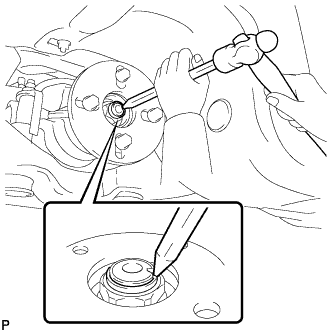
INSTALL REAR DIFFERENTIAL CARRIER OIL SEAL
-
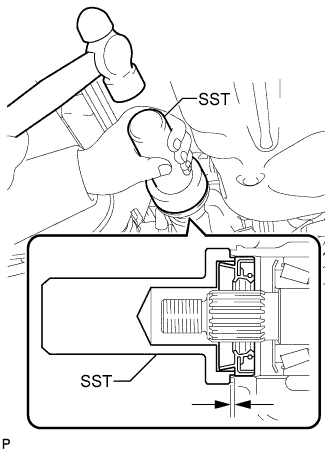
Using SST and a hammer, install a new rear differential carrier oil seal.
- SST
- 09554-22010
Oil seal driven in depth 2.0 +/- 0.3 mm (0.079 +/- 0.012 in.) -
Coat the rear differential carrier oil seal lip with MP grease.
-
-
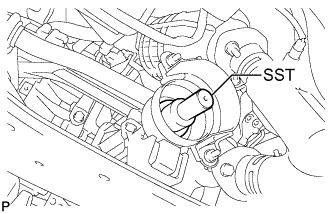
INSTALL REAR DRIVE PINION COMPANION FLANGE SUB-ASSEMBLY
-
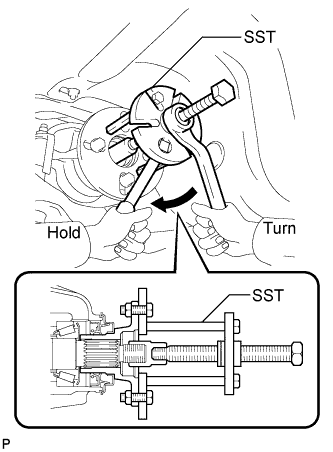
Using SST, install the rear drive pinion companion flange sub-assembly on the shaft.
- SST
- 09950-30012 ( 09951-03010, 09953-03010, 09954-03010, 09955-03030, 09956-03020 )
Note
Apply hypoid gear oil to the SST center bolt tip and threads before use.
-
-
INSTALL REAR DRIVE PINION NUT
-
Coat the threads of a new rear drive pinion nut with hypoid gear oil.
-
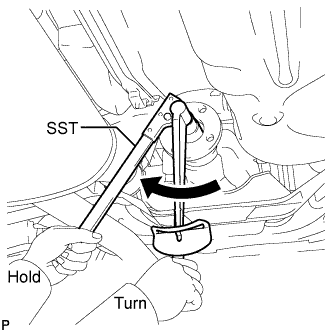
Using SST to hold the flange, tighten the rear drive pinion nut.
- SST
- 09330-00021
- Torque:
- 108 N*m { 1100 kgf*cm, 80 ft.*lbf }
-
-
INSPECT DIFFERENTIAL DRIVE PINION PRELOAD
-
Using a torque wrench, measure the preload of the drive pinon.
Drive pinion preload (Initial) Item Preload New bearing 1.1 to 1.7 N*m (11.2 to 17.3 kgf*cm, 9.7 to 15.0 in.*lbf) Reused bearing 0.6 to 0.9 N*m (6.1 to 9.2 kgf*cm, 5.3 to 8.0 in.*lbf)
-
If the preload is greater than the specification, replace the rear differential drive pinion bearing spacer.
-
If the preload is less than the specification, replace the rear drive pinion nut and tighten it in several steps with 13 N*m (130 kgf*cm, 9 ft.*lbf) of torque at a time until the specified preload is reached.
Torque 235 N*m (2400 kgf*cm, 174 ft.*lbf) or less
-
If the torque exceeds the maximum while retightening the rear drive pinion nut, replace the rear differential drive pinion bearing spacer and repeat the preload adjusting procedure.
Note
Do not loosen the pinion nut to reduce the preload.
-
-
-
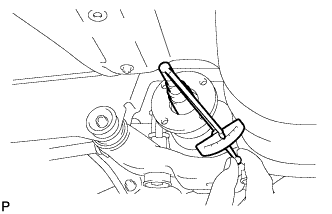
INSTALL REAR DRIVE PINION NUT
-
Using a chisel and hammer, stake the drive pinion nut.
-
-
TEMPORARILY TIGHTEN PROPELLER WITH CENTER BEARING SHAFT ASSEMBLY
-
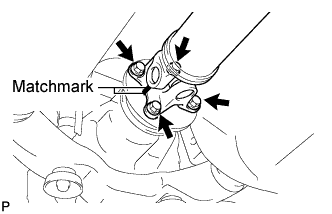
Align the matchmarks on the propeller shaft flange and differential companion flange, and connect the shaft with the 4 bolts, 4 washers and 4 nuts.
-
Remove SST from the transaxle.
-
Insert the yoke into the transaxle.
-
Install the 4 adjusting shims and propeller shaft with center bearing, and temporarily tighten the 4 bolts.
-
Tighten the 4 bolts.
- Torque:
- 74 N*m { 750 kgf*cm, 54 ft.*lbf }
-
-
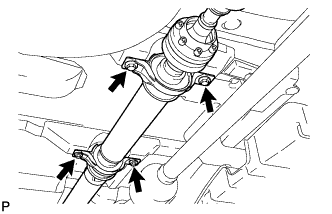
FULLY TIGHTEN PROPELLER WITH CENTER BEARING SHAFT ASSEMBLY
-
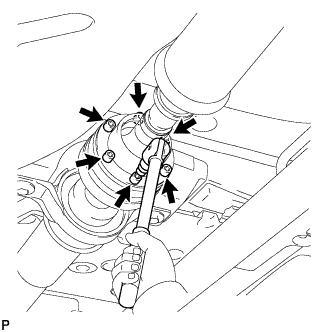
Remove the piece of cloth from the joint.
-
Using a hexagon wrench (6 mm), tighten the 6 bolts.
- Torque:
- 26 N*m { 265 kgf*cm, 19 ft.*lbf }
-
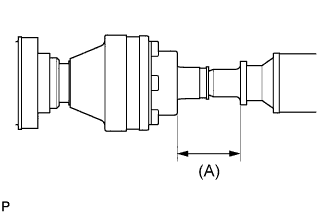
With the vehicle unloaded, adjust the dimension between the rear side of the cover and shaft as shown in the illustration.
(A) 58.0 +/- 0.5 mm (2.283 +/- 0.02 in.) -
Under the same condition as above, adjust the front and rear dimensions between the edge surface of the center support bearing and the edge surface of the cushion respectively as shown, and then tighten the bolts.

- Torque:
- 37 N*m { 375 kgf*cm, 27 ft.*lbf }
(B) 12.5 +/- 1.0 mm (0.492 +/- 0.039 in.) -
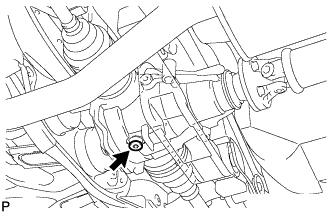
Check that the center line of the bracket is at the right angle in the shaft axial direction.
-
If any vibration or noise occurs, perform joint angle check as follows and replace the adjusting shim with a proper one.
-
Turn the propeller shaft several times by hand to stabilize the center support bearings.
-
Using a jack, raise and lower the differential to stabilize the differential mounting cushion.
-
Remove the transfer dynamic damper.
-
Using SST, measure the transfer installation angle (A) and front propeller shaft installation angle (B).
- SST
- 09370-50010
No. 1 joint angle (A) - (B) = -1.3° to -3.3° -
Using SST, measure the rear propeller shaft installation angle (C) and rear differential shaft installation angle (D).
- SST
- 09370-50010
No. 2 joint angle (C) - (D) = 1.8° to 3.5° 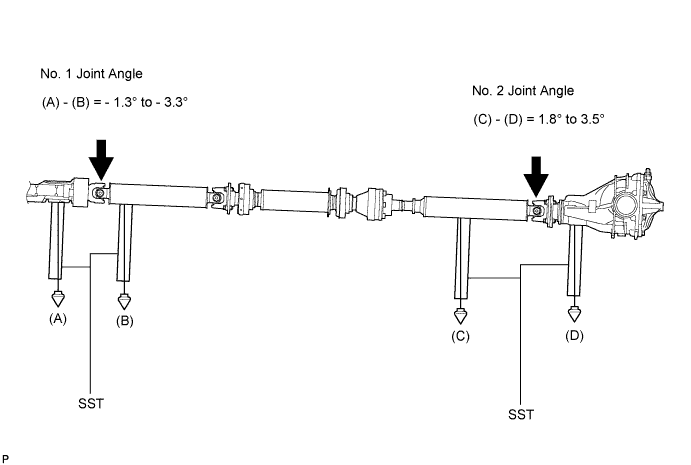
Tech Tips
If the measured angle is not within the specification, adjust it with the center support bearing adjusting shim.
Center support bearing adjusting shim thickness Thickness mm (in.) Thickness mm (in.) 3.2 (0.126) 11.0 (0.433) 4.5 (0.177) 13.5 (0.531) 6.5 (0.256) 15.5 (0.610) 9.0 (0.354) 17.5 (0.689) -
Install the transfer dynamic damper.
- Torque:
- 26 N*m { 265 kgf*cm, 19 ft.*lbf }
-
-
-
INSTALL REAR DIFFERENTIAL DRAIN PLUG
-
Using a hexagon wrench (10 mm), install the drain plug with a new gasket.
- Torque:
- 49 N*m { 500 kgf*cm, 36 ft.*lbf }
-
-
ADD DIFFERENTIAL OIL
-
Stop the vehicle on a level place.
-
Remove the differential filler plug and gasket.
-
Check that the oil surface is within 5 mm (0.20 in.) of the lowest position of the inner surface of the differential filler plug opening.
Note
-
Excessively large or small amounts of oil may cause trouble.
-
After replacing oil, drive the vehicle and check the oil level.
Tech Tips
If necessary, fill the rear differential carrier with hypoid gear oil.
Oil grade Hypoid gear oil API GL-5 Recommended oil viscosity Above -18°C (0°F) : SAE 90 Below -18°C (0°F) : SAE 80W or 80W-90 Capacity 0.9 +/- 0.05 liters (0.95 +/- 0.05 US qts, 0.79 +/- 0.04 lmp. qts) -
-
Check for oil leakage when the oil level is low.
-
Install the differential filler plug and a new gasket.
- Torque:
- 49 N*m { 500 kgf*cm, 36 ft.*lbf }
-
-
INSPECT DIFFERENTIAL OIL
-
Stop the vehicle on a level place.
-
Remove the differential filler plug and gasket.
-
Check that the oil surface is within 5 mm (0.20 in.) of the lowest position of the inner surface of the differential filler plug opening.
Note
-
Excessively large or small amounts of oil may cause trouble.
-
After replacing oil, drive the vehicle and check the oil level.
Tech Tips
If necessary, fill the rear differential carrier with hypoid gear oil.
Oil grade Hypoid gear oil API GL-5 Recommended oil viscosity Above -18°C (0°F) : SAE 90 Below -18°C (0°F) : SAE 80W or 80W-90 Capacity 0.9 +/- 0.05 liters (0.95 +/- 0.05 US qts, 0.79 +/- 0.04 lmp. qts) -
-
Check for oil leakage when the oil level is low.
-
Install the differential filler plug and a new gasket.
- Torque:
- 49 N*m { 500 kgf*cm, 36 ft.*lbf }
-
-
INSTALL REAR DIFFERENTIAL FILLER PLUG
-
Using a hexagon wrench (10 mm), install the filler plug with a new gasket.
- Torque:
- 49 N*m { 500 kgf*cm, 36 ft.*lbf }
-
-
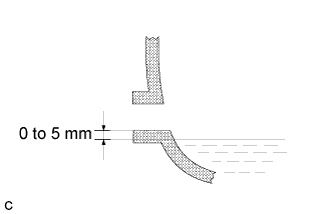
INSPECT AND ADJUST TRANSFER OIL
-
Remove the No. 1 transfer case plug and gasket.
-
Check the oil level is within 0 to 5 mm (0 to 0.20 in.) below the lowest end of the hole for the No. 1 transfer case plug.
Note
-
When changing oil, recheck the oil level after driving.
-
Excessively large or small quantity of oil may cause some trouble.
-
-
When the oil level is too low, check for oil leakage.
-
Tighten the No. 1 transfer case plug with a new gasket.
- Torque:
- 49 N*m { 500 kgf*cm, 36 ft.*lbf }
-