- Click here
INSTALL TRANSMISSION WIRE
-
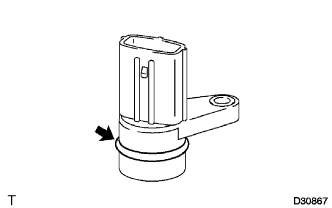
Coat a new O-ring of the transmission wire connector with ATF and install it.
-
Install the transmission wire with the bolt.
5.4 N*m 55 kgf*cm 48 in.*lbf
-
- Click here
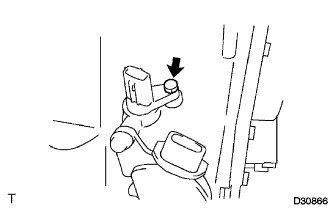
CONNECT TRANSMISSION WIRE
-
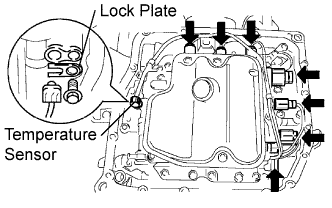
Coat a new O-ring of the ATF temperature sensor with ATF.
-
Install the ATF temperature sensor with the lock plate and bolt.
6.6 N*m 67 kgf*cm 58 in.*lbf -
Connect the 7 shift solenoid valve connectors.
-
- Click here
INSTALL AUTOMATIC TRANSAXLE OIL PAN SUB-ASSEMBLY
-
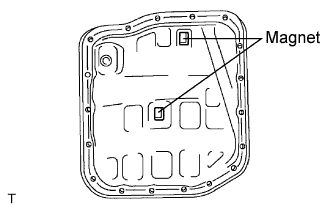
Install the 2 magnets in the oil pan.
-
Apply adhesive to the 18 bolts.
Adhesive Toyota Genuine Adhesive 1344, Three Bond 1344 or equivalent -
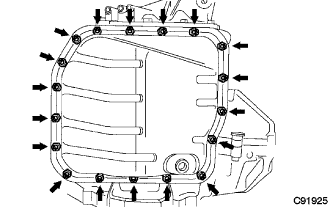
Using a new gasket, install the oil pan to the transaxle case with the 18 bolts.
7.8 N*m 80 kgf*cm 69 in.*lbf Note:Apply adhesive to the bolts and tighten them within 10 minutes of application.
-
- Click here
INSTALL AUTOMATIC TRANSAXLE ASSEMBLY
Tip: - Click here
CONNECT CABLE TO NEGATIVE BATTERY TERMINAL
Note:When disconnecting the cable, some systems need to be initialized after the cable is reconnected (Click here).
- Click here
ADD AUTOMATIC TRANSAXLE FLUID
- Click here
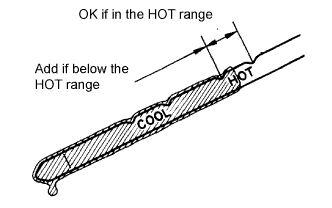
INSPECT AUTOMATIC TRANSAXLE FLUID
Tip:Drive the vehicle so that the engine and transaxle are at normal operating temperature.
Fluid temperature 70 to 80°C (158 to 176°F)
-
Park the vehicle on a level surface and set the parking brake.
-
With the engine idling and the brake pedal depressed, move the shift lever to all positions from P to S1 and return to the P position.
-
Take out the dipstick and wipe it clean.
-
Put the dipstick back all the way.
-
Take out the dipstick again and check that the fluid level is within the HOT range.
If the fluid level is below the HOT range, add new fluid and recheck the fluid level.
If the fluid level exceeds the HOT range, drain the fluid once, add the proper amount of new fluid and recheck the fluid level.
If there are leaks, it is necessary to repair or replace O-rings, FIPGs, oil seals, plugs and/or other parts.
-
- Click here
INSPECT FOR TRANSAXLE FLUID LEAK
- Click here
INSTALL NO. 2 ENGINE UNDER COVER
-
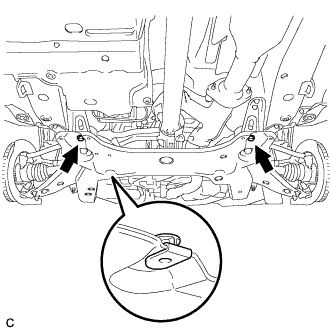
Install the No. 2 engine under cover with the 2 bolts.
-
- Click here
INSTALL NO. 1 ENGINE UNDER COVER
-
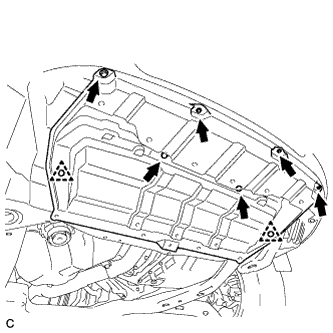
Install the No. 1 engine under cover with the 6 bolts and 2 clips.
-
- Click here
INSTALL ENGINE UNDER COVER ASSEMBLY
-

Install the engine under cover assembly with the 2 bolts, 2 screws and 5 clips.
-

Install the engine under cover assembly RR with the 2 bolts.
-
- Click here
RESET MEMORY
Tip: