DRIVE BELT INSTALLATION
-
INSTALL V-RIBBED BELT
-
Install the V-ribbed belt.
-
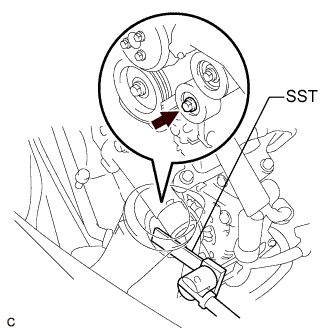
Using SST, turn the V-ribbed belt tensioner assembly counterclockwise and remove the bar.
- SST
- 09961-00950
-
If it is difficult to install the V-ribbed belt, perform the following procedure:
-
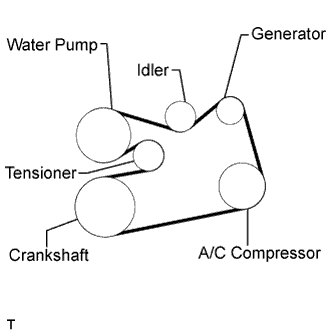
Put the V-ribbed belt on every pulley except the tensioner pulley as shown in the illustration.
-
Release the V-ribbed belt tension by turning the V-ribbed belt tensioner assembly counterclockwise, and put the V-ribbed belt on the V-ribbed belt tensioner assembly pulley.
Note
-
Put the backside of the V-ribbed belt on the V-ribbed belt tensioner assembly pulley and No. 2 idler pulley sub-assembly.
-
Check that the V-ribbed belt is properly set to each pulley.
-
-
After installing the V-ribbed belt, check that it fits properly in the ribbed grooves. Confirm that the V-ribbed belt has not slipped out of the grooves on the bottom of the crankshaft pulley by hand.
-
-
-
INSTALL FRONT FENDER APRON SEAL RH
-
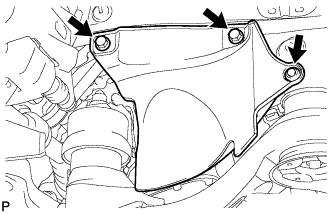
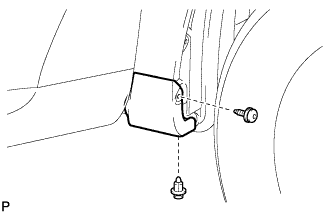
Install the front fender apron seal RH with the 2 bolts and clip.
-
-
INSTALL FRONT FENDER LINER RH
-
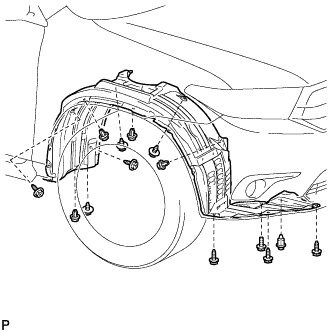
Install the front fender liner RH with the 5 clips and 8 screws.
-
Install the bolt.
-
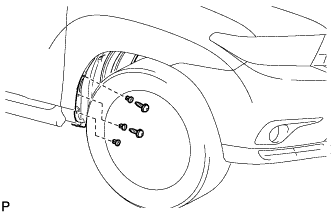
Install 3 new grommets.
-
Using a 4 mm hexagon wrench, install the 2 screws.
-
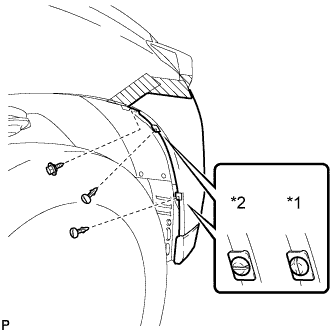
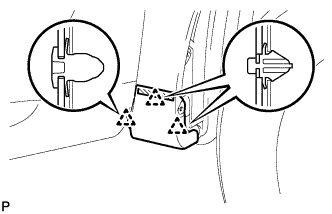
Text in Illustration *1 Correct *2 Incorrect Install the screw and 2 pin hold clips.
Note
Insert the pin hold clip with the slot aligned vertically. Do not rotate the clip after inserting it. After installation, confirm that the slot is aligned vertically.
-
-
INSTALL FRONT FENDER MOULDING SUB-ASSEMBLY RH
-
Clean the vehicle body surface.
-
Using a heat light, heat the vehicle body surface.
-
Remove the front fender side protector from the vehicle body.
-
Wipe off any tape adhesive residue with cleaner.
-
-

Clean the front fender moulding sub-assembly RH. (If reusing the front fender moulding sub-assembly RH)
-
Using a heat light, heat the front fender moulding sub-assembly RH.
-
Remove the front fender side protector from the front fender moulding sub-assembly RH.
-
Wipe off any tape adhesive residue with cleaner.
-
Install a new front fender side protector to the the front fender moulding sub-assembly RH.
-
-
Install the front fender moulding sub-assembly RH.
-
Using a heat light, heat the vehicle body and the front fender moulding sub-assembly RH.
-
Remove the release paper from the front fender moulding sub-assembly RH.
Tech Tips
After removing the release paper, keep the exposed adhesive free from foreign matter.
-
Engage the 3 clips and install the front fender moulding sub-assembly RH.
-
-
Using a 4 mm hexagon wrench, install the screw.
-
Install the clip.
-
-
INSTALL NO. 1 ENGINE UNDER COVER
-
Install the No. 1 engine under cover with the 6 bolts and 2 clips.
-
-
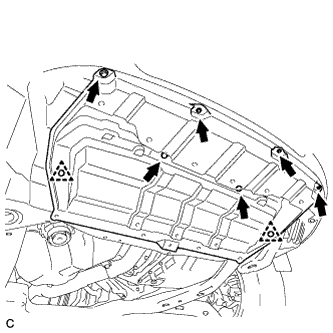
INSTALL ENGINE UNDER COVER ASSEMBLY
-

Install the engine under cover assembly with the 2 bolts, 2 screws and 5 clips.
-

Install the engine under cover assembly RR with the 2 bolts.
-
-
INSTALL FRONT WHEEL RH
- Torque:
- 103 N*m { 1050 kgf*cm, 76 ft.*lbf }