ROOF HEADLINING (for Full-trim) REMOVAL

-
DISCONNECT CABLE FROM NEGATIVE BATTERY TERMINAL
Note
When disconnecting the cable, some systems need to be initialized after the cable is reconnected Click here.
-
REMOVE REAR NO. 1 SEAT ASSEMBLY
-
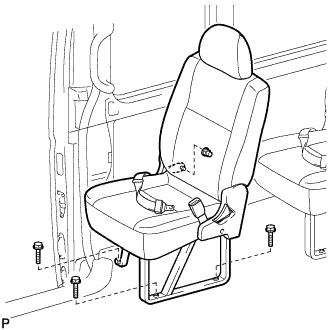
First row:
-
Remove the 3 bolts, nut and rear No.1 seat assembly.
-
-
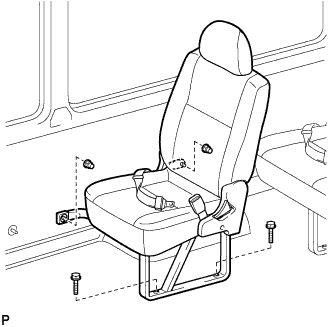
Second row:
-
Remove the 2 bolts, 2 nuts and rear No.1 seat assembly.
-
-
-
REMOVE REAR NO. 2 SEAT ASSEMBLY
-
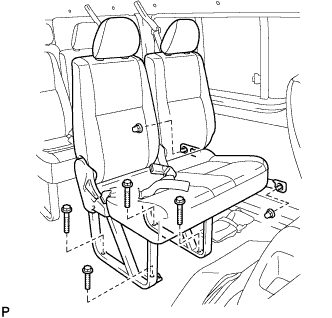
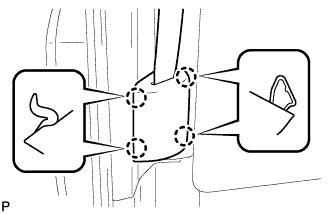
Remove the 4 bolts, 2 nuts and rear No.2 seat assembly.
Tech Tips
-
Use the same procedure for the second row.
-
Use the same procedure for the third row.
-
-
-
REMOVE REAR NO. 3 SEAT ASSEMBLY
-
for Bench Type Seatback:
Remove the rear No. 3 seat assembly Click here.
-
for Separate Type Seatback:
Remove the rear No. 3 seat assembly Click here.
-
-
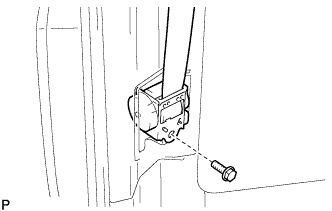
REMOVE REAR NO. 4 SEAT ASSEMBLY
-
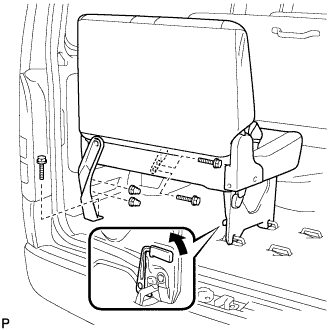
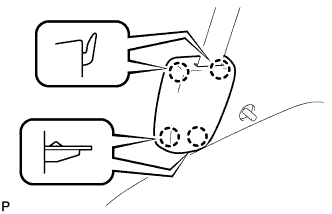
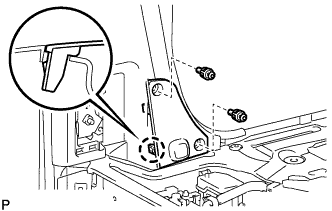
Remove the 3 bolts and 2 nuts.
-
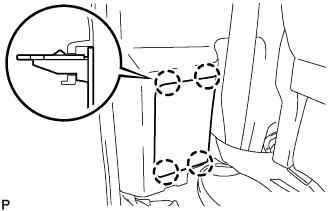
Pull the lever in the direction indicated by the arrow in the illustration, release the 2 locks, and remove the rear No.4 seat assembly.
-
-
REMOVE REAR SEAT BELT ASSEMBLY OUTER
-
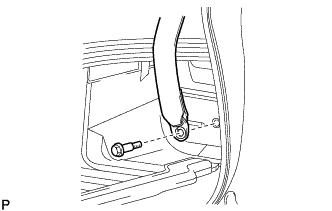
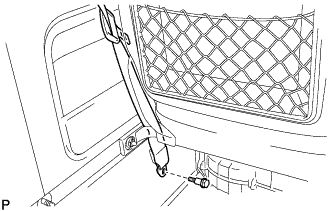
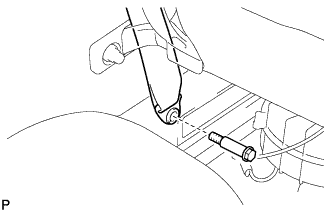
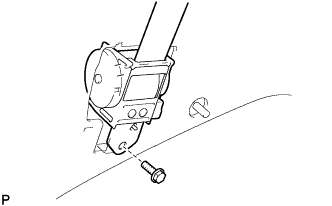
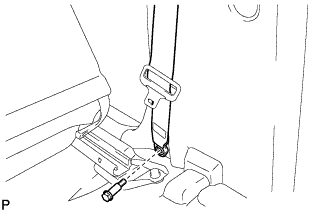
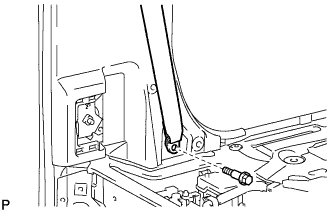
Remove the bolt and disconnect the floor side of rear seat belt assembly outer.
-
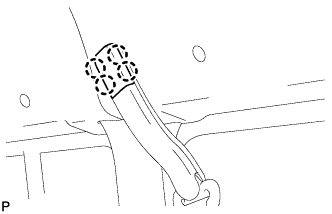
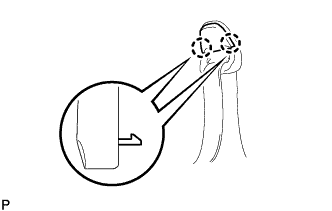
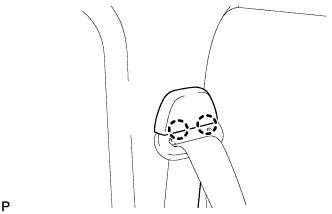
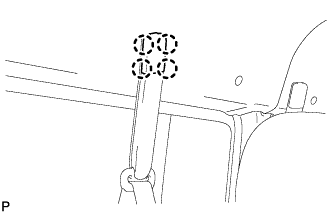
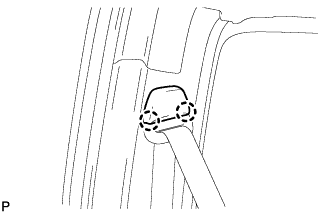
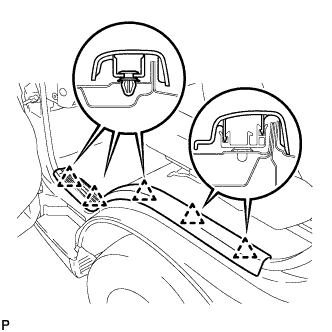
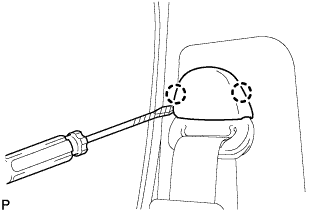
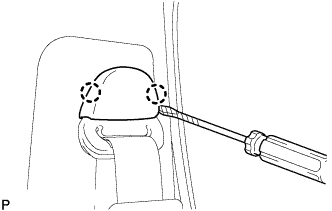
Using a screwdriver, disengage the 4 claws and disconnect the shoulder side cover of the rear seat belt assembly outer.
Tech Tips
Tape the screwdriver tip before use.
-

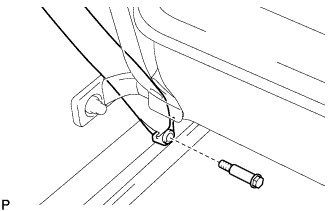
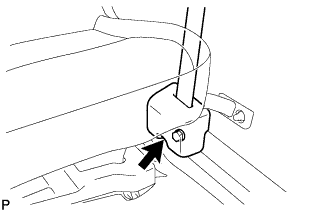
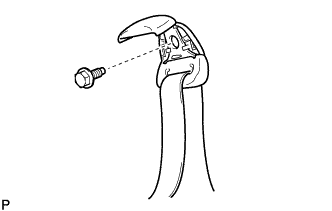
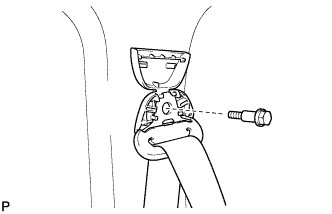
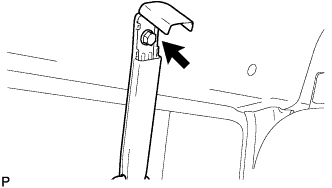
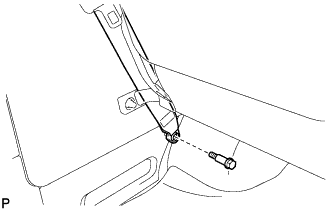
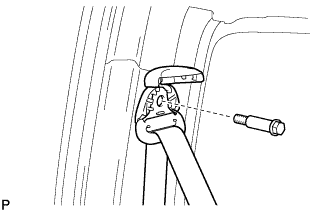
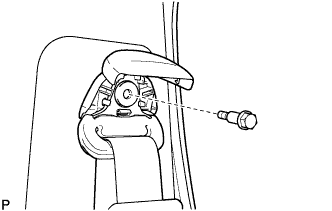
Disconnect the bolt and shoulder side the rear seat belt assembly outer.
-
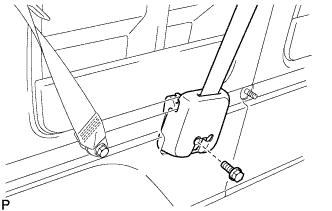
Disconnect the bolt and remove the rear seat belt assembly outer.
-
for Rear No. 1 Seat Bench Seat Type:
-
Remove the bolt and disconnect the floor side of the rear seat belt assembly outer.
-
Using a screwdriver, disengage the 2 claws and disconnect the shoulder side cover of the rear seat belt assembly outer.
Tech Tips
Tape the screwdriver tip before use.
-
Remove the bolt and disconnect the shoulder side of the rear seat belt assembly outer.
-
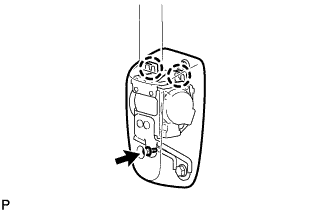
Loosen the bolt.
-
Disengage the 2 claws and disconnect the retractor cover of the rear seat belt assembly outer.
-
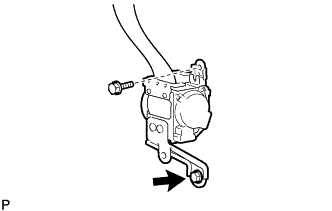
Remove the upper side bolt.
-
Loosen the lower side bolt and remove the rear seat belt assembly outer.
-
-
-
REMOVE REAR NO.2 SEAT BELT ASSEMBLY OUTER LH
-
Remove the bolt and disconnect the floor side of the rear No.2 seat belt assembly outer.
-
Using a screwdriver, disengage the 2 claws and disconnect the shoulder side cover of the rear No.2 seat belt assembly outer.
Tech Tips
Tape the screwdriver tip before use.
-
Remove the bolt and disconnect the shoulder side of the rear No.2 seat belt assembly outer.
-
Remove the bolt and remove the rear No.2 seat belt assembly outer.
-
-
REMOVE NO.3 SEAT BELT ASSEMBLY OUTER LH
-
Remove the bolt and disconnect the floor side of the rear No.3 seat belt assembly outer.
-
Using a screwdriver, disengage the 4 claws and disconnect the shoulder side cover of the rear No.3 seat belt assembly outer.
Tech Tips
Tape the screwdriver tip before use.
-
Disconnect the bolt and shoulder side of the rear No.3 seat belt assembly outer.
-
Using a screwdriver, disengage the 4 claws and disconnect the rear No.3 seat belt assembly outer retractor cover.
-
Remove the bolt and rear No.3 seat belt assembly outer.
-
-
REMOVE NO.4 SEAT BELT ASSEMBLY OUTER LH
-
Remove the bolt and disconnect the floor side of the rear No.4 seat belt assembly outer.
-
Using a screwdriver, disengage the shoulder side cover of the 2 claws and disconnect the rear No.4 seat belt assembly outer.
Tech Tips
Tape the screwdriver tip before use.
-
Remove the bolt and disconnect the shoulder side of the rear No.4 seat belt assembly outer.
-
Using a screwdriver, disengage the 4 claws and disconnect the rear No.4 seat belt assembly outer retractor cover.
-
Remove the bolt and rear No.4 seat belt assembly outer.
-
-
REMOVE FRONT DOOR SCUFF PLATE LH
-
Remove the 5 clips and front door scuff plate LH.
-
-
REMOVE FRONT DOOR SCUFF PLATE RH
-
REMOVE FRONT DOOR OPENING TRIM LH
-
REMOVE FRONT DOOR OPENING TRIM RH
-
DISCONNECT FRONT SEAT OUTER BELT ASSEMBLY RH
-
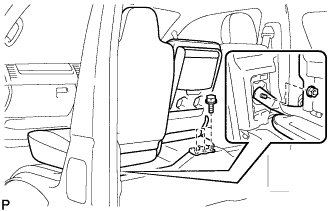
Remove the bolt and disconnect front seat outer belt assembly RH.
-
Using a screwdriver, disengage the 2 claws and cover.
Tech Tips
Tape the screwdriver tip before use.
-

Remove the bolt and disconnect front seat outer belt assembly RH.
-
-
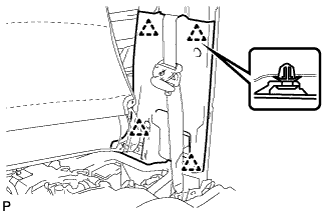
REMOVE CENTER PILLAR GARNISH COVER LOWER LH
-
Using a screwdriver, disengage the 4 claws and remove the center pillar garnish cover lower LH.
Tech Tips
Tape the screwdriver tip before use.
-
-
REMOVE SEAT ASSEMBLY LH
-
Disconnect connector.
-
Remove the nut and 3 bolts.
-
Remove the seat assembly LH.
-
-
REMOVE SEAT BELT ANCHOR COVER
-
Remove the 2 clips.
-
Disengage the claw and then remove the seat belt anchor cover.
-
-
DISCONNECT FRONT SEAT OUTER BELT ASSEMBLY LH
-
Remove the bolt and disconnect the front seat outer belt assembly LH.
-
Using a screwdriver, disengage the 2 claws and cover.
Tech Tips
Tape the screwdriver tip before use.
-
Remove the bolt and disconnect the front seat outer belt assembly LH.
-
-
REMOVE REAR DOOR SCUFF PLATE RH
-
Using a screwdriver, disengage the 11 clips and remove the rear door scuff plate LH.
Tech Tips
Tape the screwdriver tip before use.
-
-
REMOVE SLIDE DOOR WEATHERSTRIP NO.1 RH
-
REMOVE BACK DOOR SCUFF PLATE
-
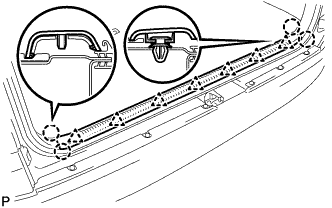
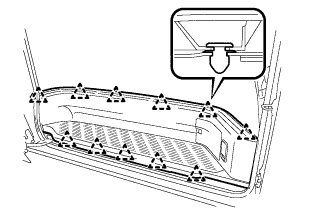
Using a screwdriver, disengage the 7 clips and 4 claws and remove the back door scuff plate.
Tech Tips
Tape the screwdriver tip before use.
-
-
REMOVE BACK DOOR WEATHERSTRIP
-
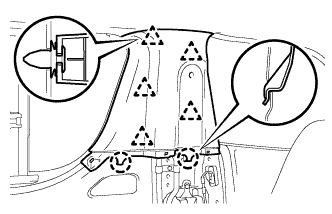
REMOVE QUARTER TRIM PANEL ASSEMBLY REAR LH (Middle Roof Type)
-
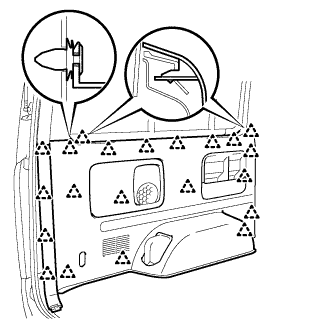
Using a screwdriver, disengage the 21 clips and remove the quarter trim panel assembly rear LH.
Tech Tips
Tape the screwdriver tip before use.
-
-
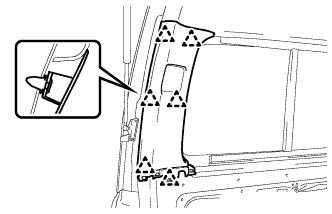
REMOVE QUARTER TRIM PANEL ASSEMBLY REAR LH (High Roof Type)
-
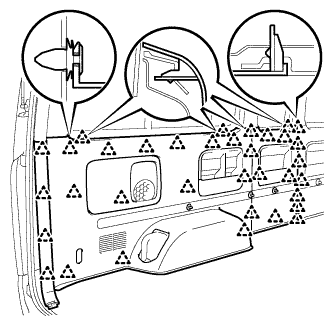
Using a screwdriver, disengage the 35 clips and remove the quarter trim panel assembly rear LH.
Tech Tips
Tape the screwdriver tip before use.
-
-
REMOVE QUARTER TRIM PANEL ASSEMBLY REAR RH
-
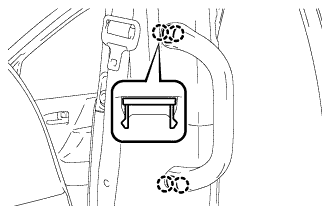
REMOVE SIDE NO.1 TRIM ASSEMBLY LH
-
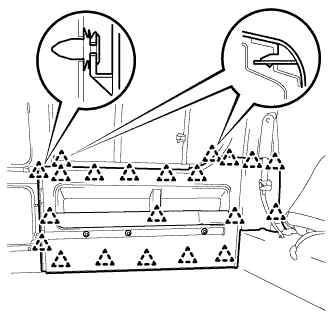
Using a screwdriver, disengage the 21 clips and remove the side No.1 trim assembly LH.
Tech Tips
Tape the screwdriver tip before use.
-
-
REMOVE ENGINE SERVICE HOLE COVER HOOK NO.2 LH
-
Remove the screw and engine service hole cover hook No.2 LH.
-
-
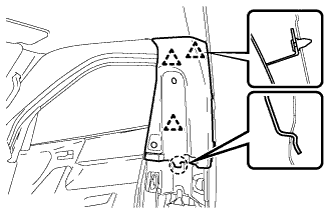
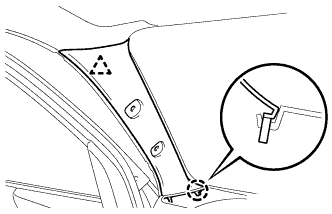
REMOVE CENTER PILLAR GARNISH LH
-
Using a screwdriver, disengage the 5 clips and 2 claws, and remove the center pillar garnish LH.
Tech Tips
Tape the screwdriver tip before use.
-
-
REMOVE ASSIST GRIP PLUG
-
Using a screwdriver, disengage the assist grip plugs.
Tech Tips
Tape the screwdriver tip before use.
-
-
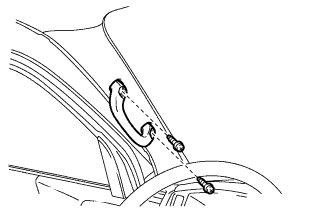
REMOVE ASSIST GRIP ASSEMBLY REAR
-
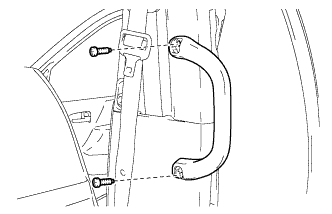
Remove the 2 screws and assist grip assembly rear.
-
-
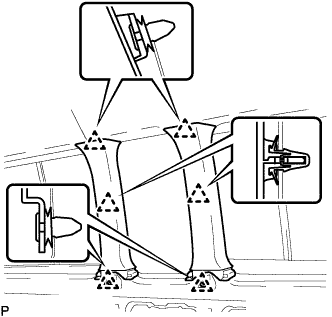
REMOVE CENTER PILLAR GARNISH LOWER RH
-
Release the 4 claws and remove the center pillar garnish lower RH.
-
-
REMOVE CENTER PILLAR GARNISH RH
-
Release the 3 clips, claw and remove the center pillar garnish RH.
-
-
REMOVE QUARTER PILLAR GARNISH LH (High Roof Type)
-
Release the 6 clips and remove the quarter pillar garnish LH.
-
-
REMOVE QUARTER PILLAR GARNISH RH (High Roof Type)
-
REMOVE QUARTER PILLAR GARNISH LH (Middle Roof Type)
-
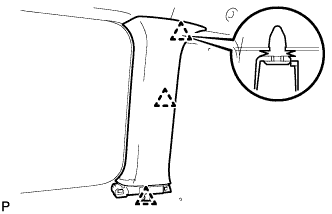
Release the 3 clips and remove the quarter pillar garnish LH.
-
-
REMOVE QUARTER PILLAR GARNISH RH (Middle Roof Type)
-
REMOVE ROOF SIDE GARNISH INNER UPPER LH
-
Using a screwdriver, disengage the 6 clips and remove the roof side garnish inner upper LH.
Tech Tips
Tape the screwdriver tip before use.
-
-
REMOVE ROOF SIDE GARNISH INNER UPPER RH
-
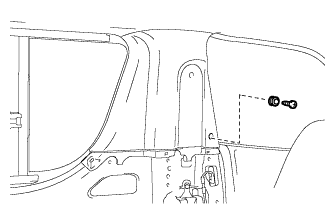
REMOVE REAR SEAT HOOK (Space Up Seat)
-
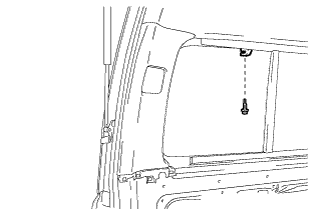
Remove the bolt and rear seat hook.
-
-
REMOVE ROOM LIGHT ASSEMBLY NO.2 (Deluxe)
-

Using a screwdriver, disengage the 4 claws and remove the room light lens cover.
Tech Tips
Tape the screwdriver tip before use.
-
Remove the 2 screws.
-
Disconnect the connector and remove the room light assembly No.2.
-
-
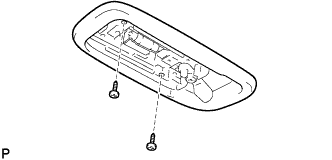
REMOVE ROOM LIGHT ASSEMBLY NO.2 (Super Wagon)
-
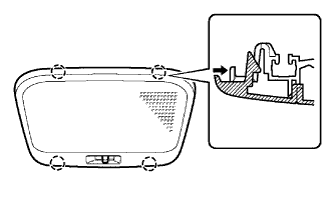
Using a screwdriver, disengage the claw and remove the room light base.
Tech Tips
Tape the screwdriver tip before use.
-
Remove the 2 screws.
-
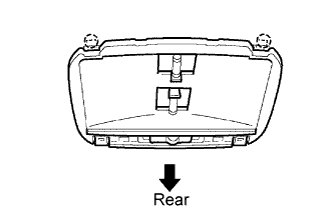
Pull the room light assembly No.2 rearward and disengage the claw.
-
Release the connector and remove the room light assembly No.2.
-
-
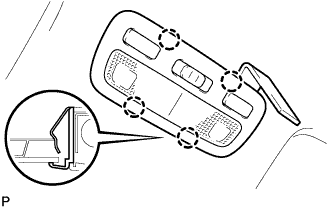
REMOVE ROOF HEADLINING NO.2 (Middle Roof Type)
-
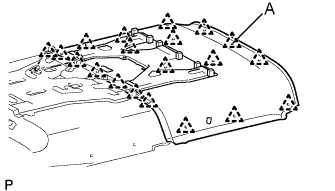
Using a clip remover, disengage the 20 clips and remove the roof headlining No.2.
Tech Tips
The clips in the illustration are part of the components. Remove them together with the roof headlining No.2.
-
-
REMOVE ROOF HEADLINING NO.2 (High Roof Type)
-
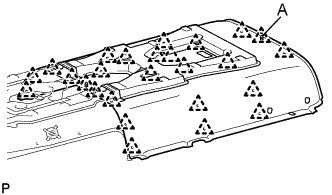
Using a clip remover, disengage the 26 clips and remove the roof headlining No.2.
Tech Tips
The clips in the illustration are part of the components. Remove them together with the roof headlining No.2.
-
-
REMOVE FRONT ASSIST GRIP PLUG NO.1
-
Using a screwdriver, disengage the assist grip plug No.1.
Tech Tips
-
Tape the screwdriver tip before use.
-
Use the same procedures described for the RH side.
-
-
-
REMOVE ASSIST GRIP ASSEMBLY
-
Remove the 2 screws and assist grip.
Tech Tips
Use the same procedures described for the RH side.
-
-
REMOVE FRONT PILLAR GARNISH LH
-
Using a screwdriver, disengage the clip and claw and remove the front pillar garnish LH.
Tech Tips
Tape the screwdriver tip before use.
-
-
REMOVE FRONT PILLAR GARNISH RH
-
REMOVE ASSIST GRIP
-
Using a screwdriver, disengage the assist grip plugs.
Tech Tips
Tape the screwdriver tip before use.
-
Remove the 2 screws and assist grip.
-
-
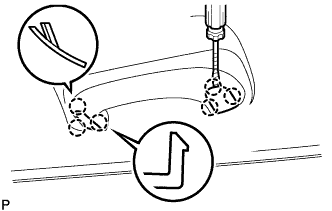
REMOVE VISOR HOLDER
-
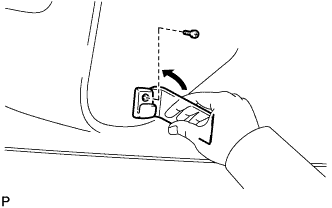
Remove the screw.
-
Using a moulding remover, disengage the claw and remove the visor holder.
Tech Tips
Use the same procedures described for the RH side.
-
-
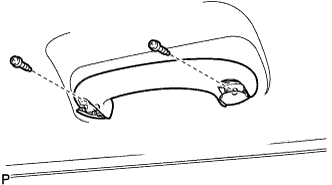
REMOVE VISOR ASSEMBLY LH
-
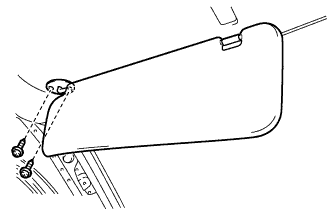
Remove the 2 screws and visor assembly LH.
-
-
REMOVE VISOR ASSEMBLY RH
Tech Tips
Use the same procedures described for the LH side.
-
REMOVE ROOM LIGHT ASSEMBLY NO.1 (Deluxe)
-
Using a screwdriver, disengage the 4 claws and remove the room light lens cover.
Tech Tips
Tape the screwdriver tip before use.
-
Remove the 2 screws.
-
Disconnect the connector and remove the room light assembly No.1.
-
-
REMOVE MAP LIGHT ASSEMBLY (Super Wagon)
-
Using a moulding remover, disengage the 4 claws and map light assembly.
-
Disconnect the connector and remove the map light assembly.
-
-
REMOVE REAR COOLER CONTROL PANEL (w/Rear Cooler)
-
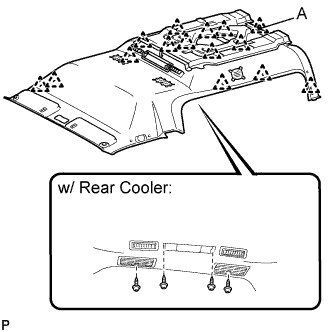
REMOVE ROOF HEADLINING NO.1 (Middle Roof Type)
-
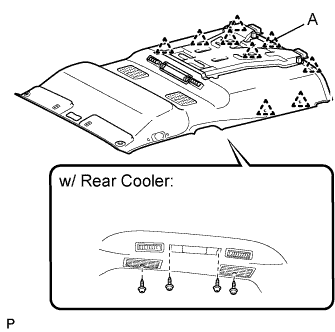
w/ Rear Cooler:
Remove the 4 screws.
-
Using a clip remover, disengage the 9 clips and remove the roof headlining No.1.
Tech Tips
The clips in the illustration are part of the components. Remove them together with the roof headlining No.1
-
-
REMOVE ROOF HEADLINING NO.1 (High Roof Type)
-
w/ Rear Cooler:
Remove the 4 screws.
-
Using a clip remover, disengage the 15 clips and remove the roof headlining No.1.
Tech Tips
The clips in the illustration are part of the components. Remove them together with the roof headlining No.1.
-