TWO-TONE TAPE INSTALLATION

-
KEY POINTS FOR INSTALLING TAPE
-
Installation position
-
Key points for replacing the tape.
-
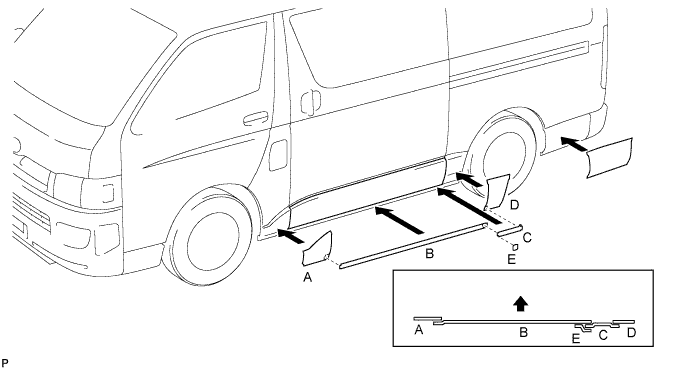
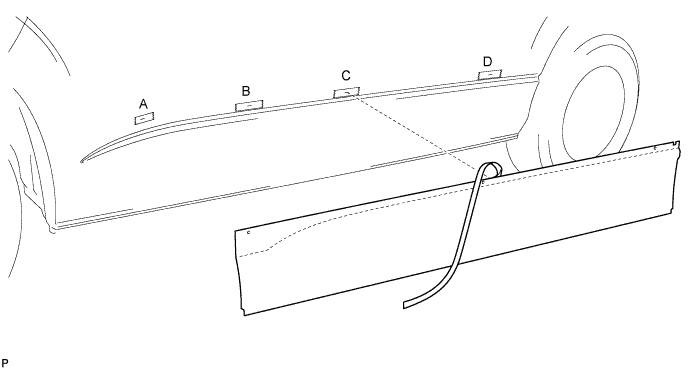
The body stripe tapes will overlap (see sectional view in the illustration). When replacing stripe tape, other sections of tape may also have to be replaced.
Replacing A Also needs to replace B and C and E Replacing B Also needs to replace C and E Replacing D Also needs to replace C and E Replacing C Also needs to replace E
-
-
Installation temperature
-
When ambient temperature is below 15°C, conduct installation after warming the vehicle body surface and tape up to between 20 to 30°C. When ambient temperature is above 35°C, cool the vehicle body surface and tape down also to between 20 to 30°C prior to installation.
Tech Tips
-
The most appropriate temperature for installing the tape is 25°C.
-
When the temperature is low, the tape turns stiff and does not fit. However, when the temperature is high, the tape looses elasticity.
-
-
-
Before installation
-
Remove any roughness from the surface of the vehicle where the tape will be installed.
-
Using an air blower, remove any foreign matter on the vehicle, tape and work clothes.
Tech Tips
Spray water on the shop floor to settle any dust.
-
Clean and degrease the installing surface.
-
-
Key points for handling the tape.
-
The tape bends and rolls up easily. Store the tape between flat pieces of cardboard and keep level.
Note
Do not bend the tape or leave it in high temperature areas.
-
-
-
INSTALLATION PROCEDURE AND KEY POINTS
-
Positioning
-
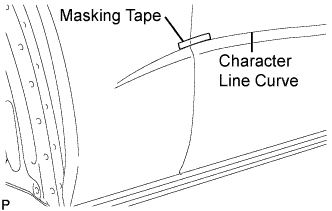
A special jig used in the vehicle assembly line is not available. Install the stripe tape considering panel dimensions and using masking tape.
Note
The starting point for tape installation must be selected. Conduct positioning with a high accuracy of +- 1 mm to achieve a neat finish and to avoid peeling.
-
-
Set the tape on a flat face (temporary setting).
-
Temporarily attach the tape following the locators.
-
-
Install the tape on a flat face (temporary application).
-
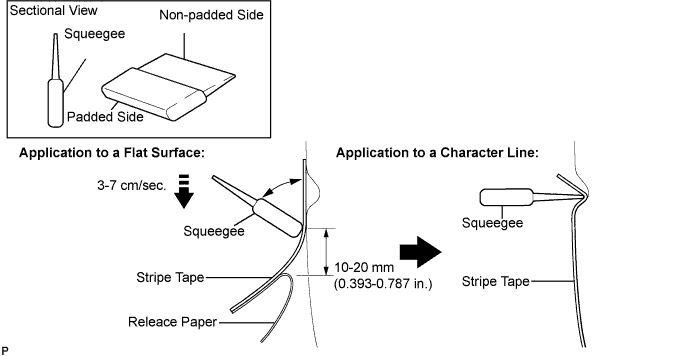
Remove the release paper and lightly press the tape to the vehicle using a squeegee.
Note
Press the tape lightly onto the vehicle body surface while removing any air from under the tape. If the tape is firmly applied from the beginning, air becomes trapped under the tape causing air bubbles.
-
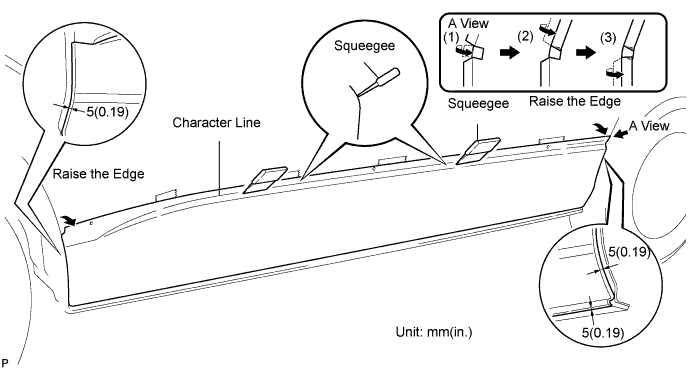
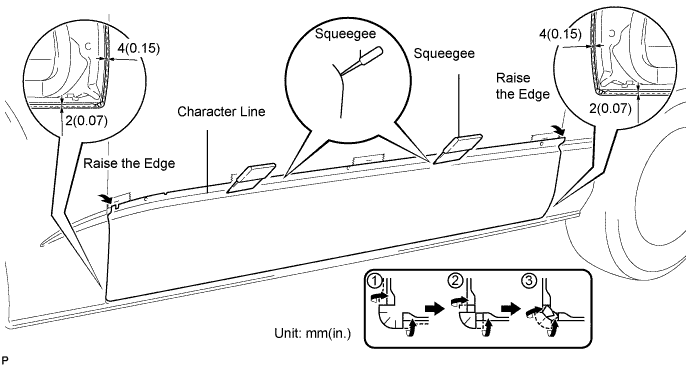
To avoid air bubbles, raise the bottom part of the tape so its adhesive surface does not touch the vehicle body while being applied.
-
After applying the tape to the flat surface with the padded side of a squeegee, fit the tape to the character line using the non-padded side of the squeegee.
-
-
Installation of flat surface (full application)
-
Press entire tape to the flat surface firmly using a squeegee.
Note
-
If air bubbles remain, remove them by pressing on the tape lightly before the final application.
-
Use the 2 padded faces of the squeegee for final application. (The non-padded end is used for installing tape to a curve).
-
-
Remove the transparent protective film from the body stripe tape.
-
-
Install the tape to the hemming and the corner (underside).
-
Use your hands or the padded face of a squeegee to carefully apply the tape to the hem of the vehicle
-
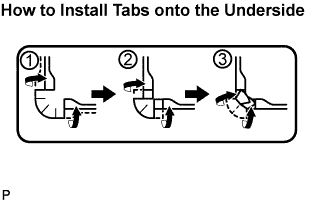
Apply the tape to the corner carefully in the order shown in the illustrations.
-
Press the tab of tape onto the underside with your hands or a squeegee.
-
-
-
INSTALL QUARTER STRIPE (w/o Slide Door)
-
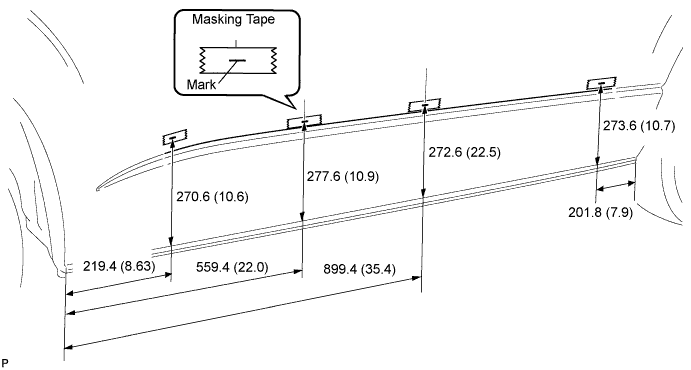
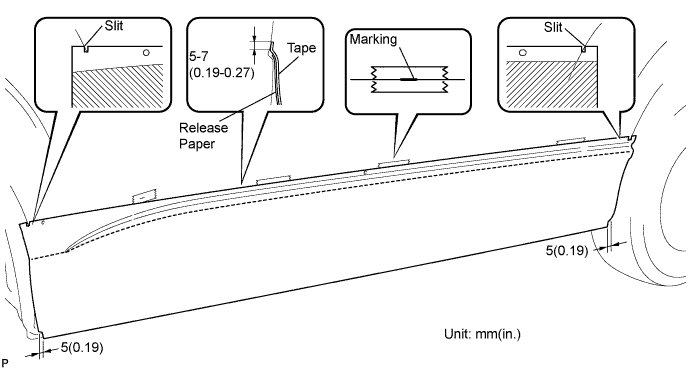
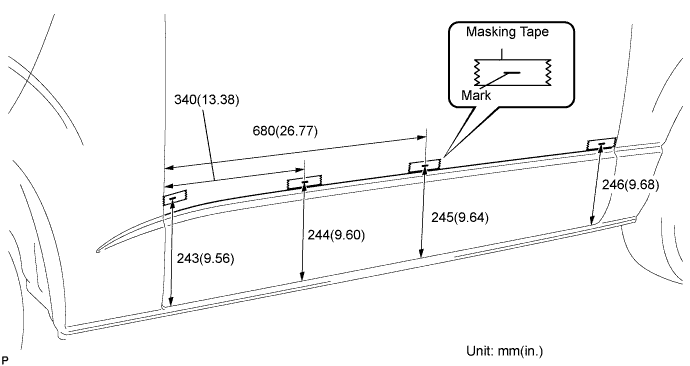
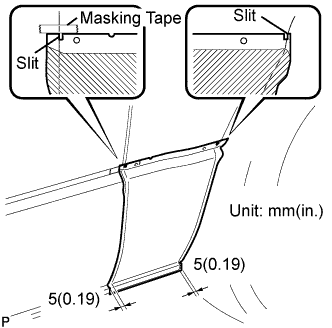
Put masking tape on the locations indicated in the illustration below.
-
Measure the correct distance from the bottom of the hemming edge and put marks on the pieces of masking tape.
-
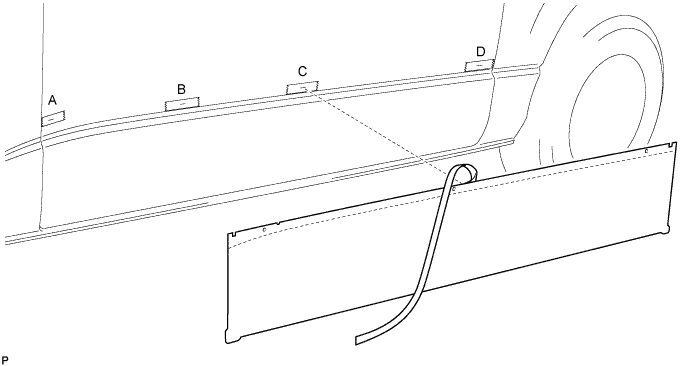
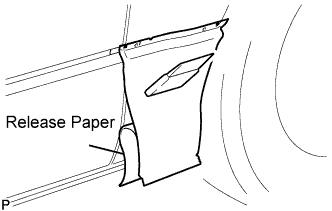
Remove release paper from the upper portion of the stripe tape as shown in the illustration, starting from the rear end of the tape to location C.
Tech Tips
Install tape from the rear of the vehicle.
-
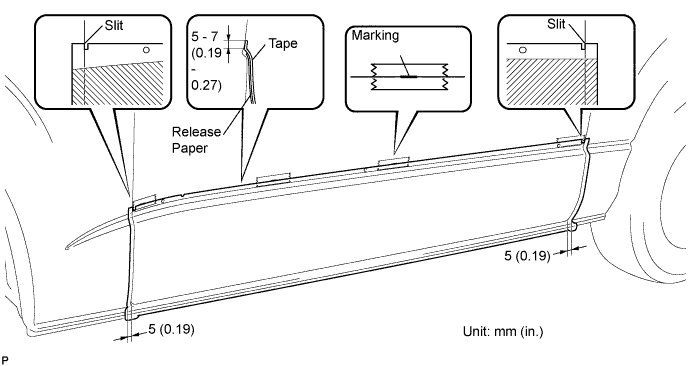
Temporarily set the body stripe tape to the vehicle surface with its upper edge attached to the markings, and its outer line of the right and left slits aligned with the vertical line of the slits between the doors and vehicle body.
-
Remove remaining release paper from the upper edge and temporarily attach the stripe tape to the markings.
-
Temporarily apply the entire body stripe tape, avoiding air bubbles and/or looseness.
CAUTION:
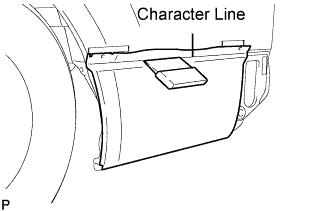
Do not fit the stripe tape to the curve of the character line. (If so, the stripe tape cannot be installed correctly.)
-
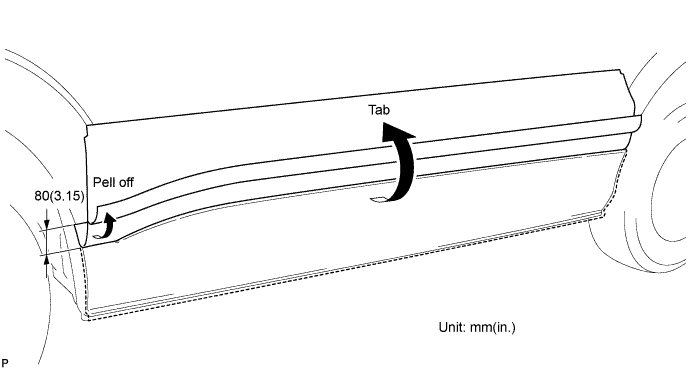
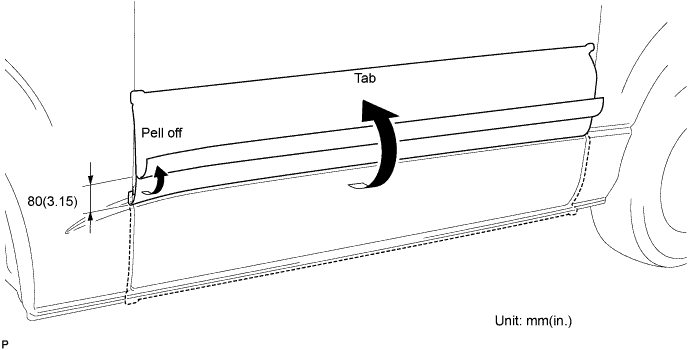
Raise the stripe tape and peel back approximately 80 mm(3.15in.) of the release paper.
-
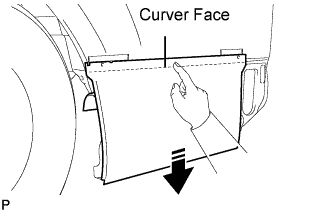
Hold the lower part of the stripe tape and lightly pull it downward to fit it to the upper section of the curved body surface. Do not apply the tape to the flat surface of the panel yet.
-
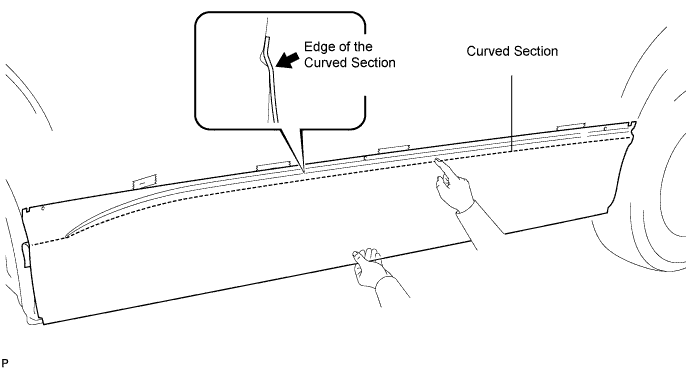
Temporarily apply the stripe tape to the curved section of the vehicle body.
-
Removing the release paper, temporarily apply the stripe tape to the flat face using your hands or the padded side of a squeegee proceeding in a gradual downward direction.
Note
Apply the tape in equal amount vertically while applying an even amount of pressure to the entire length of the tape in a horizontal direction.
-
Raise the upper edge of the stripe tape. Make sure that the adhesive face is not touching the body surface and fully install the stripe tape to the character line curve using the non-padded side of a squeegee.
-
Fully install the upper edge stripe tape firmly, using the padded side of a squeegee.
-
Remove the transparent protective film from the stripe tape.
-
Apply the tab of stripe tape.
Note
-
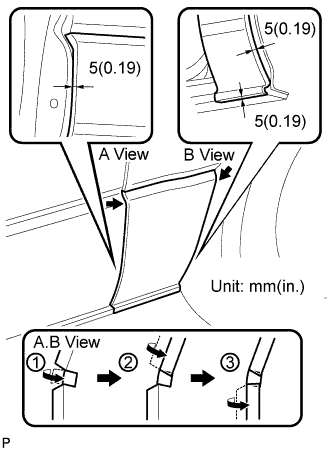
Using a squeegee, install the lower part of the stripe tape to the curved body portion of the vehicle door. Temporarily apply the tabs carefully with your hands.
-
Pull tabs "1", "2" and "3" lightly and make sure there is no looseness. Install tabs with your hands or a squeegee.
-
-
-
INSTALL SLIDE DOOR STRIPE (w/ Slide Door)
-
Put masking tape on the locations indicated in the illustration below.
-
Measure the correct distance from the bottom of the hemming edge and put marks on the pieces of masking tape.
-
Remove release paper from the upper portion of the stripe tape as shown in the illustration, starting from the rear end of the tape to location C.
Tech Tips
Install tape from the rear of the vehicle.
-
Temporarily set the body stripe tape to the vehicle surface with its upper edge attached to the markings, and its outer line of the right and left slits aligned with the vertical line of the slits between the doors and vehicle body.
-
Remove remaining release paper from the upper edge and temporarily attach the stripe tape to the markings.
-
Temporarily apply the entire body stripe tape, avoiding air bubbles and/or looseness.
Note
Do not fit the stripe tape to the curve of the character line. (If so, the stripe tape cannot be installed correctly.)
-
Raise the stripe tape and peel back approximately 80 mm(3.15in.) of the release paper.
-
Hold the lower part of the stripe tape and lightly pull it downward to fit it to the upper section of the curved body surface. Do not apply the tape to the flat surface of the panel yet.

-
Temporarily apply the stripe tape to the curved section of the vehicle body.
-
Removing the release paper, temporarily apply the stripe tape to the flat face using your hands or the padded side of a squeegee proceeding in a gradual downward direction.
Note
Apply the tape in equal amount vertically while applying an even amount of pressure to the entire length of the tape in a horizontal direction.
-
Raise the upper edge of the stripe tape. Make sure that the adhesive face is not touching the body surface and fully install the stripe tape to the character line curve using the non-padded side of a squeegee.
-
Fully install the upper edge stripe tape firmly, using the padded side of a squeegee.
Note
Using a squeegee, install the lower part of the stripe tape to the curved body portion of the vehicle door. Temporarily apply the tabs carefully with your hands.
-
Remove the transparent protective film from the stripe tape.
-
Apply the tab of stripe tape.
Note
-
Tab width is narrow. First, temporarily apply tab with your hands, and then fully install it using the non-padded side of a squeegee.
-
Install tabs at the corer as shown in the illustration. Pull the tabs "1", "2" and "3" lightly to make sure there is no looseness before firmly installing them.
-
-
-
INSTALL SLIDE DOOR LOWER STRIPE (w/ Slide Door)
-
Remove the release paper and install the 2 slide door lower stripes to the positions indicated in the illustration.
-
Remove the transparent protective film from the stripe tape.
-
-
INSTALL SLIDE DOOR STRIPE (w/ Slide Door)
-
Remove the release paper and install the 2 slide door stripes to the positions indicated in the illustration.
-
Remove the transparent protective film from the stripe tape.
-
-
INSTALL FRONT SIDE PANEL STRIPE (w/ Slide Door)
-
Attach masking tape for positioning along the extended line of the slide door parting line.
-
Remove release paper and excess portions of stripe tape leaving only protective film.
-
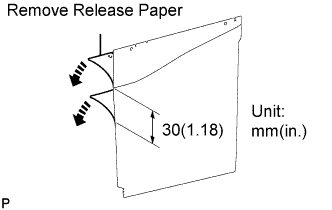
Remove and fold back approximately 30 mm(1.18 in.) of release paper.
-
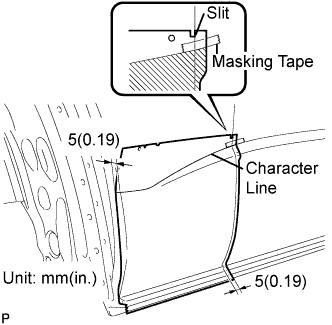
When positioning the stripe tape, temporarily attach the upper edge of the stripe tape to the lower edge of the masking tape. Also, set the outer line of the stripe tape slits so that it would align with the edge of the vehicle body.
-
Attach the stripe tape directly to the character line and temporarily apply the tape.
-
Hold the center of the stripe tape and check that both the right and left tabs are of 5 mm(0.19 in.)'s wide.
-
Removing the release paper, temporarily apply the flat surface with your hands or the padded side of a squeegee.
-
Using the non-padded side of a squeegee, fully install the upper portion of the stripe tape around the character line.
-
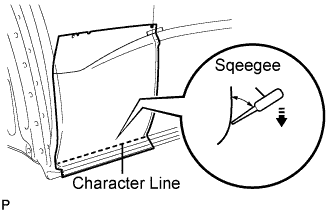
With release paper still attached to the lower edge of the stripe tape, fully install the tape all the way down to the bottom character line using the non-padded side of a squeegee.
-
Remove the release paper from the lower edge and temporarily apply the stripe tape.
-
Using the padded side of a squeegee, fully install the entire stripe tape firmly.
-
Remove the transparent protective film from the stripe tape.
-
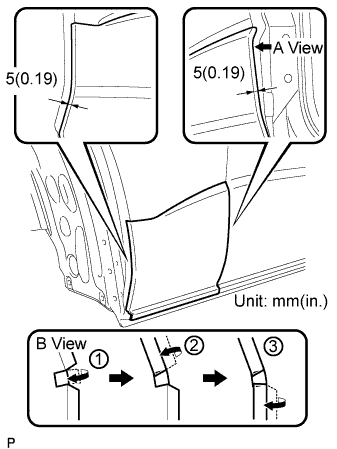
Install tabs as shown in the illustration.
Note
Pull tabs "1", "2" and "3" lightly and make sure there is no looseness. Install tabs with your hands or a squeegee.
-
-
INSTALL CENTER PILLAR STRIPE (W/ Slide Door)
-
Remove the release paper and attach the stripe tape to the location indicated in the illustration.
-
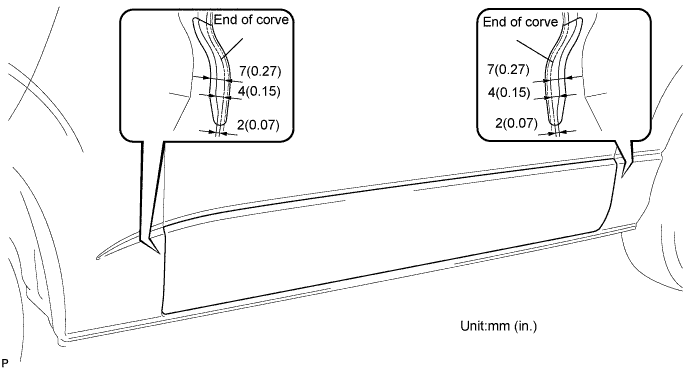
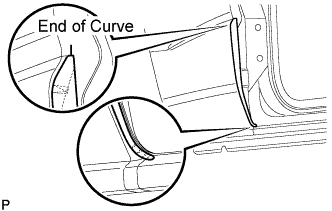
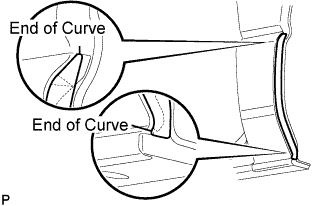
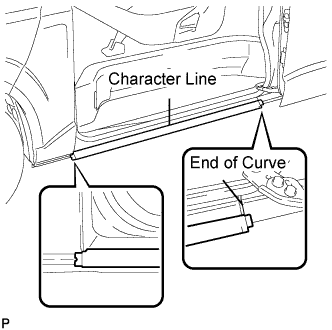
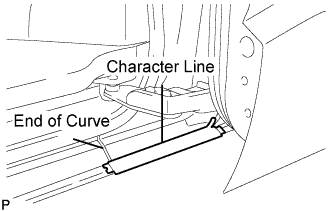
Attach the upper edge of the stripe tape to the parting line and attach the side edge to the end of the curve on the panel.
-
Finally install the center pillar stripe with your hands or a squeegee.
-
Remove the transparent protective film.
-
-
INSTALL QUARTER STRIPE (w/ Slide Door)
-
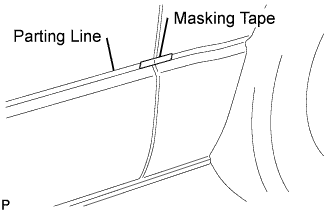
Attach masking tape for positioning along the extended line of the sliding door character line where the edge of the stripe tape would fit.
-
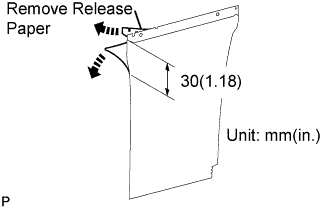
Remove release paper and excess portions of stripe tape from the upper edge, leaving only protective film.
-
Remove and fold back approximately 30 mm(1.18 in.) of release paper.
-
When positioning the stripe tape, temporarily attach the upper edge of the stripe tape to the lower edge of the masking tape. Also, set the outer line of the stripe tape slits so that it would align with the edge to the vehicle body.
-
Attach the stripe tape directly to the character line and temporarily apply it.
-
Hold the center of the stripe tape and check that both the right and left tabs are 5 mm(0.19in.) wide.
-
Removing release paper, temporarily apply the stripe tape to the flat surface with your hands or the padded side of a squeegee.
-
Using the non-padded side of a squeegee, fully install the upper portion of the stripe tape around the character line.
-

With release paper still attached to the bottom portion of the stripe tape, trace the character line with the non-padded side of a squeegee and install the tape firmly.
-
Remove the release paper from the bottom portion and temporarily apply the stripe tape.
-
Using the padded side of a squeegee, firmly install the entire stripe tape.
-
Remove the transparent protective film from the stripe tape.
-
Install tabs as shown in the illustration.
Note
Pull tabs "1", "2" and "3" lightly and make sure there is no looseness. Then install the tabs with your hands or a squeegee.
-
-
INSTALL QUARTER STRIPE FRONT LOWER (w/ Slide Door)
-
Remove release paper and attach quarter stripe front to the point indicated in the illustration.
-
Attach the upper edge of the stripe tape to the parting line and attach the outer edge to the end of curved of the panel.
-
Fully install the tape with your hands or a squeegee.
-
Remove the transparent protective film from the stripe tape.
-
-
INSTALL QUARTER STRIP REAR
-
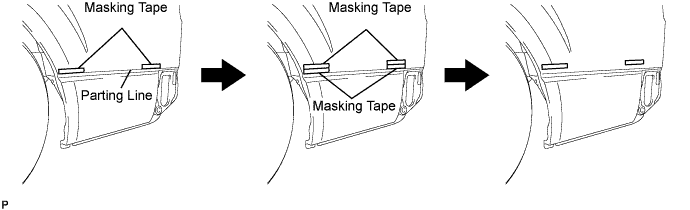
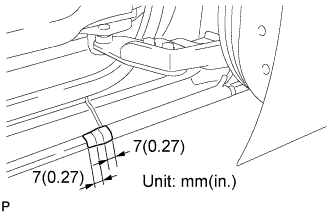
Attach the 2 pieces of masking tape 18 mm(0.70 in.) of wide along the parting line.
-
Attach 2 more pieces of masking tape 18 mm(0.70 in.) wide with their lower edges attached to the upper edges of the 2 pieces of tape previously attached in (a). Remove the bottom 2 pieces of masking tape.
-
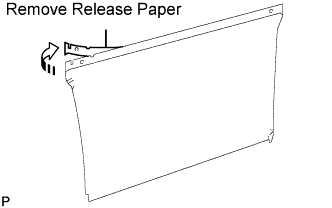
Remove the release paper from the upper portion of the stripe tape.
-
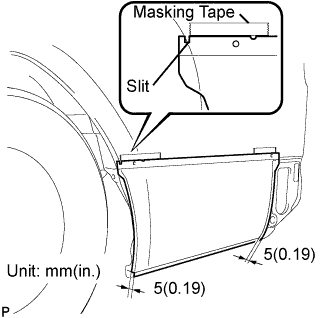
When positioning the stripe tape, temporarily attach the edge of the stripe tape to the masking tape and outside line of the slit.
-
Temporarily attach the upper part of the tape with your hands.
Note
Do not apply the stripe tape to the curved character line. (If so, the stripe tape cannot be installed correctly.)
-
After positioning the tape, hold the center part of the stripe tape and check that both the right and left tabs are 5 mm wide.
-
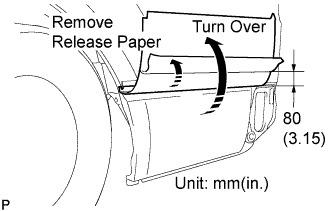
Raise the stripe tape and peel back approximately 80 mm (3.14 in.) of the release paper.
-
Hold the lower part of the stripe tape and lightly pull downward to fit it to the upper section of the curved body surface. Do not apply tape to the flat surface of the panel yet.
-
Temporarily apply the stripe tape to the curved section of the vehicle body.
-
Removing the release paper, temporarily apply the stripe tape to the flat face with your hands or the padded side of a squeegee.
-
Raise and remove the upper edge of the stripe tape.
-
Make sure that the adhesive face is not touching the body surface and fully install the stripe tape to the character line curve using the non-padded side of a squeegee.
-
Fully install the upper edge of the stripe tape firmly, using the padded side of a squeegee.
-
Remove the transparent protective film from the stripe tape.
-
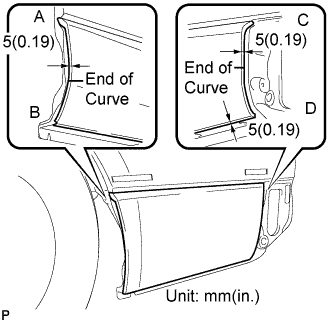
Pull the center, upper and lower tubs at section A to make sure there is no looseness, before finally installing them with your hands or a squeegee.
-
Attach and install tabs to sections B, C and D along the contour line of the vehicle body.
Note
At section D, install the lower edge of the stripe tape first and then overlap the side or underside tab.
-
-
INSTALL QUARTER REAR LOWER STRIPE
-
Remove release paper and attach quarter rear lower stripe to the position indicated in the illustration.
-
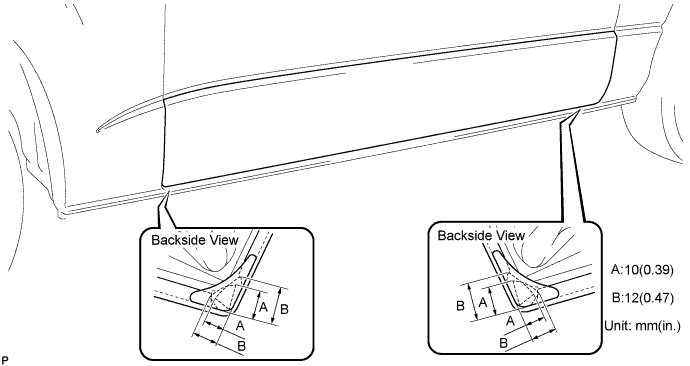
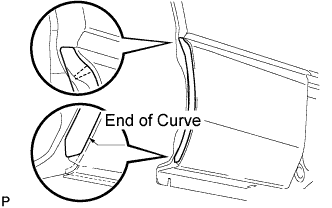
When positioning the stripe tape, attach the upper edge to the parting line and the side edge to the end of the curve of the panel.
-
Install the stripe tape firmly using your hands or a squeegee.
-
Remove the transparent protective film from the stripe tape.
-
-
INSTALL SIDE PANEL STRIPE (w/ Slide Door)
-
Attach the upper edge of the stripe tape to the character line indicated in the illustration.
-
Attach the both side of the stripe tape to the curve ends by the panel joint section.
-
Remove 1/3 of the release paper from the rear side of the stripe tape.
-
Attach the end of the stripe tape to the edge of the curved panel joint section.
-
Temporarily apply the stripe tape with the upper edge attached to the character line.
-
Completely remove the release paper. Temporarily apply the stripe tape all the way to the front side of the vehicle.
-
Divide the curved section on the panel into upper, center and lower parts. Conduct each installation taking care of radius.
Note
Follow the above procedure carefully to avoid air bubbles in the stripe tape.
-
Firmly install the entire surface of the stripe tape using the padded side of a squeegee.
Tech Tips
To avoid air bubbles, install small portion of the stripe tape at a time. Install approximately 300 mm(11.8 in.) at a time, while constantly adjusting the tape.
-
Remove the transparent protective film from the stripe tape.
-
-
INSTALL QUARTER STRIPE FRONT (w/ Slide Door)
-
Remove release paper from the quarter stripe front.
-
Attach the end of the stripe tape to the front side curve end of the panel joint section.
-
Attach the upper edge of the stripe tape directly to the character line.
-
Divide the tabs at the curved surface into upper, center and lower parts. Install the tape to the curved surface by section. Conduct each installation taking care of the radius.
-
Firmly install the entire surface of the stripe tape using the padded side of a squeegee.
Note
To keep the stripe tape from peeling, make sure the installation of the tape over the joint section is especially firm.
-
Remove the transparent protective film from the stripe tape.
-
-
INSTALL SIDE PANEL STRIPE (w/ Slide Door)
-
Remove the release paper and install the 2 side panel stripe to the positions indicated in the illustration.
-
Remove the transparent protective film from the stripe tape.
-
-
INSTALL SIDE MUDGUARD PROTECTOR FRONT LH
-
INSTALL REAR BUMPER