SLIDE DOOR (w/o Power Slide Door) REASSEMBLY

-
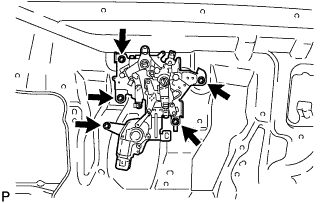
INSTALL SLIDE DOOR ROLLER ASSEMBLY LOWER
-
Install the slide door roller assembly lower with the 4 bolts.
- Torque:
- 19 N*m { 194 kgf*cm, 14 ft.*lbf }
-
-
INSTALL SLIDE DOOR HINGE ASSEMBLY CENTER
-
Install the slide door roller hinge assembly center with the 2 bolts.
- Torque:
- 19 N*m { 194 kgf*cm, 14 ft.*lbf }
-
-
INSTALL SLIDE DOOR ROLLER ASSEMBLY UPPER
-
Install the slide door roller assembly upper with the 2 bolts
- Torque:
- 11.5 N*m { 117 kgf*cm, 9 ft.*lbf }
-
-
INSTALL SLIDE DOOR SUB-ASSEMBLY
-
INSTALL SLIDE DOOR LOWER RAIL PLATE
-
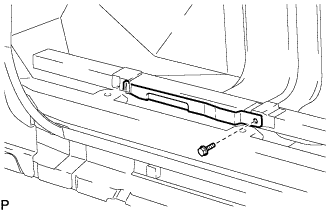
Install the slide door lower rail plate with the bolt.
-
-
INSTALL SLIDE DOOR UPPER RAIL CUSHION
-
Install the slide door upper rail cushion with the bolt.
-
-
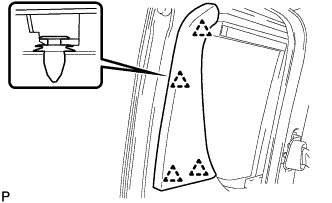
INSTALL SLIDE RAIL END MOULDING
-
Engage the clip and install the slide rail end moulding.
-
-
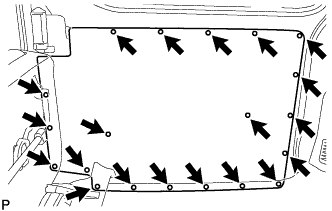
INSTALL REAR DOOR SCUFF PLATE
-
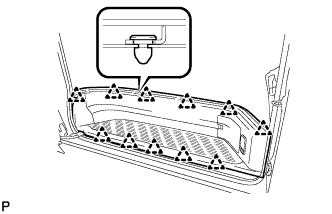
Engage the 11 clips, and install the rear door scuff plate.
-
-
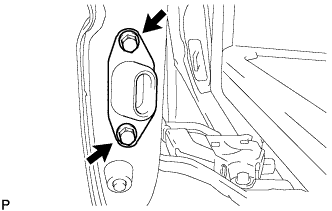
INSTALL SLIDE DOOR LOCK REMOTE CONTROL ASSEMBLY
-
Install the slide door lock remote control assembly with the 5 bolts.
- Torque:
- 5.5 N*m { 56 kgf*cm, 49 in.*lbf }
-
-
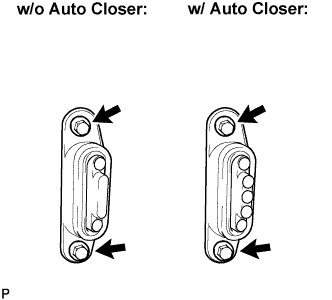
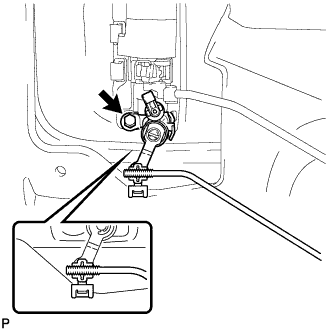
INSTALL POWER SLIDE DOOR LOCK ASSEMBLY (w/ Auto Closer)
-
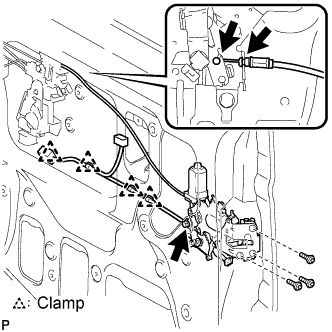
Using a "torx" socket wrench, install the 3 "torx" screws.
- Torque:
- 8.0 N*m { 82 kgf*cm, 71 in.*lbf }
-
Install the bolt.
-
Engage the wire harness and connect the cable.
-
-
INSTALL REAR DOOR LOCK ASSEMBLY (w/o Auto Closer)
-
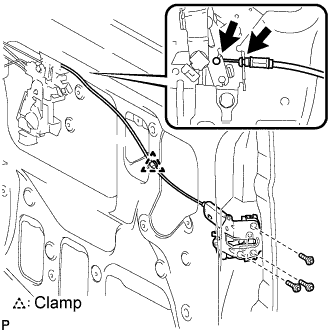
Using a "torx" socket wrench, install the 3 "torx" screws.
- Torque:
- 8.0 N*m { 82 kgf*cm, 71 in.*lbf }
-
Engage the wire harness and connect the cable.
-
-
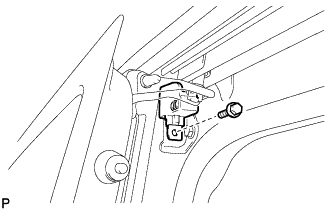
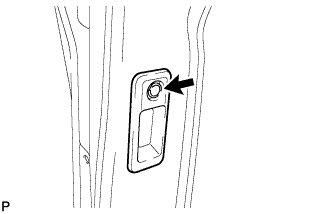
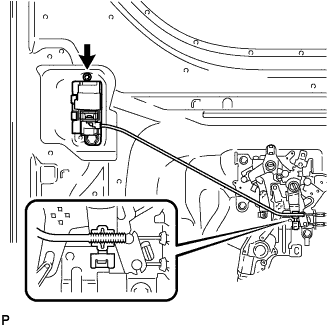
INSTALL SLIDE DOOR CLOSER RELAY (w/ Auto Closer)
-
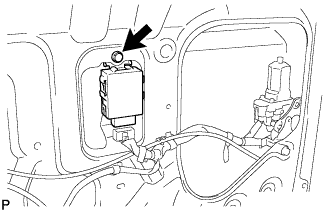
Install the slide door closer relay with the bolt.
-
Connect the connector.
-
-
INSTALL SLIDE DOOR FULL OPEN STOP LOCK ASSEMBLY
-
Install the slide door full open stop lock assembly with the 2 bolts.
-
Install the clamp.
-
-
INSTALL SLIDE DOOR DOWN FEMALE STOP
-
Install the slide door down female stop with the 2 bolts.
-
-
INSTALL SLIDE DOOR CONTROL JUNCTION FEMALE
-
Install the slide door control junction female with the 2 bolts.
-
Connect the connector.
-
-
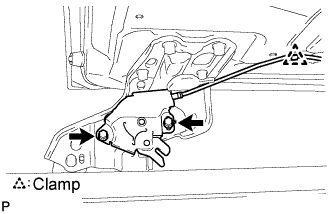
INSTALL SLIDE DOOR LOCK ASSEMBLY FRONT
-

Install the slide door lock assembly front with the 3 screws.
- Torque:
- 5.0 N*m { 51 kgf*cm, 44 in.*lbf }
-
Clamp the cable and install the end of the cable to the slide door lock remote control assembly front.
-
-
INSTALL REAR DOOR LOCK CHILD PROTECTION COVER (w/ Cover)
-
for Cover Type:
-
Install the rear door lock child protection cover with the clip.
-
-
for Tape Type:
Tech Tips
When installing the front door weatherstrip, heat the vehicle body using a heat light.
Note
Do not heat the vehicle body excessively.
-
Using a heat light, heat the vehicle body.
Heating Temperature Item Temperature Vehicle Body 40 to 60°C (104 to 140°F) -
Remove the double-sided tape from the vehicle body.
-
Wipe off any tape adhesive residue with cleaner.
-

Install a new rear door lock child protection cover.
-
-
-
INSTALL REAR DOOR OPEN CONTROL LINK ASSEMBLY (w/o Cover)
-
Install the rear door open control link assembly with the clip.
-
-
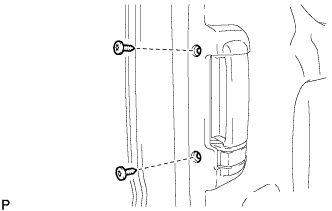
INSTALL REAR DOOR OUTSIDE HANDLE ASSEMBLY
-
Install the rear door outside handle assembly with the bolt.
- Torque:
- 5.5 N*m { 56 kgf*cm, 49 in.*lbf }
-
Connect the link.
-
Install the slide door lock cylinder assembly with the bolt.
- Torque:
- 5.5 N*m { 56 kgf*cm, 49 in.*lbf }
-
Connect the link.
-
-
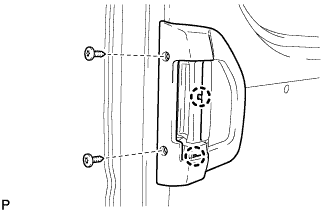
INSTALL REAR DOOR INSIDE HANDLE SUB-ASSEMBLY
-
Install the rear door inside handle sub-assembly with the 2 bolts.
-
Connect the link.
-
-
INSTALL SLIDE DOOR SERVICE HOLE NO.1 COVER
-
INSTALL REAR DOOR TRIM BOARD SUB-ASSEMBLY (w/ Auto Closer)
-
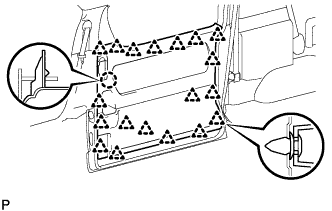
Engage the 19 clips and claw, and install the rear door trim board sub-assembly.
-
Using a "torx" socket wrench, install the 2 "torx" screws.
-
-
INSTALL REAR DOOR TRIM BOARD SUB-ASSEMBLY (w/o Auto Closer)
-
Install the rear door trim board sub-assembly with the 20 clips.
-
-
INSTALL SLIDE DOOR WINDOW GARNISH (w/ Auto Closer)
-
Engage the clips and install the slide door window garnish.
-
-
INSTALL DOOR LOCK CONTROL KNOB BEZEL (w/o Auto Closer)
-
Engage the claws and install the door lock control knob bezel.
-
Using a "torx" socket wrench, install the 2 "torx" screws.
-
-
INSPECT AND ADJUST SLIDE DOOR