STARTER (for 2.2 kW Type) REASSEMBLY

-
INSTALL PLANET CARRIER SHAFT SUB-ASSEMBLY
-
Install the 3 damper rubbers and the intermediate sealing to the planet carrier.
-
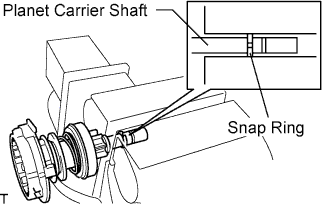
Install the planet carrier shaft to the planet carrier.
-
Install the washer to the planet carrier shaft.
-
Using a screwdriver and hammer, tap on a new snap ring.
-
-
INSTALL STARTER CLUTCH SUB-ASSEMBLY
-
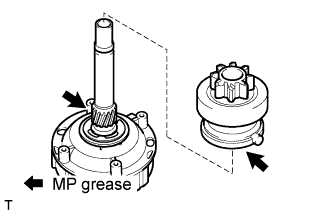
Apply MP grease to the spline of the starter clutch sub-assembly and planet carrier shaft.
-
Install the starter clutch to the planet carrier shaft.
-
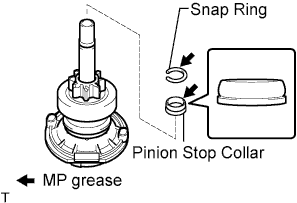
Apply MP grease to a new snap ring and the pinion stop collar.
-
Install the pinion stop collar and snap ring.
-
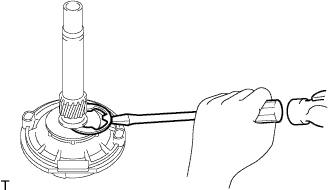
Using a vise, compress the snap ring.
-
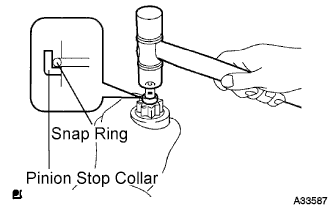
Using a plastic-faced hammer, lightly tap the planet carrier shaft while holding the outside of the starter clutch sub-assembly by hand until the pinion stop collar and snap ring are as shown in the illustration.
-
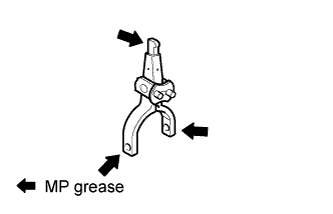
Apply MP grease to the pinion drive lever.
-
Install the starter clutch sub-assembly, pinion drive lever and cover to the starter drive housing.
-
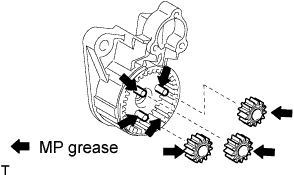
Apply MP grease to the planetary gears and pin parts of the planet carrier shaft.
-
Install the 3 planetary gears to the planet carrier.
-
-
INSTALL STARTER ARMATURE ASSEMBLY
-
Install the starter armature to the starter yoke.
-
-
INSTALL STARTER BRUSH HOLDER ASSEMBLY
Note
Do not drop the starter armature assembly.
-
Hold the starter yoke assembly between aluminum plates in a vise.
Note
Do not damage the starter yoke.
-
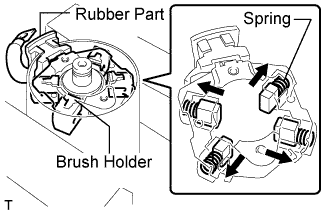
While compressing the springs, install the starter brush holder to the starter armature.
Note
Align the cutout of the starter yoke and the rubber part and install the starter brush holder.
-
Install the starter commutator end frame to the starter yoke.
-
Install the washer to the starter commutator end frame.
-
Apply MP grease to the slotted washer and install it.
-
Install the seal ring.
-
Install the starter commutator end frame cover to the starter commutator end frame with the 2 screws.
- Torque:
- 1.8 N*m { 18 kgf*cm, 16 in.*lbf }
-
-
INSTALL STARTER YOKE ASSEMBLY
-
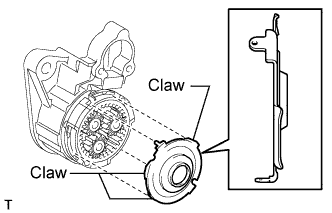
Fit the 3 claws of the plate into the 3 grooves of the planet carrier to install the plate to the planet carrier.
-
Install the cover ring to the planet carrier.
-
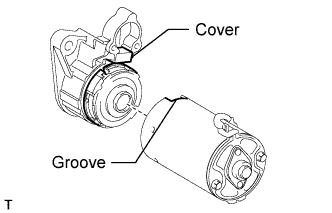
Align the groove of the starter yoke assembly with the cover to install the starter yoke assembly to the starter drive housing.
-
Install the 2 bolts.
- Torque:
- 4.8 N*m { 48 kgf*cm, 42 in.*lbf }
-
-
INSTALL MAGNET STARTER SWITCH ASSEMBLY
-
Apply MP grease to the hook.
-
Install the plunger to the pinion drive lever.
-
Install the return spring to the magnet starter switch assembly.
-
Using a T25 "TORX" socket wrench, install the magnet starter switch assembly with the 3 screws.
- Torque:
- 7.0 N*m { 71 kgf*cm, 62 in.*lbf }
-
Connect the lead wire to terminal C with the nut.
- Torque:
- 8.0 N*m { 82 kgf*cm, 71 in.*lbf }
-