IGNITION SYSTEM ON-VEHICLE INSPECTION

-
PERFORM SPARK TEST
-
Check for DTCs.
Note
If a DTC is present, perform troubleshooting procedures for that DTC.
-
Check if sparks occur.
-
Remove the front seat assembly (for Hi-back Seat Type : Click here (for Low-back Seat Type : Click here (for Split Bench Seat Type : Click here (for Center Seat Type : Click here.
-
Remove the front door scuff plate RH.
-
Remove the 5 bolts and the engine service hole cover.
-
Remove the ignition coil.
-
Remove the spark plug.
-
Install the spark plug to the ignition coil and connect the ignition coil connector.
-
Disconnect the 4 injector connectors.
-
Ground the spark plug.
-
Visually check that sparks occur while the engine is being cranked.
Note
-
Be sure to ground the spark plug before checking.
-
If the ignition coil has been struck or dropped, replace it.
-
Do not crank the engine for more than 2 seconds.
-
-
-
Spark test flowchart.
-
Check that the wire harness side connector of the ignition coil with igniter is securely connected.
Result Result Proceed to NG Connect securely OK Go to next step -
Perform spark test on each ignition coil with igniter.
-
Replace the ignition coil with igniter with a normal one.
-
Perform spark test again.
Result Result Proceed to OK Replace ignition coil with igniter NG Go to next step -
-
Check the power supply to ignition coil with igniter.
-
Turn the ignition switch ON.
-
Check that there is battery voltage at the ignition coil positive (+) terminal.
Result Result Proceed to NG Check wiring between engine switch and ignition coil with igniter OK Go to next step -
-
Check the camshaft position sensor.
-
Measure the resistance according to the value(s) in the table below.
Standard resistance 950 to 1250 Ω at 20°C (68°F) Result Result Proceed to NG Replace camshaft position sensor OK Go to next step -
-
Check the of crankshaft position sensor.
-
Measure the resistance according to the value(s) in the table below.
Standard resistance 1850 to 2450 Ω at 20°C (68°F) Result Result Proceed to NG Replace crankshaft position sensor OK Go to next step -
-
Check IGT signal from the ECM.
Result Result Proceed to NG Check ECM OK Repair wiring between ignition coil and ECM
-
-
Install the ignition coil.
-
Using a 16 mm plug wrench, install the spark plug.
- Torque:
- 18 N*m { 183 kgf*cm, 13 ft.*lbf }
-
Install the ignition coil.
- Torque:
- 9.0 N*m { 92 kgf*cm, 80 in.*lbf }
-
Install the engine service hole cover with the 5 bolts.
-
Install the front door scuff plate RH.
-
Install the front seat assembly (for Hi-back Seat Type : Click here (for Low-back Seat Type : Click here (for Split Bench Seat Type : Click here (for Center Seat Type : Click here.
-
-
-
CHECK SPARK PLUG (for Unleaded Gasoline Specification Vehicle)
Note
-
Do not use a wire brush for cleaning.
-
Do not attempt to adjust the electrode gap of a used spark plug.
-
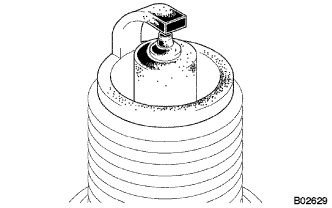
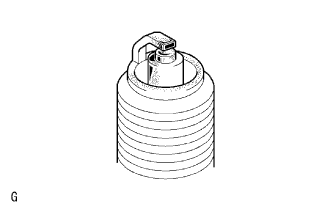
Check the electrode.
-
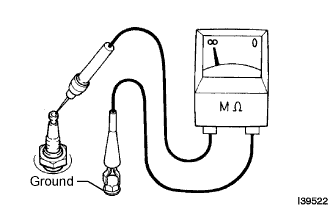
Using a megohmmeter, measure the insulation resistance.
Insulation resistance 10 MΩ or more Tech Tips
If a megohmmeter is not available, perform the following simple inspection instead.
-
-
Alternative inspection method.
-
Quickly accelerate the engine to 4,000 rpm 5 times.
-
Remove the spark plug.
-
Visually check the spark plug.
If the electrode is dry, the spark plug is functioning properly. If the electrode is damp, proceed to the next step.
-
-
Check the spark plug for any damage to its threads and insulator.
If there is damage, replace the spark plug. If not, reinstall the spark plug.
Recommended spark plug Manufacture Product DENSO made SK20HR-A11 -
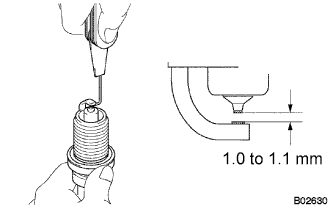
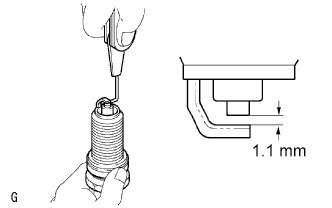
Check the spark plug electrode gap.
Maximum electrode gap for used spark plug 1.3 mm (0.051 in.) If the gap is greater than the maximum, replace the spark plug.
Electrode gap for new spark plug 1.0 to 1.1 mm (0.039 to 0.043 in.) Note
When adjusting the gap of a new spark plug, bend only the base of the ground electrode. Do not touch the tip. Never attempt to adjust the gap of a used plug.
-
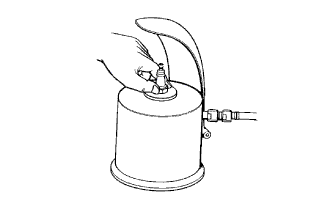
Clean the spark plugs.
If the electrode has traces of wet carbon, clean the electrode with a spark plug cleaner and then dry it.
Air pressure 588 kPa (6 kgf*cm2, 85 psi) Duration 20 seconds or less Tech Tips
Only use the spark plug cleaner when the electrode is free of oil. If the electrode has traces of oil, use gasoline to clean off the oil before using the spark plug cleaner.
-
-
CHECK SPARK PLUG (for Leaded Gasoline Specification Vehicle)
-
Check the electrode.
-
Using a megohmmeter, measure the insulation resistance.
Insulation resistance 10 MΩ or more Tech Tips
If a megohmmeter is not available, perform the following simple inspection instead.
-
-
Alternative inspection method:
-
Quickly accelerate the engine to 4,000 rpm 5 times.
-
Remove the spark plug.
-
Visually check the spark plug.
If the electrode is dry, the spark plug is functioning properly. If the electrode is damp, proceed to the next step.
-
-
Check the spark plug for any damage to its threads and insulator.
If there is damage, replace the spark plug. If not, reinstall the spark plug.
Recommended spark plug Manufacture Product DENSO made K20HR-U11 NGK made LFR6C-11 -
Check the spark plug electrode gap.
Maximum electrode gap for used spark plug 1.3 mm (0.051 in.) If the gap is greater than the maximum, replace the spark plug.
Electrode gap for new spark plug 1.1 mm (0.043 in.) Note
When adjusting the gap of a new spark plug, bend only the base of the ground electrode. Never attempt to adjust the gap of a used plug.
-
Clean the spark plugs.
If the electrode has traces of wet carbon, clean the electrode with a spark plug cleaner and then dry it.
Air pressure 588 kPa (6 kgf*cm2, 85 psi) Duration 20 seconds or less Tech Tips
Only use the spark plug cleaner when the electrode is free of oil. If the electrode has traces of oil, use gasoline to clean off the oil before using the spark plug cleaner.
-