INTERCOOLER INSTALLATION

-
INSTALL INTERCOOLER ASSEMBLY
-
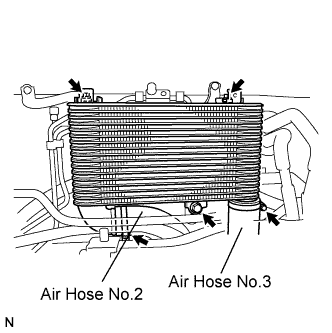
Temporarily install the intercooler assembly with the 3 bolts.
-
Connect the air hose No.2, and tighten the clamp.
-
Connect the air hose No.3, and tighten the clamp.
-
Tighten the intercooler assembly.
- Torque:
- 18 N*m { 180 kgf*cm, 13 ft.*lbf }
- 6.0 N*m { 61 kgf*cm, 53 in.*lbf }
-
-
INSTALL RADIATOR UPPER SUPPORT
-
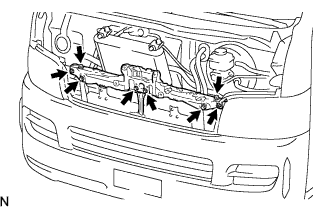
Install the radiator upper support with the 6 bolts and 2 screws.
- Torque:
- 5.5 N*m { 56 kgf*cm, 49 in.*lbf }
Tech Tips
If the position of the radiator upper support goes out of alignment while installing it, remove the front bumper and adjust the hood lock brace and bumper stay.
-
-
INSTALL HOOD LOCK ASSEMBLY
-
Connect the hood lock cable assembly to the hood lock assembly.
-
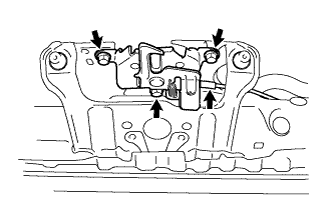
Temporarily tighten the hood lock assembly with the 3 bolts from the radiator upper support.
-
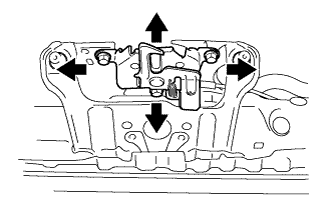
Check the hood position and adjust the hood lock assembly position.
-
Tighten the hood lock assembly with the 3 bolts.
- Torque:
- 12 N*m { 122 kgf*cm, 9 ft.*lbf }
-
-
INSTALL RADIATOR RESERVE TANK ASSEMBLY
-
Connect the water by-pass hose No.2 with the clip.
-
Connect the water by-pass hose No.1 with the clip.
-

Place the reserve tank in the 2 grommets of the radiator upper support, and install the radiator reserve tank assembly with the bolt.
- Torque:
- 7.0 N*m { 71 kgf*cm, 62 in.*lbf }
-
-
INSTALL WINDSHIELD WASHER JAR ASSEMBLY (w/o Rear Wiper)
-
Connect the connector and hose.
-
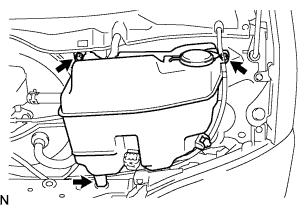
Install the wind washer jar assembly with the 2 bolts.
- Torque:
- 4.9 N*m { 50 kgf*cm, 43 in.*lbf }
-
-
INSTALL WINDSHIELD WASHER JAR ASSEMBLY (w/ Rear Wiper)
-
Connect the 2 connectors and 2 hoses.
-
Install the wind washer jar assembly with the 2 bolts.
- Torque:
- 4.9 N*m { 50 kgf*cm, 43 in.*lbf }
-
-
ADD WINDSHIELD WASHER FLUID
-
INSTALL AIR INLET DUCT
-
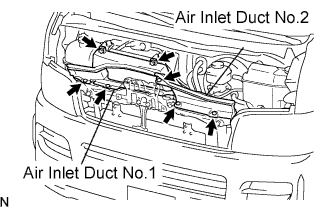
Install the air inlet duct No.1 with the 2 bolts and 2 clips.
- Torque:
- 7.0 N*m { 71 kgf*cm, 62 in.*lbf }
-
Install the air inlet duct No.2 with the 3 clips.
-
-
INSTALL RADIATOR GRILLE
-
ADD ENGINE COOLANT
-
Firmly tighten the drain plugs and fill the radiator reserve tank assembly with coolant to the top of the inlet.
-
Loosen the bleeder plug of outlet housing.
-
When air is bled and the coolant drains out, firmly install the bleeder plug.
-
Add coolant up to the B line mark in the radiator reserve tank assembly and install the radiator cap.
Coolant capacity Condition Capacity w/ rear heater 17.0 liters (18.0 US qts, 15.0 imp. qts) w/o rear heater 15.0 liters (15.9 US qts, 13.2 imp. qts) -
Warm up the engine.
-
After the engine cools down check that the coolant level is between the LOW and FULL level marks.
-
-
CHECK FOR ENGINE COOLANT LEAKS
-
INSTALL ENGINE UNDER COVER NO.1 (w/ Engine Under Cover No.1)
- Torque:
- 13 N*m { 133 kgf*cm, 10 ft.*lbf }