FUEL INJECTOR INSTALLATION

-
INSTALL INJECTOR ASSEMBLY
-
Apply a light coat of grease or gasoline to new O-rings and install them to the injector spacers.
Note
Make sure that the O-rings are installed between the parts correctly.
-
Install the injection spacers.
-
Apply a light coat of grease or gasoline to the place where the delivery pipe touches the O-ring.
-
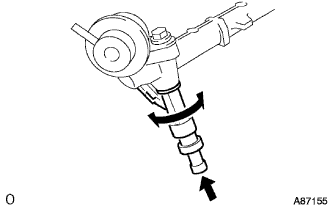
To install the fuel injector into the fuel delivery pipe, push the fuel injector while twisting it right and left.
Note
-
Be careful not to twist the O-ring.
-
After installing the fuel injector, check that it turns smoothly. If not, reinstall it with a new O-ring.
-
-
-
INSTALL FUEL DELIVERY PIPE SUB-ASSEMBLY
-
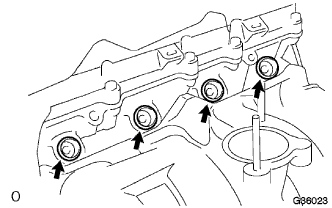
Install the 4 spacers to the cylinder head.
-
Install the delivery pipe spacers.
-
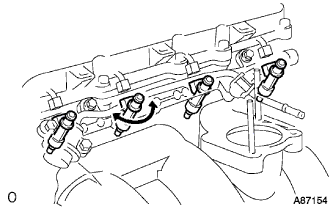
Temporarily install the 2 bolts and fuel delivery pipe together with the 4 injectors.
Note
-
Do not drop the fuel injector when installing the fuel delivery pipe.
-
Make sure that the fuel injector turns smoothly.
-
-
Fully tighten the 2 bolts.
- Torque:
- 12 N*m { 122 kgf*cm, 10 ft.*lbf }
-
Apply a light coat of grease or gasoline to the place where the delivery pipe touches the O-ring.
-
Install the 2 bolts and pressure pulsation damper assembly.
- Torque:
- 8.5 N*m { 87 kgf*cm, 75 in.*lbf }
-
Connect the 2 fuel hoses.
-
-
INSTALL FUEL HOSE
-
Align the connector and pipe. Push on the connector until the retainer locks with a click sound. Click here
-
Pull the connector to check that the connector is securely connected. Click here
-
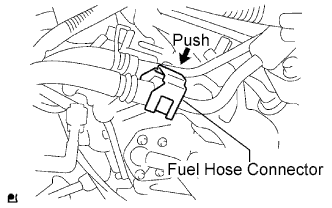
Install the connector and lock it with the fuel hose connector cover. Click here
-
-
INSTALL THROTTLE BODY ASSEMBLY
-
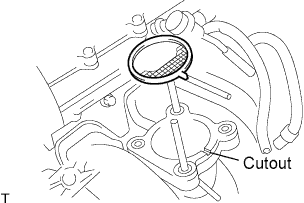
Install a new gasket onto the intake manifold.
Tech Tips
Fit the gasket to the cutout of the intake manifold.
-
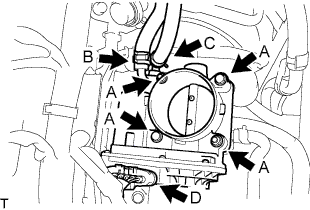
for Type A:
Install the throttle body assembly with the 2 bolts and 2 nuts. (A)
- Torque:
- 9.0 N*m { 92 kgf*cm, 80 in.*lbf }
-
for Type B:
Install the throttle body assembly with the 4 bolts. (A)
- Torque:
- 9.0 N*m { 92 kgf*cm, 80 in.*lbf }
-
Connect the water by-pass hose, and slide the clamp to secure it. (B)
-
Connect the No. 2 water by-pass hose, and slide the clamp to secure it. (C)
-
Connect the throttle motor connector. (D)
-
-
INSTALL INTAKE AIR CONNECTOR
-
Temporarily install the intake air connector to the throttle body assembly.
-
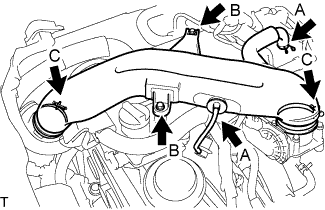
Connect the No. 2 ventilation hose and vacuum hose, and slide the clamp to secure it. (A)
-
Install the intake air connector with the 2 bolts. (B)
- Torque:
- 8.0 N*m { 82 kgf*cm, 71 in.*lbf }
-
Tighten the 2 hose clamp bolts. (C)
- Torque:
- 5.0 N*m { 51 kgf*cm, 44 in.*lbf }
-
-
INSTALL ENGINE SERVICE HOLE SUB COVER SUB-ASSEMBLY
-
Install the engine service hole sub cover with the 5 bolts.
- Torque:
- 13 N*m { 133 kgf*cm, 10 ft.*lbf }
-
-
INSTALL FRONT DOOR SCUFF PLATE RH
-
INSTALL FRONT SEAT ASSEMBLY RH (for Hi-back Seat Type)
-
Perform the same procedure as above on the opposite side. Click here
-
-
INSTALL FRONT SEAT ASSEMBLY RH (for Low-back Seat Type)
-
Perform the same procedure as above on the opposite side. Click here
-
-
ADD ENGINE COOLANT
-
Firmly tighten the drain plugs and fill the reservoir tank with coolant to the top of the inlet.
-
Remove the 2-way that is located near the throttle body.
-
When air is bled and the coolant drains out, firmly install the 2-way.
-
Add coolant up to the B line mark in the reservoir tank and install the radiator cap.
Coolant Capacity Condition Capacity w/ front and rear heaters 13.6 liters (14.4 US qts, 12.0 lmp. qts) w/ front heater 11.6 liters (12.3 US qts, 10.2 lmp. qts) w/o heater 10.6 liters (11.2 US qts, 9.3 lmp. qts) -
Warm up the engine.
-
After the engine cools down, check that the coolant level is between the LOW and FULL level marks.
-
-
CHECK FOR ENGINE COOLANT LEAKAGE
-
Check that the engine coolant level is between the LOW and FULL lines when the engine is cold. If the engine coolant level is low, check for leaks and add "TOYOTA Super Long Life Coolant (SLLC)" or similar high quality ethylene glycol based non-silicate, non-amine, non-nitrite and non-borate coolant with long-life hybrid organic acid technology to the FULL line.
Note
Do not substitute plain water for engine coolant.
-
-
CONNECT BATTERY NEGATIVE CABLE
-
INSPECT FOR FUEL LEAKS
-
When using the intelligent tester
-
Connect the intelligent tester to the DLC3.
-
Turn the ignition switch to the on position and intelligent tester main switch ON.
Note
Do not start the engine.
-
Select the Active Test mode on the intelligent tester.
Tech Tips
Please refer to the intelligent tester operator's manual for further details.
-
-
When not using the intelligent tester.
-
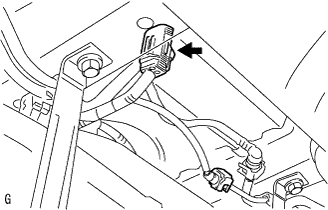
Disconnect the fuel pump connector.
-
Using a service wire, connect terminals FP and +B of the relay block.
Note
Pay attention to the terminal connecting position to avoid a malfunction.
-
Turn the ignition switch to the ON position, and check that the fuel pump operates.
Note
Do not start the engine.
-
-
Check that there are no fuel leaks anywhere on the fuel system after doing maintenance.
-
Check that the pulsation damper screw rises up when the fuel pump operates.
If operation is not as specified, check the following parts:
-
Fusible link
-
Fuel pump
-
Wiring connections
-
ECM
-
Fuses
-
-
Turn the ignition switch off.
-
Disconnect the intelligent tester from the DLC3.
-