ECM INSTALLATION

Note
When the ECM is replaced, all of the existing injector compensation codes must be input into the new ECM and the learning value of the fuel supply pump assembly must be initialized.
-
INSTALL NO. 2 ECM BRACKET
-
Install the No. 2 ECM bracket with the 2 screws.
- Torque:
- 3.0 N*m { 31 kgf*cm, 27 in.*lbf }
-
-
INSTALL NO. 1 ECM BRACKET
-
Install the No. 1 ECM bracket with the 3 screws.
- Torque:
- 3.0 N*m { 31 kgf*cm, 27 in.*lbf }
-
-
INSTALL ECM
-
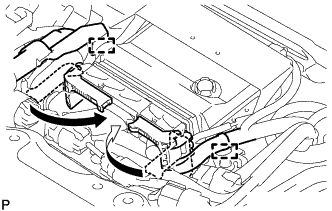
Install the ECM, connect the 2 ECM connectors and lower the 2 levers.
Note
-
When connecting a ECM connector, make sure that dirt, water and other foreign matter is not stuck between the ECM connector and ECM.
-
Make sure that the 2 levers are securely lowered.
-
-
Attach the 2 wire harness clamps to the No. 1 ECM bracket and No. 2 ECM bracket.
-
Install the 3 bolts to the ECM.
- Torque:
- 5.5 N*m { 56 kgf*cm, 49 in.*lbf }
Note
Do not use an ECM that has been dropped or subjected to a strong impact.
-
Return the floor carpet to its original position.
-
-
INSTALL FRONT SEAT ASSEMBLY RH
-
for Hi-back Seat Type Click here
-
for Low-back Seat Type Click here
-
for Split Bench Seat Type Click here
-
-
INSTALL FRONT DOOR SCUFF PLATE RH
-
Attach the 5 clips to install the front door scuff plate RH.
-
-
CONNECT CABLE TO NEGATIVE BATTERY TERMINAL
-
PERFORM REGISTRATION
-
Perform registration.
-
w/ DPF: Click here
-
w/o DPF: Click here
Tech Tips
Only perform registration when the ECM is replaced, either by itself or in any of the following combinations.
-
ECM and Fuel Supply Pump Assembly
-
ECM and Diesel Throttle Body Assembly
-
ECM and Injector Assembly
-
ECM and Engine Assembly
-
-
-
START ENGINE
-
When replacing the ECM, start the engine to initialize the new ECM.
-
w/ DPF: Click here
-
w/o DPF: Click here
-
-