HEADLIGHT ASSEMBLY ADJUSTMENT

-
HEADLIGHT AIM ONLY
Tech Tips
-
Perform aiming adjustment with low-beam.
-
Since the low-beam light and the high-beam light are a unit, if aiming on either side is correct, the other side should also be correct.
However, check both beams just to make sure.
-
Prepare the vehicle in the following conditions.
-
Check that any damage or deformation does not exist on the body around the headlights.
-
Fuel tank is full.
-
The tire inflation pressure is at the specified level Click here.
-
Vehicle is parked on a level surface.
-
A person having an average weight (75 kg ) sits in the driver's seat.
-
Vehicle is bounced up and down to stabilize the suspension to the normal position.
-
-
Prepare a thick white paper (Draw base lines).
Tech Tips
-
Stand the paper perpendicularly against a wall.
-
The base lines differ for "Low-beam inspection" and "High-beam inspection".
-
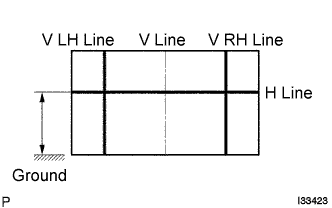
V line (Vehicle Center position)
Draw a vertical line down the center of the paper in order to align it with the center of the vehicle.
-
H line (Headlight height)
Draw a horizontal line across the paper at the same height from the ground as the center mark for the low-beam lights.
-
V LH line, V RH line (Center mark position of right and left headlights)
Draw vertical lines, for left & right, at the same position as the center mark for the low-beam lights.
Tech Tips
Follow the same procedures when adjusting the high-beam lights.
-
-
Check the headlight aiming.
-
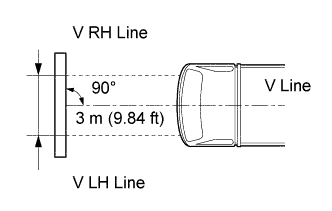
Align the position of the paper and vehicle.
-
Make the distance of 3 m (9.84 ft) between the headlights and the paper, and put the paper on the wall with the H line being at the same height as the center mark.
-
Align the center of the vehicle with the V line on the paper, and ensure that the paper is at a 90°C angle in accordance with the V line.
-
-
Start the engine.
-
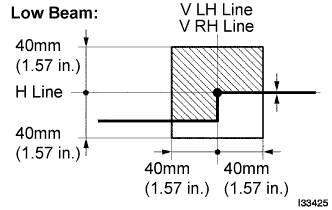
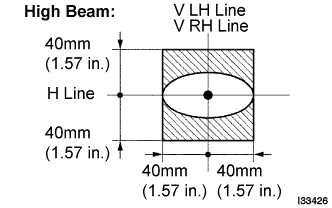
Turn on the headlights and check that the aim is with in the specified values shown in the illustration.
Note
-
When covering the headlights, finish it within 3 minutes.
-
The headlight lens is made of synthetic resin, so it is easily.
Tech Tips
When checking the aiming on one side, shut off the other side.
-
-
-
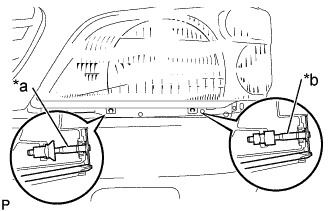
Text in Illustration *a Bolt A *b Bolt B Adjust the aiming in the vertical direction: Using a screwdriver, adjust the headlight aim to within the specified range by turning the adjusting screw A.
Note
-
Adjust the headlight aim by turning the screw in the tightening direction.
-
When the screw is tightened excessively, loosen it once and re?tighten it to adjust the headlight aim.
Tech Tips
The optical axis aim moves downward when turning the screwdriver clockwise, and it moves upward when turning the screwdriver counterclockwise.
-
-
Adjust the aim in the horizontal direction: Using a screwdriver, adjust the headlight aim into the specified range by turning the adjusting screw B.
Note
-
Adjust the headlight aim by turning the screw in the tightening direction.
-
When the screw is tightened excessively, loosen it once and re?tighten it to adjust the headlight aim.
-
-