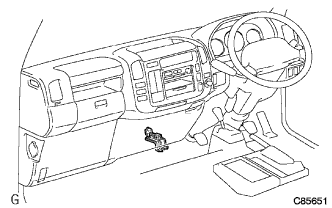
FRONT AIRBAG SENSOR INSTALLATION

-
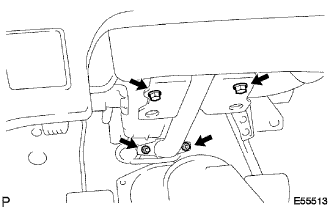
INSTALL AIR BAG SENSOR ASSEMBLY NO. 2
-
Check that the ignition switch turn OFF.
-
Check that the battery negative terminal is disconnected.
Note
Do not start the operation for 90 seconds after removing the terminal.
-
Install the airbag sensor assembly No. 2 with the 3 torx screws.
- Torque:
- 20 N*m { 200 kgf*cm, 14 ft.*lbf }
-
Connect the connector to the airbag sensor assembly No. 2.
-
Check that no play is identified.
-
-
INSPECT AIR BAG SENSOR ASSEMBLY NO. 2
-
Do a diagnostic system check Click here.
-
-
INSTALL SEAT AIR BAG NO. 1 COVER RH
-
Install the 2 bolts and seat airbag No. 1 cover RH.
- Torque:
- 20 N*m { 200 kgf*cm, 14 ft.*lbf }
-
-
INSTALL HEATER RADIATOR ASSEMBLY
-
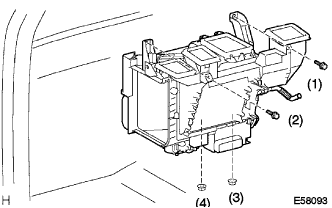
Install the heater radiator assembly with the 2 bolts and 2 nuts.
Tech Tips
Tighten in the following order.
-
-
INSTALL AIR DUCT SUB-ASSEMBLY NO. 1
-
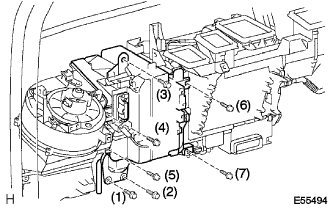
Install the air duct sub-assembly No. 1 with the 3 bolts and 4 screws.
Tech Tips
Tighten in the following order.
-
-
INSTALL INSTRUMENT PANEL REINFORCEMENT
-
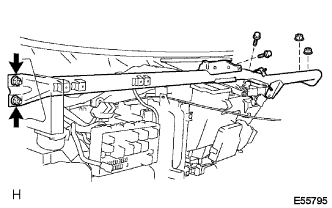
Install the instrument panel reinforcement with the 2 bolts and 4 nuts.
-
-
INSTALL STEERING COLUMN TUBE ASSEMBLY LOWER
-
Install the steering column tube sub-assembly lower with the 2 bolts and 2 nuts.
-
-
INSTALL STEERING COLUMN ASSEMBLY
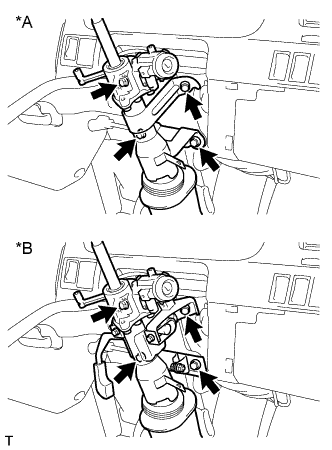
-
Install the 4 bolts and steering column assembly.
Text in Illustration *A Non-Tilt Steering Column *B Tilt Steering Column - Torque:
- 11.5 N*m { 117 kgf*cm, 9 ft.*lbf }
-
Install the 2 bolts and clamp bracket.
-
-
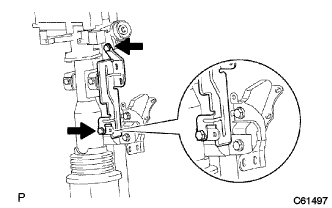
INSTALL STEERING COLUMN TUBE LOWER
- Torque:
- 8 N*m { 82 kgf*cm, 71 in.*lbf }
-
INSTALL INSTRUMENT PANEL BRACE SUB-ASSEMBLY NO. 1
-
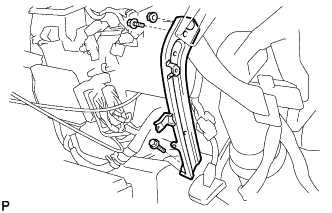
Install the instrument panel brace sub-assembly with the 2 bolts and nut.
-
-
INSTALL INSTRUMENT PANEL SUB-ASSEMBLY
-
CENTER SPIRAL CABLE
-
INSTALL STEERING WHEEL ASSEMBLY
-
Align the matchmarks on the steering wheel assembly with the one on the steering main shaft.
-
Install the steering wheel set nut.
- Torque:
- 50 N*m { 510 kgf*cm, 37 ft.*lbf }
-
-
STEERING WHEEL CENTER POINT
-
INSTALL HORN BUTTON ASSEMBLY
-
INSPECT HORN BUTTON ASSEMBLY
-
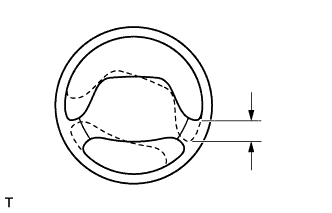
Stop the vehicle and face the tires straight ahead.
-
Move the steering wheel gently up and down with your hand, check the steering wheel free play.
Maximum free play 40mm (1.57 in.)
-
-
INSPECT SRS WARNING LIGHT
-
ADD COOLANT
-
Slowly fill the system with coolant.
-
Use of improper coolants may damage engine cooling system.
-
Use "Toyota Long Life Coolant" or equivalent and mix it with plan water according to the manufacturer's directions.
-
Using of coolant which includes more than 50 % [freezing protection down to -35°C (-31°F)] or 60 % [freezing protection down to -50°C (-58°F)] of ethylene-glycol is recommended but not more than 70 %.
Note
-
Do not use an alcohol type coolant or plain water alone.
-
The coolant should be mixed with plain water (preferably demineralized water or distilled water).
Capacity: Independent Front Suspension Rigid Front Suspension w/ Front heater 10.7 liters
(11.3 US qts, 9.4 Imp. qts)
10.9 liters
(11.5 US qts, 9.6 Imp. qts)
w/o heater 9.8 liters
(10.4 US qts, 8.6 Imp. qts)
10 liters
(10.6 US qts, 8.8 Imp. qts)
w/ Front and Rear heater 11.5 liters
(12.2 US qts, 10.1 Imp. qts)
11.7 liters
(12.3 US qts, 10.3 Imp. qts)
-
-
Reinstall the radiator cap.
-
Start the engine, and bleed the cooling system.
-
Refill the radiator reservoir with coolant until it reaches the "full" line.
-
-
INSPECT CHECK ENGINE COOLANT LEAK
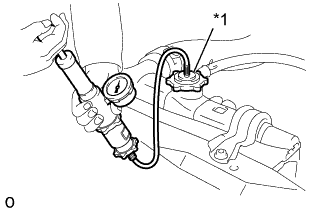
Text in Illustration *1 Radiator Cap Tester
-
Fill the radiator with coolant and attach a radiator cap tester.
-
Warm up the engine.
-
Pump it to 118 kPa (1.2 kgf/cm2, 17.1 psi), and check that the pressure does not drop.
If the pressure drops, check the hoses, radiator or water pump for leaks. If no external leaks are found, check the heater core, cylinder block and head.
-
-
WARM UP ENGINE