AIR CONDITIONING UNIT INSTALLATION

-
INSTALL AIRMIX DAMPER CONTROL CABLE SUB-ASSEMBLY
-
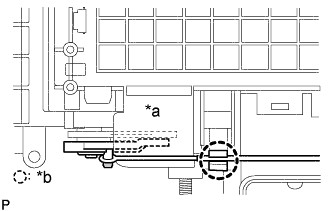
Text in Illustration *a COOL *b Clamp Connect the heater control cable to the heater control assembly, keep the condition of MAX COOL remaining.
-
Install the inner cable to the control lever in MAX COOL position.
-
Install the outer cable to the clamp while slightly pulling it to the direction shown by arrow in the illustration.
Note
When operating the mode control lever, check that the restraint exists at the both ends of MAX COOL and MAX HOT, and no repulsion occurs.
-
-
INSTALL HEATER CONTROL CABLE SUB-ASSEMBLY
-
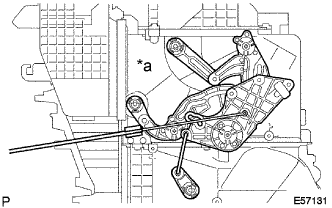
Text in Illustration *a DEF Connect the heater control cable to the heater control assembly, keep the condition of DEF remaining.
-
Install the inner cable to the control lever in DEF position.
-
Install the outer cable to the clamp while slightly pulling it to the direction shown by arrow in the illustration.
Note
When operating the mode control lever, check that the restraint exists at the both ends of FACE and DEF, and no repulsion occurs.
-
-
INSTALL HEATER RADIATOR ASSEMBLY
-
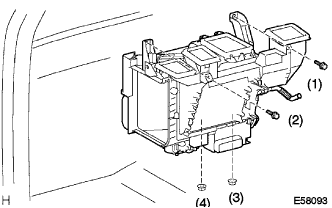
Install the heater radiator assembly with the 2 bolts and 2 nuts.
Tech Tips
Tighten in the following order.
-
-
INSTALL AIR DUCT SUB-ASSEMBLY NO. 1
-
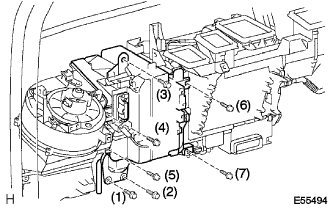
Install the air duct sub-assembly No. 1 with the 3 bolts and 4 screws.
Tech Tips
Tighten in the following order.
-
-
INSTALL INSTRUMENT PANEL REINFORCEMENT
-
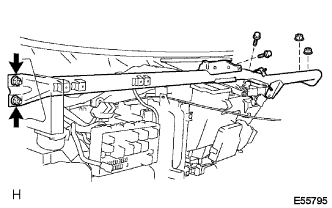
Install the instrument panel reinforcement with the 2 bolts and 4 nuts.
-
-
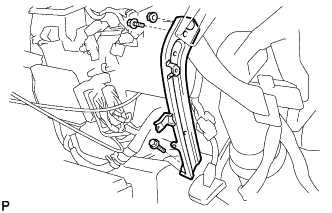
INSTALL STEERING COLUMN TUBE ASSEMBLY LOWER
-
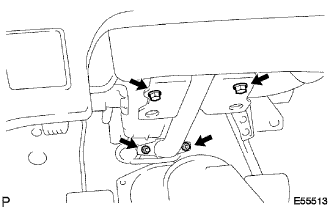
Install the steering column tube sub-assembly lower with the 2 bolts and 2 nuts.
-
-
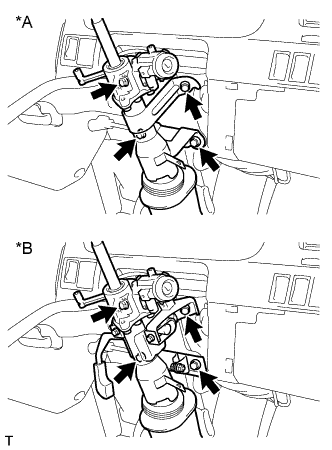
INSTALL STEERING COLUMN ASSEMBLY
-
Install the 4 bolts and steering column assembly.
Text in Illustration *A Non-Tilt Steering Column *B Tilt Steering Column - Torque:
- 11.5 N*m { 117 kgf*cm, 9 ft.*lbf }
-
Install the 2 bolts and clamp bracket.
-
-
INSTALL STEERING COLUMN COVER LWR
-
Install the steering column cover LWR with the clip and 2 screws.
-
-
INSTALL STEERING COLUMN COVER UPR
-
Install the steering column cover UPR with the 2 screws.
-
-
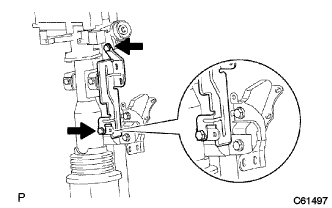
INSTALL INSTRUMENT PANEL BRACE SUB-ASSEMBLY NO. 1
-
Install the instrument panel brace sub-assembly with the 2 bolts and nut.
-
-
INSTALL INSTRUMENT PANEL SUB-ASSEMBLY
-
ADD COOLANT
-
Slowly fill the system with coolant.
-
Use of improper coolants may damage engine cooling system.
-
Use "Toyota Long Life Coolant" or equivalent and mix it with plan water according to the manufacturer's directions.
-
Using of coolant which includes more than 50 % [freezing protection down to -35°C (-31°F)] or 60 % [freezing protection down to -50°C (-58°F)] of ethylene-glycol is recommended but not more than 70 %.
Note
-
Do not use an alcohol type coolant or plain water alone.
-
The coolant should be mixed with plain water (preferably demineralized water or distilled water).
Capacity: Independent Front Suspension Rigid Front Suspension w/ Front heater 10.7 liters
(11.3 US qts, 9.4 Imp. qts)
10.9 liters
(11.5 US qts, 9.6 Imp. qts)
w/o heater 9.8 liters
(10.4 US qts, 8.6 Imp. qts)
10 liters
(10.6 US qts, 8.8 Imp. qts)
w/ Front and Rear heater 11.5 liters
(12.2 US qts, 10.1 Imp. qts)
11.7 liters
(12.3 US qts, 10.3 Imp. qts)
-
-
Reinstall the radiator cap.
-
Start the engine, and bleed the cooling system.
-
Refill the radiator reservoir with coolant until it reaches the "full" line.
-
-
INSPECT CHECK ENGINE COOLANT LEAK
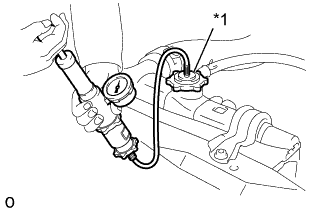
Text in Illustration *1 Radiator Cap Tester
-
Fill the radiator with coolant and attach a radiator cap tester.
-
Warm up the engine.
-
Pump it to 118 kPa (1.2 kgf/cm2, 17.1 psi), and check that the pressure does not drop.
If the pressure drops, check the hoses, radiator or water pump for leaks. If no external leaks are found, check the heater core, cylinder block and head.
-
-
WARM UP ENGINE