BRAKE ACTUATOR INSTALLATION

-
INSTALL BRAKE ACTUATOR BOLT CUSHION
-
Install the 3 brake actuator bolt cushions to the brake actuator.
-
-
INSTALL BRAKE ACTUATOR BOLT HOLDER
-
Install the 2 brake actuator bolt holders to the brake actuator.
-
-
INSTALL BRAKE ACTUATOR BRACKET ASSEMBLY
-
Install the brake actuator bracket to the brake actuator with the 2 nuts.
- Torque:
- 5.5 N*m { 56 kgf*cm, 49 in.*lbf }
-
-
INSTALL BRAKE ACTUATOR ASSEMBLY
-
Install the brake actuator with bracket with the 3 bolts.
- Torque:
- 29.5 N*m { 300 kgf*cm, 22 ft.*lbf }
-
Using a union nut wrench 10 mm, install the 5 brake tubes to the brake actuator.
- Torque:
- 15 N*m { 155 kgf*cm, 11 ft.*lbf }
Tech Tips
At the time of installation, connect each brake tube to the correct position Click here.
-
-
FILL RESERVOIR WITH BRAKE FLUID
-
BLEED MASTER CYLINDER
Tech Tips
If the master cylinder has been disassembled or if the reservoir becomes empty, bleed the air from the master cylinder.
-
Disconnect the brake lines from the master cylinder.
-
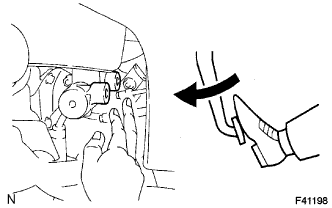
Slowly depress the brake pedal and hold it.
-
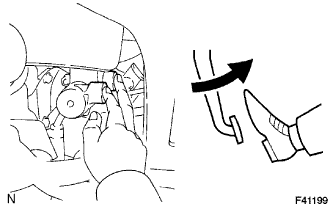
Block off the outer holes with your fingers, and release the brake pedal.
-
Repeat (b) and (c) 3 or 4 times.
-
-
BLEED BRAKE LINE
-
Connect the vinyl tube to the brake caliper.
-
Depress the brake pedal several times, then loosen the bleeder plug with the pedal held down.
-
At the point when fluid stops coming out, tighten the bleeder plug, then release the brake pedal.
-
Repeat (b) and (c) until all the air in the fluid has been bled out.
-
Repeat the above procedure to bleed the air out of the brake line for each wheel.
- Torque:
- 11 N*m { 110 kgf*cm, 8 ft.*lbf }
-
-
CHECK FLUID LEVEL IN RESERVOIR
-
CHECK BRAKE FLUID LEAKAGE
-
CHECK BRAKE ACTUATOR WITH INTELLIGENT TESTER OR ACTUATOR CHECKER