REAR AXLE HUB BOLT (for Full Just Low) REPLACEMENT

Tech Tips
Replace the RH side by the same procedures with the LH side.
-
REMOVE REAR AXLE SHAFT LH
-
REMOVE REAR AXLE SHAFT GASKET LH
-
REMOVE REAR TIRE
-
SEPARATE SKID CONTROL SENSOR (W/ ABS)
-
REMOVE REAR AXLE BEARING LOCK NUT
-
Remove the 2 screws from the rear axle bearing lock nut.
-
Remove the rear axle lock nut plate LH.
-
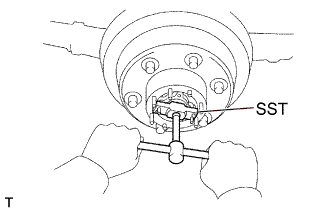
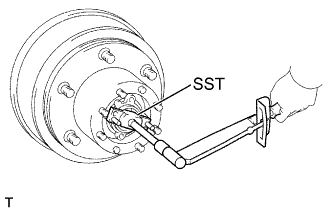
Using SST, remove the rear axle bearing lock nut.
- SST
- 09513-36020
-
Remove the rear axle lock nut plate LH.
-
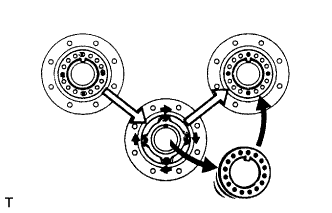
Remove the rear axle outer tapered roller bearing.
-
-
REMOVE AXLE HUB W/DRUM
-
Using SST, remove the rear axle hub & brake drum assembly.
- SST
- 09510-36010
-
-
REMOVE REAR BRAKE DRUM SUB-ASSEMBLY
-
REMOVE REAR AXLE LH HUB BOLT
-
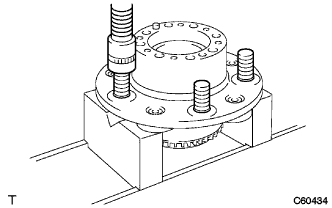
Using a press, remove the rear axle LH hub bolt.
-
-
INSTALL REAR AXLE LH HUB BOLT
-
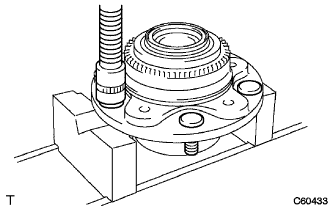
Using a press, press in a new rear axle LH hub bolt.
-
-
INSTALL REAR BRAKE DRUM SUB-ASSEMBLY
-
INSTALL AXLE HUB W/DRUM
-
INSTALL REAR AXLE BEARING LOCK NUT
-
Install the lock nut.
-
-
INSPECT PRELOAD
-
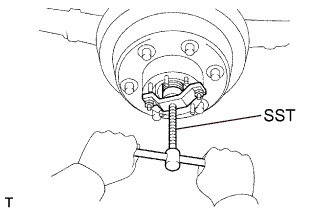
Using SST, torque the lock nut.
- SST
- 09513-36020
- Torque:
- 56 N*m { 575 kgf*cm, 42 ft.*lbf }
-
Snug down the bearing by turning the several times.
-
Using SST, retorque the lock nut.
- Torque:
- 56 N*m { 575 kgf*cm, 42 ft.*lbf }
-
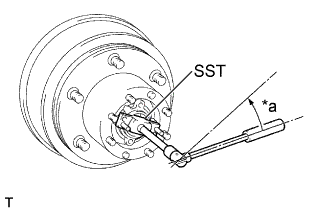
Text in Illustration *a 30° Using SST, loosen the lock nut by 30°.
- SST
- 09513-36020
-
Temporarily install the lock plate.
If the screw holes are not aligned, correct by tightening the nut by the smallest amount possible.
-
Remove the lock plate.
-
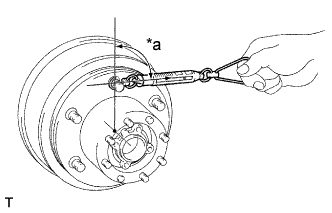
Text in Illustration *a 90° Using a spring tension gauge, measure the preload.
Preload (at starting) 11 to 32 N (1.1 to 3.3 kgf, 2.4 to 7.3 lbf) If the preload is not within the specification, the above procedure must be repeated.
-
-
INSPECT AXLE HUB AXIAL PLAY
-
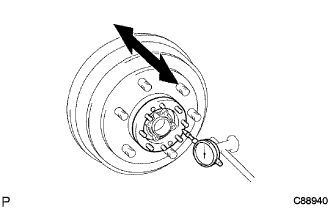
Using a dial indicator, check the axle hub axial play.
Maximum 0.10 mm (0.0039 in.) or less
-
-
INSTALL REAR AXLE BEARING LOCK NUT SCREW
-
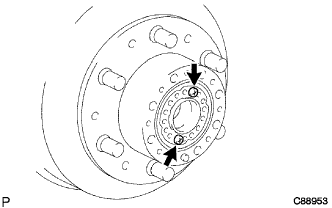
Install the lock plate.
-
Install the rear axle bearing lock nut screw.
-
-
INSTALL SKID CONTROL SENSOR (W/ ABS)
- Torque:
- 8.0 N*m { 82 kgf*cm, 71 in.*lbf }
-
INSTALL REAR TIRE
- Torque:
- 365 N*m { 3722 kgf*cm, 269 ft.*lbf }
-
INSTALL REAR AXLE SHAFT GASKET LH
-
INSTALL REAR AXLE SHAFT LH
-
CHECK ABS SPEED SENSOR SIGNAL (w/ ABS)