FRONT LOWER BALL JOINT REMOVAL

-
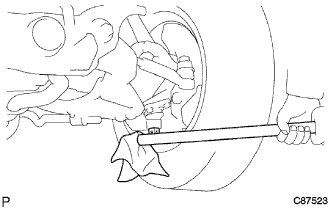
CHECK BALL JOINT LOOSENESS
-
Jack up the front side of the vehicle.
-
Put a lever under the wheel, use wood tip etc, as a fulcrum and lift the lower ball joint assembly front LH up.
-
Then check the rattle of the lower ball joint assembly front LH.
-
-
REMOVE FRONT WHEEL
-
SEPARATE SHOCK ABSORBER ASSEMBLY FRONT LH
-
SEPARATE STABILIZER BAR FRONT
-
LOOSEN FRONT SUSPENSION ARM SUB-ASSEMBLY LOWER NO.1 LH
-
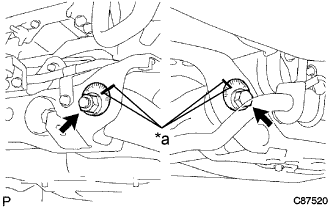
Text in Illustration *a Matchmark Place matchmarks on the camber adjust cam and front suspension toe adjust cam assembly.
-
Loosen the bolt and nut.
-
-
REMOVE LOWER BALL JOINT ASSEMBLY FRONT LH
-
Remove the cotter pin and castle nut.
-
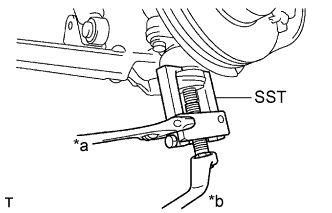
Text in Illustration *a Hold *b Turn Using SST, disconnect the lower ball joint assembly from the suspension lower arm.
-
Remove the 4 bolts and lower ball joint assembly from the steering knuckle.
- SST
- 09628-62011
-
-
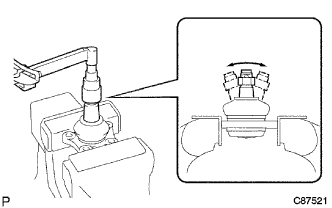
INSPECT LOWER BALL JOINT ASSEMBLY FRONT LH
-
Flip the stud back and forth 5 times in the sliding direction, then rotate it continuously at the speed of 2 to 4 seconds per revolution and take the torque reading on the 5th revolution torque.
Turning Torque 1.0 to 6.5 N*m (10 to 66 kgf*cm, 9 to 58 in. lbf)
-