MANUAL TRANSMISSION ASSEMBLY INSTALLATION

-
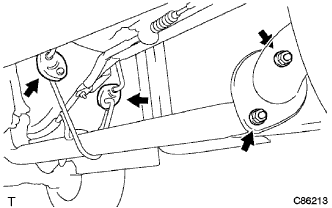
INSTALL ENGINE MOUNTING INSULATOR ASSEMBLY REAR
-
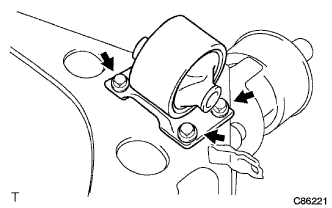
Install the shifting control assembly and the engine mounting insulator rear with the 4 bolts.
- Torque:
- 33 N*m { 337 kgf*cm, 24 ft.*lbf }
-
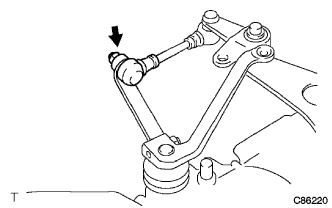
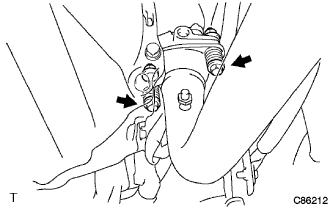
Connect the shift cable link with the nut.
- Torque:
- 12 N*m { 122 kgf*cm, 9 ft.*lbf }
-
-
INSTALL MANUAL TRANSMISSION ASSEMBLY (5L ENGINE MODELS)
-
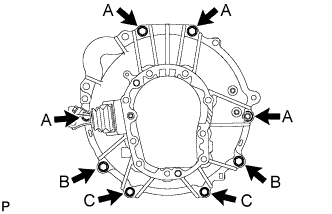
Align the input shaft with the clutch disc and install the transmission assembly to the engine.
-
Install the 8 bolts.
- Torque:
- Bolt A
- 71.5 N*m { 729 kgf*cm, 53 ft.*lbf }
- Bolt B
- 68.6 N*m { 700 kgf*cm, 51 ft.*lbf }
- Bolt C
- 37.2 N*m { 379 kgf*cm, 27 ft.*lbf }
-
-
INSTALL MANUAL TRANSMISSION ASSEMBLY (2KD-FTV ENGINE MODELS)
-
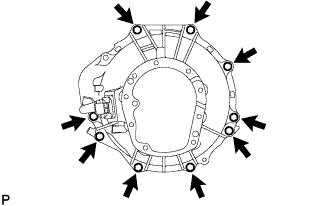
Align the input shaft with the clutch disc and install the transmission assembly to the engine.
-
Install the 9 bolts.
- Torque:
- 71.5 N*m { 729 kgf*cm, 53 ft.*lbf }
-
-
CONNECT ENGINE MOUNTING INSULATOR ASSEMBLY REAR
-
Connect the engine mounting insulator rear to the engine mounting bracket with the bolt and nut.
- Torque:
- 98 N*m { 1000 kgf*cm, 72 ft.*lbf }
-
-
CONNECT CLUTCH RELEASE CYLINDER ASSEMBLY
-
Connect the clutch release cylinder assembly with the 2 bolts.
- Torque:
- 11.8 N*m { 120 kgf*cm, 9 ft.*lbf }
-
-
INSTALL STARTER ASSEMBLY
-
Install the starter assembly with the nut.
- Torque:
- 69 N*m { 704 kgf*cm, 51 ft.*lbf }
-
Connect the starter connector.
-
-
CONNECT FLOOR SHIFT CABLE TRANSMISSION CONTROL SHIFT
-
Connect the shift cable with the clip and nut.
- Torque:
- 12 N*m { 122 kgf*cm, 9 ft.*lbf }
-
-
CONNECT FLOOR SHIFT CABLE TRANSMISSION CONTROL SELECT
-

Connect the select cable with the clip and nut.
- Torque:
- 12 N*m { 122 kgf*cm, 9 ft.*lbf }
-
-
CONNECT WIRE HARNESS
-
Connect the back-up lamp and speed sensor wire harness.
-
-
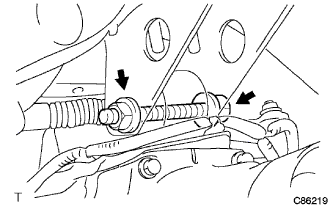
INSTALL PROPELLER SHAFT ASSEMBLY REAR
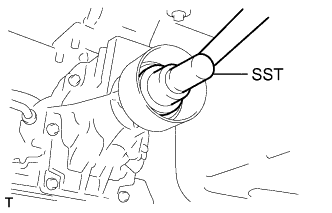
-
Remove the SST from the extension housing.
- SST
- 09325-20010
-
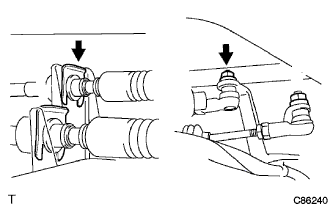
Install propeller shaft in the extension housing.
-
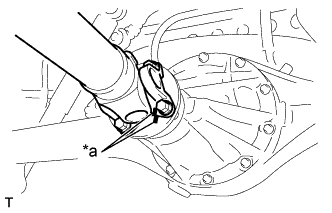
Text in Illustration *a Matchmark Align the matchmarks on the yoke and differential flange.
-
Install the 4 bolts, 4 nuts and washer.
- Torque:
- 74 N*m { 755 kgf*cm, 55 ft.*lbf }
-
-
INSTALL EXHAUST FRONT PIPE ASSEMBLY NO.2
-
Install the exhaust front pipe assembly No. 2 with the 2 muffler mounts, 2 bolts and 2 nuts.
- Torque:
- 43 N*m { 438 kgf*cm, 32 ft.*lbf }
-
Install the exhaust front pipe assembly No. 2 with the 2 bolts and the 2 springs.
- Torque:
- 43 N*m { 438 kgf*cm, 32 ft.*lbf }
-
-
INSTALL ENGINE UNDER COVER SUB-ASSEMBLY NO.2
-
CONNECT BATTERY NEGATIVE TERMINAL
-
INSPECT AND ADJUST MANUAL TRANSMISSION OIL
-
Stop the vehicle on the level place.
-
Remove the transmission filler plug and gasket.
-

Text in Illustration *a 0 to 5 mm (0 to 0.20 in.) Check that the oil surface is within 5 mm (0.20 in.) from the lowest position of the inner surface of the transmission filler plug opening.
Note
-
Excessively large or small amount of oil may cause troubles.
-
After replacing oil, drive the vehicle and check the oil level.
-
-
Check for oil leakage when the oil level is low.
-
Install the transmission filler plug and a new gasket.
- Torque:
- 37 N*m { 377 kgf*cm, 27 ft.*lbf }
-