GENERATOR REMOVAL

-
REMOVE BATTERY NEGATIVE TERMINAL
-
REMOVE ENGINE SERVICE HOLE SUB COVER SUB-ASSEMBLY (RHD vehicle)
-
REMOVE ENGINE UNDER COVER SUB-ASSEMBLY NO.1
-
REMOVE V (COOLER COMPRESSOR TO CRANKSHAFT PULLEY) BELT NO.1 (w/ air conditioner)
-
REMOVE FAN AND GENERATOR V BELT
-
SEPARATE COOLER COMPRESSOR ASSEMBLY (w/ air conditioner)
-
Disconnect the connector.
-
Remove the 4 bolts and disconnect the cooler compressor with the cooler pipes.
Tech Tips
Suspend the cooler compressor by ropes or similar object.
-
-
REMOVE COMPRESSOR MOUNTING BRACKET NO.1 (w/ air conditioner)
-
Disconnect the connector and 2 vacuum hoses.
-
Remove the 5 bolts and bracket.
-
-
REMOVE GENERATOR BRACKET NO.1 (w/ air conditioner)
-
Remove the 3 bolts and bracket.
-
-
REMOVE ALTERNATOR ASSEMBLY (w/ VACUUM PUMP)
-
Remove the terminal cover and nut, disconnect the +B terminal wire.
-
Disconnect the connector.
-
Disconnect the 3 hoses.
-
Remove the union nut and gasket, disconnect the vacuum pump inlet hose.
-
-
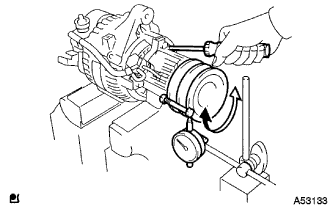
INSPECT ALTERNATOR ASSEMBLY (w/ VACUUM PUMP)
-
Mount the generator in a vice.
-
Insert the screwdriver to hold the generator rotor.
-
Hold the pulley by a bolt and nut.
-
Set a dial gauge as shown.
-
Turn the pulley and check the backlash between generator rotor and vacuum pump shaft.
Maximum backlash 1.6 mm If the backlash is greater than maximum, replace the generator rotor and vacuum pump shaft.
-