ENGINE OIL COOLER REMOVAL

-
SEPARATE BATTERY NEGATIVE TERMINAL
-
DRAIN COOLANT
-
REMOVE ENGINE UNDER COVER SUB-ASSEMBLY NO.1
-
REMOVE ENGINE UNDER COVER SUB-ASSEMBLY NO.2
-
REMOVE FRONT SEAT ASSEMBLY (DRIVER SEAT) (W/O TILT CAB CAB TYPE)
-
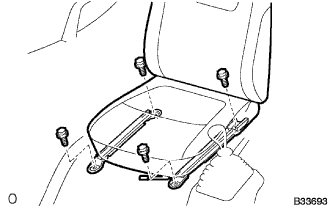
Remove the seat track cover.
-
Remove the 4 bolts.
-
Remove the front seat assembly RH.
-
-
REMOVE TRANSMISSION FLOOR SHIFT ASSEMBLY (W/O TILT CAB CAB TYPE)
for G54 Manual Transmission
for R451 Manual Transmission
-
REMOVE PARKING BRAKE LEVER ASSEMBLY (W/O TILT CAB CAB TYPE)
-
REMOVE ENGINE SERVICE HOLE SUB COVER SUB-ASSEMBLY (W/O TILT CAB CAB TYPE)
-
Remove the front door scuff.
-
Remove the floor mat.
-
Remove the 7 bolts and the engine service hole sub-cover.
-
-
REMOVE AIR CLEANER HOSE NO.1
-
REMOVE V (COOLER COMPRESSOR TO CRANKSHAFT PULLEY) BELT NO.1 (W/ AIR CONDITIONER)
-
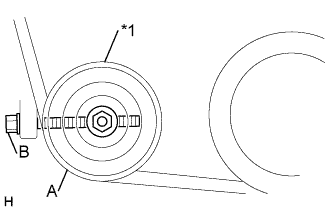
Text in Illustration *1 Idler pulley Loosen the nut A and bolt B, and remove the V belt.
-
-
REMOVE FAN AND GENERATOR V BELT
-
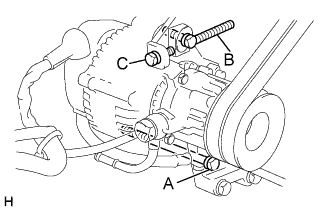
For vehicles with A/C.
-
Loosen the bolts A and B, and remove the V belt.
-
-

For vehicles without A/C.
-
Loosen the bolts A and B, and remove the V belt.
-
-
-
SEPARATE COMPRESSOR AND MAGNETIC CLUTCH (W/ AIR CONDITIONER)
-
Disconnect the connector.
-
Remove the 4 bolts and disconnect the cooler compressor with the cooler pipes.
Tech Tips
Suspend the cooler compressor by ropes or similar object.
-
-
REMOVE COMPRESSOR MOUNTING BRACKET NO.1 (W/ AIR CONDITIONER)
-
Remove the 3 bolts and bracket.
-
-
REMOVE GENERATOR ASSEMBLY
-
Remove the terminal cover and nut, disconnect the +B terminal wire.
-
Disconnect the connector.
-
Disconnect the 3 hoses.
-
Remove the union nut and gasket, disconnect the vacuum pump inlet hose.
-
-
SEPARATE EXHAUST PIPE ASSEMBLY FRONT
-
REMOVE EXHAUST MANIFOLD HEAT INSULATOR NO.1
-
REMOVE EXHAUST MANIFOLD
-
REMOVE OIL FILTER SUB-ASSEMBLY
-
Using SST, remove the oil filter.
- SST
- 09228-10002
-
-
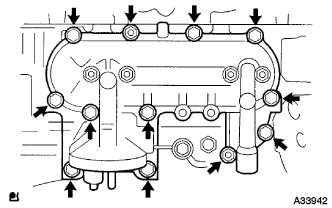
REMOVE OIL FILTER BRACKET SUB-ASSEMBLY
-
Remove the union bolt and gasket, and disconnect the vacuum pump oil inlet hose.
-
Remove the 10 bolts, 2 nuts, oil filter bracket and gasket.
-
-
REMOVE OIL COOLER ASSEMBLY
-
Loosen the 4 nuts so that they can be even with the bolt end.
-
Remove the oil cooler and 2 gaskets by tapping the nuts uniformly with a plastic hammer.
-