OIL AND OIL FILTER REPLACEMENT

CAUTION:
-
Prolonged and repeated contact with mineral oil will result in the removal of natural fats from the skin, leading to dryness, irritation and dermatitis. In addition, used engine oil contains potentially harmful contaminants which may cause skin cancer.
-
Exercise caution in order to minimize the length and frequency of contact of your skin to used oil. Wear protective clothing and gloves. Wash your skin thoroughly with soap and water, or use water-less hand cleaner to remove any used engine oil. Do not use gasoline, thinners, or solvents.
-
In order to preserve the environment, used oil and used oil filter must be disposed of only at designated disposal sites.
-
REMOVE ENGINE UNDER COVER SUB-ASSEMBLY NO.1
-
REMOVE ENGINE UNDER COVER SUB-ASSEMBLY NO.2
-
DRAIN ENGINE OIL
-
Remove the oil filler cap.
-
Remove the oil drain plug, and drain the oil into a container.
-
-
REMOVE OIL FILTER SUB-ASSEMBLY
-
Using SST, remove the oil filter.
- SST
- 09228-10002
-
-
INSTALL OIL FILTER SUB-ASSEMBLY
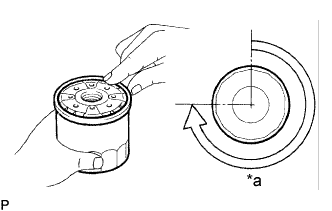
Text in Illustration *a 3/4 Turn
-
Check and clean the oil filter installation surface.
-
Apply clean engine oil to the rubber gasket of a new oil filter.
-
Lightly screw the oil filter into place, and tighten it by hand until the rubber gasket contacts the installation surface.
-
Using SST, tighten it by an additional 3/4 turn to seat the filter.
- SST
- 09228-10002
-
-
ADD ENGINE OIL
-
Clean the drain plug, and install a new gasket and it.
- Torque:
- 34.5 N*m { 350 kgf*cm, 25 ft.*lbf }
-
Fill with fresh engine oil.
Oil capacity: Drain and refill w/ oil filter change 6.5 liters (6.9 US qts, 5.7 Imp. qts) w/o oil filter change 5.7 liters (6.0 US qts, 5.0 Imp. qts) Dry fill 6.8 liters (7.2 US qts, 6.0 Imp. qts) -
Reinstall the oil filler cap.
-
-
CHECK ENGINE OIL LEVEL
-
CHECK ENGINE OIL LEAK
-
INSTALL ENGINE UNDER COVER SUB-ASSEMBLY NO.2
-
INSTALL ENGINE UNDER COVER SUB-ASSEMBLY NO.1