RADIATOR ON-VEHICLE INSPECTION

-
RADIATOR CAP SUB-ASSEMBLY
Note
To avoid the danger or being burned, do not remove the radiator cap while the engine and radiator are still hot, as fluid and steam can be blown out under pressure.
-
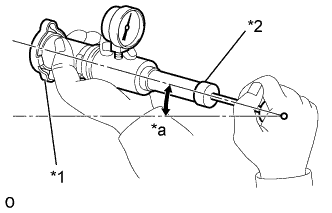
Text in Illustration *1 Radiator Cap *2 Radiator Cap Tester *a 30°C or more Inspect the radiator cap.
Note
-
If the radiator cap has contaminations, always rinse it with water.
-
Before using a radiator cap tester, wet the relief valve and pressure valve with engine coolant or water.
-
When performing steps (a) and (b) below, keep the tester at an angle of over 30°above the horizontal
-
-
Using a radiator cap tester, slowly pump the tester and check that air is coming from the vacuum valve.
Pump speed 1 push/(3 seconds or more) Note
Push the pump at a constant speed.
If air is not coming from the vacuum valve, replace the radiator cap.
-
Pump the radiator cap tester, and measure the relief valve opening pressure.
Pump speed 1 push within 1 second Note
Push the pump at a constant speed.
If air is not coming from the vacuum valve, replace the radiator cap.
-
Pump the radiator cap tester, and measure the relief valve opening pressure.
Pump speed 1 push within 1 second Note
This pump speed is for the first pump only (in order to close the vacuum valve). After this, the pump speed can be reduced.
Standard opening pressure 93 - 123 kPa (0.95 - 1.25 kgf/cm2, 13.5 - 17.1 psi) Minimum opening pressure 78 kPa (0.8 kgf/cm2, 11.4 psi) Tech Tips
Use the tester's maximum reading as the opening pressure. If the opening pressure is less than minimum, replace the radiator cap.
-