EGR VALVE (w/ DPF) INSPECTION
-
INSPECT ELECTRIC EGR CONTROL VALVE ASSEMBLY
-
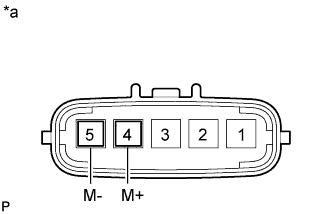
Text in Illustration *a Component without harness connected
(Electric EGR Control Valve)
Measure the resistance according to the value(s) in the table below.
Standard Resistance Tester Connection Condition Specified Condition 5 (M-) - 4 (M+) 25°C 0.3 to 100 Ω Tech Tips
The temperature indicated under "Condition" is the temperature of the electric EGR control valve assembly.
If the result is not as specified, replace the electric EGR control valve assembly.
-
-
INSPECT ELECTRIC EGR CONTROL VALVE ASSEMBLY
-
Visually check the electric EGR control valve for deposits.
OK No Accumlation If there are deposits, clean the electric EGR control valve.
Note
-
When cleaning the electric EGR control valve, make sure the valve is completely closed.
-
Do not forcibly open the valve as it may be damaged or deformed.
-
When cleaning the electric EGR control valve, use a piece of cloth soaked with cleaning solvent. Spraying the solvent directly onto this part or soaking the part in solvent may damage the part.
-
-
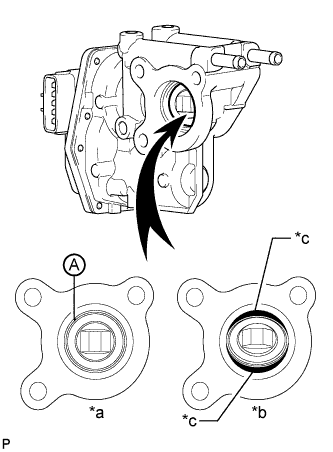
Text in Illustration *a CORRECT *b INCORRECT *c Gap Hold the electric EGR control valve up to a light, and then from the side indicated by the arrow in the illustration, visually check that there is no gap between the valve and body.
OK No light passes through (there is no gap between the valve and body). If light passes through (there is a gap between the valve and body), replace the electric EGR control valve assembly.
Tech Tips
Light passes through part A shown in the illustration even if the valve is completely closed. This is not a problem.
-