TIMING BELT REMOVAL

-
DISCONNECT BATTERY NEGATIVE TERMINAL
-
DRAIN COOLANT
-
REMOVE ENGINE UNDER COVER SUB-ASSEMBLY NO.1
-
REMOVE FRONT SEAT ASSEMBLY (DRIVER SEAT) (W/O TILT CAB CAB TYPE)
-
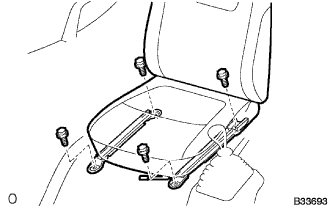
Remove the seat track cover.
-
Remove the 4 bolts.
-
Remove the front seat assembly RH.
-
-
REMOVE TRANSMISSION FLOOR SHIFT ASSEMBLY (W/O TILT CAB CAB TYPE)
G54 Manual Transmission
R451 Manual Transmission
-
REMOVE PARKING BRAKE SHOE LEVER SUB-ASSEMBLY (W/O TILT CAB CAB TYPE)
-
REMOVE ENGINE SERVICE HOLE SUB COVER SUB-ASSEMBLY (W/O TILT CAB CAB TYPE)
-
Remove the front door scuff.
-
Remove the floor mat.
-
Remove the 7 bolts and the engine service hole sub-cover.
-
-
REMOVE RADIATOR ASSEMBLY
-
REMOVE VANE PUMP V BELT
-
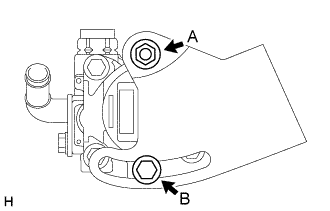
Loosen the nut A and bolt B, and remove the V belt.
-
-
REMOVE V (COOLER COMPRESSOR TO CRANKSHAFT PULLEY) BELT NO.1 (W/ AIR CONDITIONER)
-
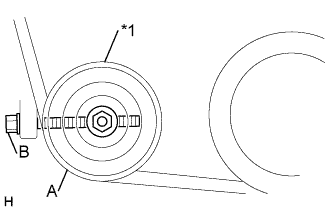
Text in Illustration *1 Idler pulley Loosen the nut A and bolt B, and remove the V belt.
-
-
REMOVE FAN AND GENERATOR V BELT
-
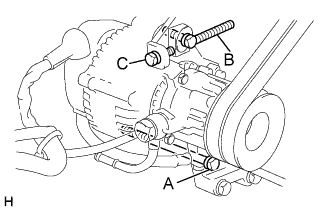
For vehicles with A/C.
-
Loosen the bolts A and B, and remove the V belt.
-
-

For vehicles without A/C.
-
Loosen the bolts A and B, and remove the V belt.
-
-
-
DISCONNECT COMPRESSOR AND MAGNETIC CLUTCH (W/ AIR CONDITIONER)
Tech Tips
Disconnect the compressor and magnetic clutch with the high and low pressure hoses connected, and it should be hung with rope.
-
REMOVE COMPRESSOR MOUNTING BRACKET NO.1 (W/ AIR CONDITIONER)
-
REMOVE VANE PUMP DRIVE PULLEY
-
Remove the 4 bolts, vane pump drive pulley and the vane pump drive pulley spacer.
-
w/ A/C:
Remove the 4 bolts, vane pump drive pulley and the crankshaft pulley No. 2.
-
-
REMOVE CRANKSHAFT PULLEY
-
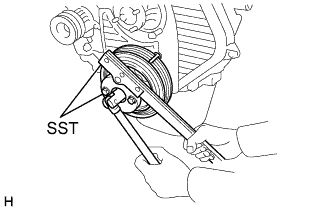
Using SST, remove the pulley bolt.
- SST
- 09213-54015 ( 91651-60855 )
- 09330-00021
-
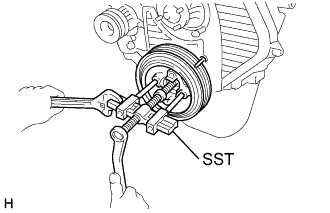
Using SST, remove the pulley.
- SST
- 09213-54015 ( 91651-60855 )
- 09330-00021
- 09950-50013 ( 09951-05010, 09952-05010, 09953-05020, 09954-05021 )
-
-
REMOVE TIMING CHAIN OR BELT COVER SUB-ASSEMBLY
-
Remove the 11 bolts, washers, timing belt cover and 2 gaskets.
-
Remove the collar from the timing pointer.
-
-
REMOVE TIMING BELT GUIDE
-
REMOVE TIMING BELT
-
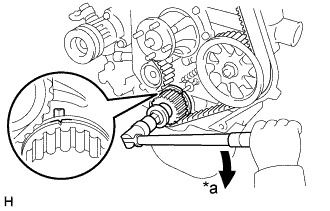
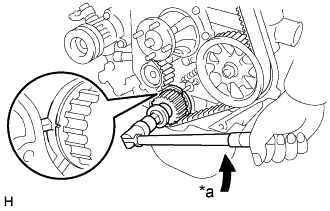
Text in Illustration *a Turn Using the crankshaft pulley bolt, align its groove with the timing pointer by turning the crankshaft clockwise.
-
Check that timing marks of the camshaft timing pulley and No.2 timing belt cover are aligned.
If not, turn the crankshaft 1 revolution (360°).
-
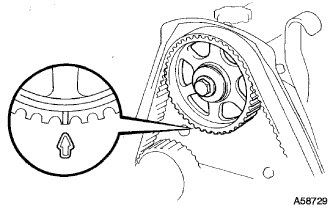
Text in Illustration *a Turn Turn the crankshaft 90° counterclockwise, and put the timing mark of the crankshaft timing pulley with the protrusion of the timing belt case.
Note
If the timing belt is disengaged, having the crankshaft timing pulley at the wrong angle can cause the piston head and valve head to come into contact with each other when you remove the camshaft timing pulley, causing damage. So always set the crankshaft pulley at the correct angle.
-
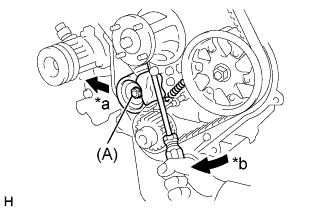
Text in Illustration *a Move *b Pry Loosen the No. 1 idler pulley bolt (A), and shift left as far as it will go.
-
Temporarily tighten the pulley bolt (A), and then relieve the timing belt tension.
-
Remove the timing belt.
-
-
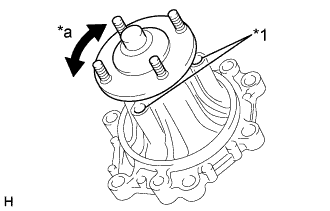
INSPECT WATER PUMP ASSEMBLY
-
Text in Illustration *1 Air Hole *a Turn Visually check air holes for coolant leakage.
If leakage is found, replace the water pump.
If engine coolant has leaked onto the timing belt, replace the timing belt.
-
Turn the pulley and check that the water pump bearing moves smoothly and quietly.
If necessary, replace the water pump.
-