ENGINE UNIT INSTALLATION

-
INSTALL ENGINE MOUNTING BRACKET FRONT NO.1 RH
- Torque:
- 68 N*m { 694 kgf*cm, 50 ft.*lbf }
-
INSTALL ENGINE MOUNTING BRACKET FRONT NO.1 LH
- Torque:
- 68 N*m { 694 kgf*cm, 50 ft.*lbf }
-
INSTALL ENGINE OIL LEVEL SENSOR
- Torque:
- 5 N*m { 51 kgf*cm, 44 in.*lbf }
-
INSTALL WATER TEMPERATURE SENDER GAGE ASSEMBLY
- Torque:
- 20 N*m { 204 kgf*cm, 15 ft.*lbf }
-
INSTALL CRANK POSITION NO.2 SENSOR
- Torque:
- 8.5 N*m { 87 kgf*cm, 75 in.*lbf }
-
INSTALL CRANK POSITION SENSOR
- Torque:
- 8.5 N*m { 87 kgf*cm, 75 in.*lbf }
-
INSTALL V-RIBBED BELT TENSIONER ASSEMBLY
-
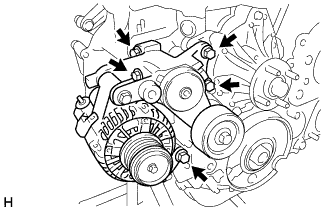
Install the alternator with belt tensioner assembly and 5 bolts.
- Torque:
- 21 N*m { 214 kgf*cm, 15 ft.*lbf }
-
-
INSTALL OIL LEVEL GAGE GUIDE
- Torque:
- 8 N*m { 82 kgf*cm, 71 in.*lbf }
-
INSTALL WATER INLET
- Torque:
- 13 N*m { 133 kgf*cm, 9.6 ft.*lbf }
-
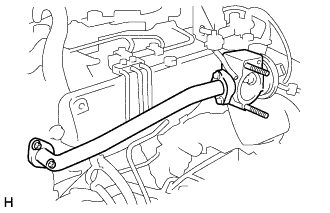
INSTALL WATER BY-PASS PIPE SUB-ASSEMBLY NO.2
- Torque:
- 8 N*m { 82 kgf*cm, 71 in.*lbf }
-
INSTALL EXHAUST MANIFOLD
-
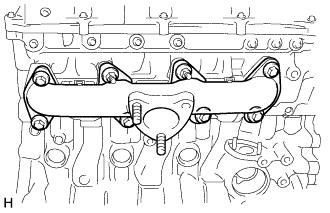
Install a new gasket and the exhaust manifold with the 6 bolts and 2 nuts.
-
Uniformly tighten the bolts and nuts in several passes.
- Torque:
- 52 N*m { 530 kgf*cm, 38 ft.*lbf }
-
-
INSTALL VENTILATION HOSE HEAT INSULATOR
- Torque:
- 12 N*m { 122 kgf*cm, 8.9 ft.*lbf }
-
INSTALL VACUUM PIPE
-
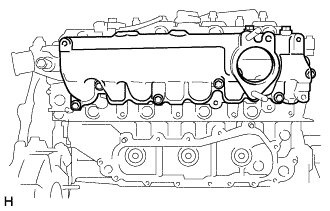
INSTALL OIL COOLER COVER SUB-ASSEMBLY
-
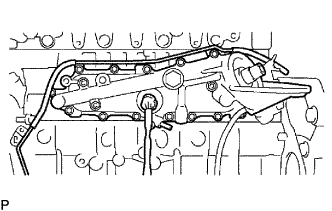
Install a new gasket and oil cooler cover sub-assembly with the 13 bolts.
- Torque:
- 13 N*m { 130 kgf*cm, 9 ft.*lbf }
-
Disconnect the oil pressure switch connector.
-
Disconnect the engine coolant temperature sensor connector.
-
-
INSTALL INJECTION PUMP ASSEMBLY
-
INSTALL COMMON RAIL ASSEMBLY
-
INSTALL GLOW PLUG ASSEMBLY
-
INSTALL WATER OUTLET
- Torque:
- 19 N*m { 194 kgf*cm, 14 ft.*lbf }
-
INSTALL TURBO WATER HOSE NO.1
-
INSTALL INTAKE MANIFOLD
-
Install a new gasket and intake manifold with the 4 bolts and 2 nuts.
- Torque:
- 29 N*m { 296 kgf*cm, 21 ft.*lbf }
-
-
INSTALL NOZZLE LEAKAGE PIPE ASSEMBLY NO.2
- Torque:
- Bolt
- 12.7 N*m { 130 kgf*cm, 9 ft.*lbf }
- Union bolt
- 12.7 N*m { 130 kgf*cm, 9 ft.*lbf }
- Check valve
- 21 N*m { 214 kgf*cm, 15 ft.*lbf }
-
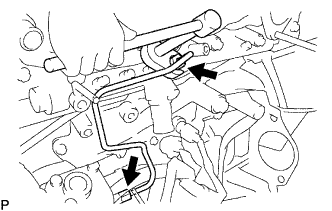
INSTALL FUEL INLET PIPE SUB-ASSEMBLY
-
Temporarily install the fuel inlet pipe sub-assembly.
-
Using a union wrench 17 mm, tighten the fuel inlet pipe sub-assembly union of common rail side.
- Torque:
- 31.9 N*m { 325 kgf*cm, 23 ft.*lbf, for use with SST }
- 35 N*m { 357 kgf*cm, 26 ft.*lbf }
Tech Tips
Use a torque wrench with a fulcrum length of 30 cm (11.81 in)..
-
Using a union wrench 17 mm, tighten the fuel inlet pipe sub-assembly union of injection pump side.
- Torque:
- 31.9 N*m { 325 kgf*cm, 23 ft.*lbf, for use with SST }
- 35 N*m { 357 kgf*cm, 26 ft.*lbf }
-
Install the injection pipe clamp to the fuel inlet pipe sub- assembly.
Tech Tips
Use a torque wrench with a fulcrum length of 30 cm (11.81 in)..
-
-
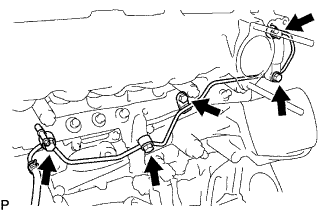
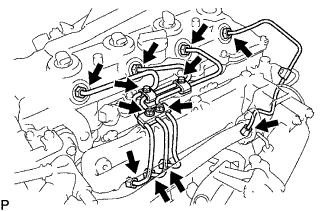
INSTALL INJECTION PIPE SET
-
Temporarily install the 4 injection pipes.
-
Install the injection pipe No. 1 clamp with the bolt.
- Torque:
- 5.0 N*m { 51 kgf*cm, 44 in.*lbf }
Note
-
Make sure that the rubber is fit inside the clamp.
-
When installing, properly position the rubber and clamp.
-
Install the injection pipe clamp No. 2 with the bolt.
- Torque:
- 5.0 N*m { 51 kgf*cm, 44 in.*lbf }
-
Install the injection pipe clamp No. 3 with the 2 nuts.
- Torque:
- 5.0 N*m { 51 kgf*cm, 44 in.*lbf }
-
Using a 17 mm union nut wrench, tighten the injection pipe union of common rail side.
- Torque:
- 35 N*m { 357 kgf*cm, 26 ft.*lbf }
Note
Use the formula to calculate special torque values for situations where a union nut wrench is combined with a torque wrench Click here
-
Using a 17 mm union nut wrench, tighten the injection pipe union of injector side.
- Torque:
- 35 N*m { 357 kgf*cm, 26 ft.*lbf }
Note
Use the formula to calculate special torque values for situations where a union nut wrench is combined with a torque wrench Click here
-
Tighten the 2 bolts, union bolt and check valve for No. 2 nozzle leakage pipe.
- Torque:
- Bolt
- 12.7 N*m { 130 kgf*cm, 9 ft.*lbf }
- Union bolt
- 12.5 N*m { 128 kgf*cm, 9 ft.*lbf }
- Check valve
- 16 N*m { 163 kgf*cm, 12 ft.*lbf }
-
-
INSTALL OIL FILTER SUB-ASSEMBLY
-

Tighten the oil filter by hand until the rubber gasket contacts the seat of the filter mounting.
-
Using SST, give it an additional 3/4 turn to seat the filter.
- SST
- 09228-10002
- Torque:
- 17 N*m { 173 kgf*cm, 13 ft.*lbf }
-
-
INSTALL VSV ASSEMBLY
-
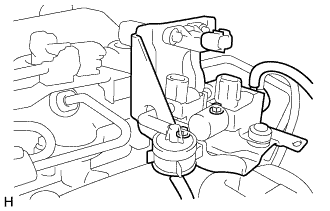
Install the VSV assembly and 2 bolts.
- Torque:
- 29 N*m { 296 kgf*cm, 21 ft.*lbf }
-
-
INSTALL EGR PIPE SUB-ASSEMBLY NO.1
-
Install the 2 gaskets, EGR control valve and EGR pipe sub-assembly.
-
Install the 2 nuts.
- Torque:
- 13 N*m { 133 kgf*cm, 9.6 ft.*lbf }
-
-
INSTALL CRANKSHAFT PULLEY
-
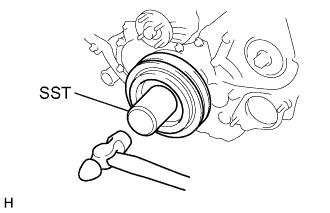
Align the pulley set key with the key groove of the pulley.
-
Using SST and a hammer, tap in the pulley.
- SST
- 09214-60010
-
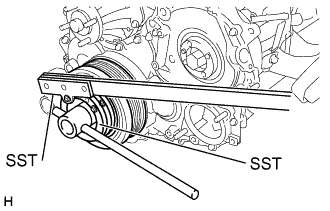
Using SST, install and torque the plate bolt.
- SST
- 09213-58012
- 09330-00021
- Torque:
- 365 N*m { 3,700 kgf*cm, 269 ft.*lbf }
-
-
INSTALL VACUUM PUMP ASSEMBLY
-
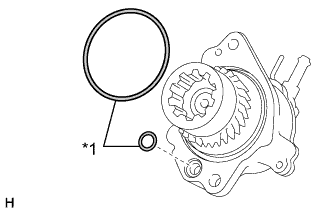
Text in Illustration *1 New O-ring Install 2 new O-rings to the vacuum pump.
-
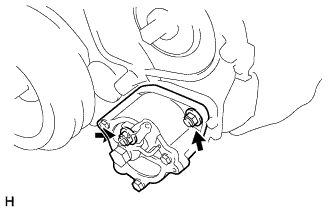
Install the vacuum pump with the 2 nuts.
- Torque:
- 21 N*m { 214 kgf*cm, 15 ft.*lbf }
-
-
INSTALL PUMP DRIVE SHAFT PULLEY
-
INSTALL TIMING BELT
-
INSTALL ENGINE WIRE
-
INSTALL ENGINE ASSEMBLY