TIMING BELT INSTALLATION

-
SET NO. 1 CYLINDER TO TDC / COMPRESSION
-
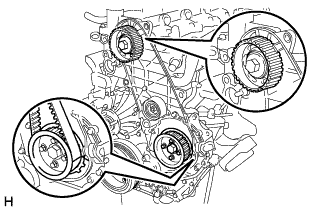
Set the timing pulley at each position.
Note
When turning the crankshaft, the valve heads will hit against the position top. So do not turn it more than necessary.
-
-
INSTALL TIMING BELT
Note
The engine should be cold.
Tech Tips
If re-using the timing belt, align the points marked during removal, and install the belt with the arrow pointing in the direction of engine revolution.
-
INSTALL TIMING BELT IDLER SUB-ASSEMBLY NO.1
-
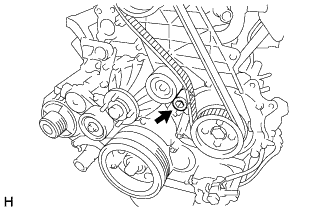
Using a 10 mm hexagon wrench, install the washer and timing belt idler pulley with the bolt.
- Torque:
- 35 N*m { 350 kgf*cm, 25 ft.*lbf }
-
Check that the idler pulley moves smoothly.
If it doesn't move smoothly, check the idler pulley and washer.
-
-
SET CHAIN TENSIONER ASSEMBLY NO.1
-
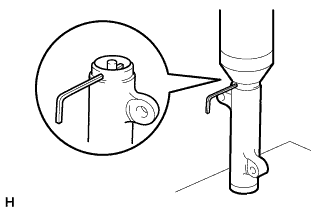
Using a press, slowly press in the push rod using 981 - 9807 N (100 - 1000 kgf, 220 - 2205 lbf) of force.
-
Align the holes of the push rod and housing, pass a 1.5 mm hexagon wrench through the holes to keep the setting position of the push rod.
-
Release the press.
-
-
INSTALL CHAIN TENSIONER ASSEMBLY NO.1
-
Temporarily install the timing belt tensioner with the 2 bolts while pushing the idler pulley toward the timing belt.
-
Tighten the 2 bolts.
- Torque:
- 13 N*m { 133 kgf*cm, 9 ft.*lbf }
-
Remove the 1.5 mm hexagon wrench from the tensioner.
-
-
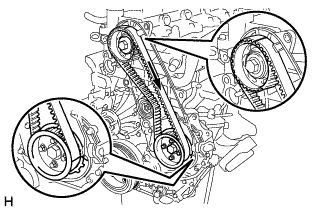
CHECK VALVE TIMING
-

Turn the crankshaft pulley clockwise and check that each pulley aligns with the timing marks (TDC mark) as shown in the illustration.
If the marks do not align, remove the timing belt and reinstall it.
-
-
INSTALL TIMING BELT NO.1 COVER
-
Install the timing belt cover with the 6 seal washers and bolts.
- Torque:
- 6.0 N*m { 61 kgf*cm, 53 in.*lbf }
-
-
INSTALL TURBO WATER HOSE NO.1
-
INSTALL RADIATOR ASSEMBLY
-
INSTALL FAN AND GENERATOR V BELT
-
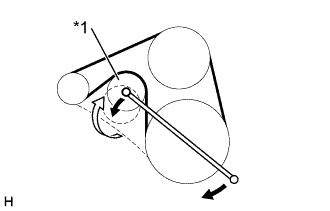
Text in Illustration *1 Auto Tensioner Set the V belt to everything except the auto tensioner, as shown in the illustration.
-
Loosen the V belt by turning the belt tensioner clockwise.
-
Then set the V belt to the auto tensioner.
-
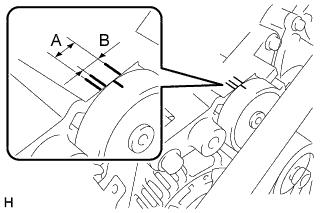
After a new belt has been installed, check that the mark is within the B range as shown in the illustration.
-
-
INSTALL ENGINE SIDE COVER SUB-ASSEMBLY LH
-
INSTALL ENGINE SIDE COVER SUB-ASSEMBLY RH
-
INSTALL ENGINE SERVICE HOLE SUB COVER SUB-ASSEMBLY (W/O TILT CAB CAB TYPE)
- Torque:
- 11.5 N*m { 115 kgf*cm, 8.5 ft.*lbf }
-
INSTALL PARKING BRAKE SHOE LEVER SUB-ASSEMBLY (W/O TILT CAB CAB TYPE)
-
INSTALL TRANSMISSION FLOOR SHIFT ASSEMBLY (W/O TILT CAB CAB TYPE)
for G54 Manual Transmission
for R451 Manual Transmission
-
INSTALL FRONT SEAT ASSEMBLY (DRIVER SEAT) (W/O TILT CAB CAB TYPE)
-
INSTALL FRONT SEAT ASSEMBLY RH (W/O TILT CAB CAB TYPE)
-
REFILL ENGINE COOLANT
-
Slowly fill the system with coolant.
-
Use of improper coolants may damage engine cooling system.
-
Use "Toyota Long Life Coolant" or equivalent and mix it with plan water according to the manufacturer's directions.
-
Using of coolant which includes more than 50 % [freezing protection down to -35°C (-31°F)] or 60 % [freezing protection down to -50°C (-58°F)] of ethylene-glycol is recommended but not more than 70 %.
Note
-
Do not use an alcohol type coolant or plain water alone.
-
The coolant should be mixed with plain water (preferably demineralized water or distilled water).
Capacity: w/ Front heater
w/o heater
10.1 liters (10.5 US qts, 8.7 Imp. qts)
9.2 liters (9.51 US qts, 7.9 Imp. qts)
w/ Front and Rear
heater
10.9 liters (11.5 US qts, 8.9 Imp. qts)
-
-
Reinstall the radiator cap.
-
Start the engine, and bleed the cooling system.
-
Refill the radiator reservoir with coolant until it reaches the "full" line.
-
-
CHECK ENGINE COOLANT LEAK