CHARGING SYSTEM ON-VEHICLE INSPECTION

CAUTION:
If the battery is weak or if the engine is difficult to start, recharge the battery and perform inspections again before returning the vehicle to the customer.
-
TILT UP CAB
CAUTION:
-
Make sure that the vehicle is on a level surface before tilting the cab up.
-
Make sure that all the doors are closed before tilting the cab up.
-
Make sure that nobody is inside or near the cab when tilting it up.
-
Be sure to have 2 people tilt the cab up when a heavy object such as a roof rack or cargo carrier is installed to the cab.
-
Be sure to remove anything set on top of the cab before tilting it up.
-
Make sure that the cab is securely locked in place after it is tilted up.
-
Make sure that there are no tools, cloths, etc. left in the engine room before tilting the cab back down.
-
Make sure that the cab is securely locked in place after tilting it back down.
-
-
CHECK BATTERY CONDITION
-
Check the battery for damage and deformation. If severe damage, deformation or leakage is found, replace the battery.
-
Check the electrolyte quantity of each cell.
If the electrolyte quantity is below the lower line, add distilled water to each cell. Then, recharge the battery and check the electrolyte's specific gravity.
Standard specific gravity 1.25 to 1.29 at 20°C (68°F) -
Turn the ignition switch off and turn on the headlights for 20 to 30 seconds. This removes the surface charge from the battery.
-
Measure the battery voltage between the negative (- ) and positive (+) terminals of the battery.
Standard voltage 24.0 to 25.0 V at 20°C (68°F) If the voltage is less than the specification, recharge or replace the battery.
-
-
INSPECT BATTERY TERMINAL AND FUSE
-
Check that the battery terminals are not loose or corroded.
If the terminals are corroded, clean the terminals.
-
Measure the resistance of related fuses.
Standard resistance Below 1 Ω If the result is not as specified, replace the fuse.
-
-
INSPECT FAN AND GENERATOR V BELT
-
Check the V belt for wear, cracks or other signs of damage.
If any of the following defects is found, replace the V belt.
-
The V belt is cracked.
-
The V belt is worn out to the extent that the cords are exposed.
-
The V belt has chunks missing from the ribs.
-
-
Check that the V belt fits properly in the ribbed grooves.
Tech Tips
Check with your hand to confirm that the V belt has not slipped out of the groove on the bottom of the pulley. If it has slipped out, replace the V belt. Install the V belt correctly.
-
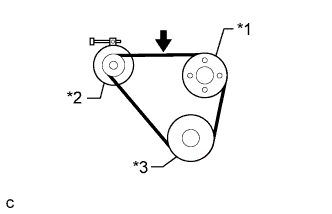
Text in Illustration *1 Fan Pulley *2 Generator *3 Crankshaft Pulley Check the fan and generator V belt deflection.
Standard Deflection Item Specified Condition New belt 10.5 to 12.5 mm (0.413 to 0.492 in.) Used belt 12 to 13 mm (0.472 to 0.512 in.) Note
-
Check the V belt deflection at the specified point.
-
When inspecting a V belt which has been used for over 5 minutes, use the used V belt specifications.
Tech Tips
When inspecting the V belt deflection, apply 98 N (10 kgf, 22 lbf) of tensile force to it.
-
-
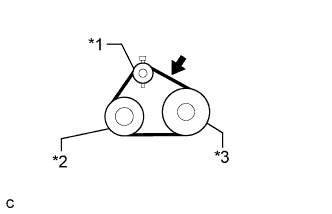
Text in Illustration *1 Idler Pulley *2 A/C Compressor *3 Crankshaft Pulley Check the No. 1 V (cooler compressor to crankshaft pulley) belt deflection.
Standard Deflection Item Specified Condition New belt 7 to 9 mm (0.276 to 0.354 in.) Used belt 8.5 to 10 mm (0.335 to 0.394 in.) Note
-
Check the V belt deflection at the specified point.
-
When inspecting a V belt which has been used for over 5 minutes, use the used V belt specifications.
Tech Tips
When inspecting the V belt deflection, apply 98 N (10 kgf, 22 lbf) of tensile force to it.
-
-
-
INSPECT GENERATOR WIRING
-
Visually check the generator wiring.
-
Check that the wiring is in good condition.
-
-
-
CHECK FOR ABNORMAL NOISES
-
Listen for abnormal noises from the generator assembly.
-
Check that no abnormal noises are heard from the generator assembly while the engine is running.
-
-
-
INSPECT CHARGE WARNING LIGHT CIRCUIT
-
Turn the ignition switch to ON. Check that the charge warning light comes on.
-
Start the engine and check that the light goes off.
If the light does not operate as specified, troubleshoot the charge warning light circuit.
-
-
INSPECT CHARGING CIRCUIT WITHOUT LOAD
-
Connect a voltmeter and ammeter to the charging circuit as follows.
-
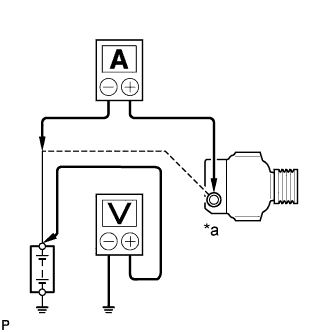
Text in Illustration *a Disconnect Wire from Terminal B Disconnect the wire from terminal B of the generator assembly, and then connect it to the negative (-) lead of an ammeter.
-
Connect the positive (+) lead of the ammeter to terminal B of the generator assembly.
-
Connect the positive (+) lead of the voltmeter to the positive (+) terminal of the battery.
-
Ground the negative (-) lead of the voltmeter.
-
-
Check the charging circuit.
-
Maintain the engine speed at 2000 rpm. Check the reading on the ammeter and voltmeter.
Standard current 10 A or less Standard voltage 26.0 to 29.6 V If the results are not as specified, replace the generator assembly.
Tech Tips
If the battery is not fully charged, the ammeter reading will sometimes be higher than the standard current.
-
-
-
INSPECT CHARGING CIRCUIT WITH LOAD
-
With the engine running at 2000 rpm, turn on the high beam headlights and turn the heater blower switch to the HI position.
-
Check the reading on the ammeter.
Standard current 30 A or higher If the ammeter reading is below the standard current, replace the generator assembly.
Tech Tips
If the battery is fully charged, the ammeter reading may be below the standard current. In this case, increase the electrical load by operating electrical equipment such as the wiper motor. Then, recheck the reading of the ammeter.
-