EXHAUST PIPE INSTALLATION

-
INSTALL FRONT EXHAUST PIPE ASSEMBLY
-
Install a new gasket to the exhaust retarder assembly.
-
Temporarily install the front exhaust pipe assembly with a new bolt and 2 new nuts.
-
Connect the clamp to the No. 1 exhaust pipe support bracket.
-
Temporarily install a new clamp bolt.
-
Tighten the bolt and 2 nuts.
- Torque:
- 70 N*m { 714 kgf*cm, 52 ft.*lbf }
-
Tighten the clamp bolt.
- Torque:
- 25 N*m { 259 kgf*cm, 19 ft.*lbf }
-
-
INSTALL VACUUM PIPE
-
Install the vacuum pipe with the 2 bolts.
- Torque:
- 29 N*m { 291 kgf*cm, 21 ft.*lbf }
-
Install the vacuum hose to the vacuum pipe, and slide the clamp to secure the hose.
-
Connect the vacuum hose to the exhaust retarder assembly.
-
-
INSTALL NO. 1 EXHAUST PIPE HEAT INSULATOR SUB-ASSEMBLY
-
Install the No. 1 exhaust pipe heat insulator sub-assembly with the 3 bolts.
- Torque:
- 29 N*m { 291 kgf*cm, 21 ft.*lbf }
-
-
INSTALL CATALYTIC WITH PIPE CONVERTER ASSEMBLY
-
Install the catalytic with pipe converter assembly with 3 new nuts and the 3 exhaust pipe support cushions.
- Torque:
- 64 N*m { 653 kgf*cm, 47 ft.*lbf }
-
Install a new gasket and connect the catalytic with pipe converter assembly to the front exhaust pipe assembly with 3 new bolts.
- Torque:
- 43 N*m { 438 kgf*cm, 32 ft.*lbf }
-
Connect the 2 differential pressure sensor hoses to the catalytic with pipe converter assembly.
-
-
INSTALL TAILPIPE ASSEMBLY
-
Install the tailpipe assembly with 2 new nuts.
- Torque:
- 31 N*m { 316 kgf*cm, 23 ft.*lbf }
-
-
INSTALL EXHAUST GAS TEMPERATURE SENSOR
-
INSPECT CATALYTIC WITH PIPE CONVERTER ASSEMBLY
-
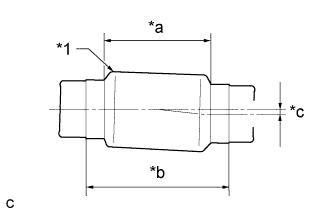
Text in Illustration *1 Bellows *a 173 to 179 mm (6.81 to 7.03 in.) *b 210 mm (8.27 in.) *c Less than 5 mm (0.197 in.) Check that the catalytic with pipe converter assembly bellows is installed as shown in the illustration.
-
-
INSPECT FOR EXHAUST GAS LEAK
-
If gas is leaking, tighten the areas necessary to stop the leak. Replace damaged parts as necessary.
-