CAMSHAFT REMOVAL

-
TILT UP CAB
CAUTION:
-
Make sure that the vehicle is on a level surface before tilting the cab up.
-
Make sure that all the doors are closed before tilting the cab up.
-
Make sure that nobody is inside or near the cab when tilting it up.
-
Be sure to have 2 people tilt the cab up when a heavy object such as a roof rack or cargo carrier is installed to the cab.
-
Be sure to remove anything set on top of the cab before tilting it up.
-
Make sure that the cab is securely locked in place after it is tilted up.
-
Make sure that there are no tools, cloths, etc. left in the engine room before tilting the cab back down.
-
Make sure that the cab is securely locked in place after tilting it back down.
-
-
PRECAUTION
Note
After turning the ignition switch off, waiting time may be required before disconnecting the cable from the battery terminal. Therefore, make sure to read the disconnecting the cable from the battery terminal notice before proceeding with work Click here.
-
DISCONNECT CABLE FROM NEGATIVE BATTERY TERMINAL
Note
When disconnecting the cable, some systems need to be initialized after the cable is reconnected Click here.
-
DRAIN ENGINE OIL
-
Remove the oil filler cap.
-
Remove the oil pan drain plug and gasket, and then drain the engine oil into a container.
-
Wipe the oil pan and oil pan drain plug.
-
Install a new gasket and the oil pan drain plug.
- Torque:
- 41 N*m { 418 kgf*cm, 30 ft.*lbf }
-
-
DRAIN ENGINE COOLANT
CAUTION:
Do not remove the radiator cap sub-assembly, radiator drain cock plug or engine drain plug while the engine and radiator are still hot. Pressurized, hot engine coolant and steam may be released and cause serious burns.
-
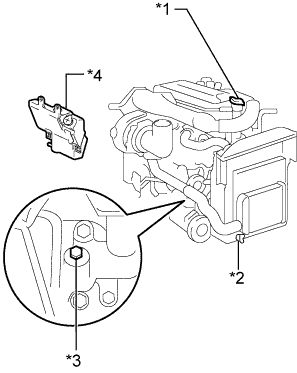
Text in Illustration *1 Radiator Cap Sub-assembly *2 Radiator Drain Cock Plug *3 Engine Drain Plug *4 Radiator Reservoir Assembly Loosen the radiator drain cock plug and engine drain plug.
-
Remove the radiator cap sub-assembly, and then drain the coolant.
Tech Tips
Collect the coolant in a container and dispose of it according to the local regulations.
-
Tighten the radiator drain cock plug by hand.
-
Tighten the engine drain plug.
- Torque:
- 27 N*m { 275 kgf*cm, 20 ft.*lbf }
-
-
DRAIN POWER STEERING FLUID
-
REMOVE CYLINDER HEAD GASKET
-
REMOVE SUPPLY PUMP ASSEMBLY
-
REMOVE VACUUM PUMP ASSEMBLY
-
REMOVE ENGINE WATER PUMP ASSEMBLY
-

Remove the 8 bolts and engine water pump assembly.
-
-
DISCONNECT COOLER COMPRESSOR ASSEMBLY
-
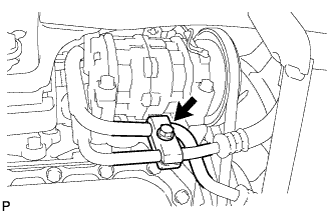
Remove the bolt and disconnect the cooler pipe.
-
Disconnect the connector.
-
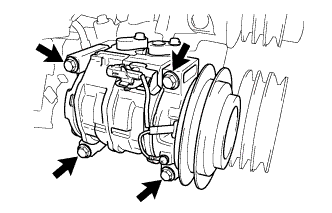
Remove the 4 bolts and disconnect the cooler compressor assembly.
Tech Tips
With the hoses connected to the cooler compressor assembly, hang the cooler compressor assembly on the vehicle body with a rope.
-
-
REMOVE IDLE PULLEY BRACKET
-
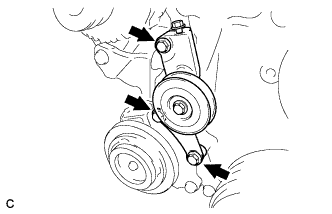
Remove the 3 bolts and idle pulley bracket.
-
-
REMOVE NO. 1 COMPRESSOR MOUNTING BRACKET
-
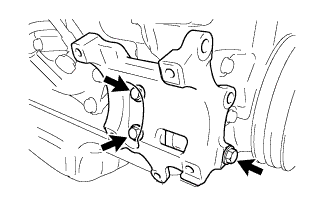
Remove the 3 bolts and No. 1 compressor mounting bracket.
-
-
REMOVE CAMSHAFT POSITION SENSOR
-
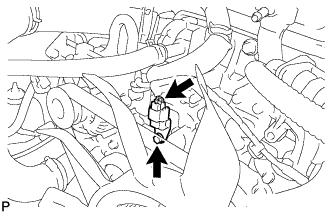
Disconnect the camshaft position sensor connector.
-
Remove the bolt and camshaft position sensor.
-
-
REMOVE CRANKSHAFT POSITION SENSOR
-
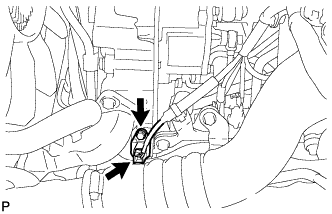
Disconnect the crankshaft position sensor connector.
-
Remove the bolt and crankshaft position sensor.
-
-
REMOVE CRANKSHAFT PULLEY
-
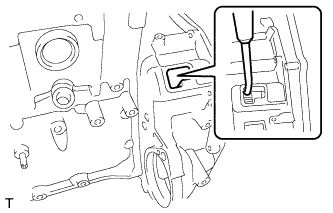
Using a 46 mm socket wrench, remove the nut, spacer and crankshaft pulley.
Tech Tips
Insert a screwdriver through the inspection hole of the flywheel housing into the ring gear of the flywheel sub-assembly to prevent the ring gear from turning together with the crankshaft.
-
-
REMOVE FLYWHEEL HOUSING STAY LH
-
Remove the 4 bolts and flywheel housing stay LH.
-
-
REMOVE FLYWHEEL HOUSING STAY RH
-
Remove the 4 bolts and flywheel housing stay RH.
-
-
REMOVE OIL PAN SUB-ASSEMBLY
-
Remove the 26 bolts.
-
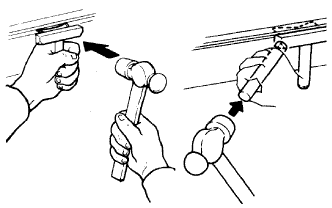
Insert the blade of an oil pan seal cutter between the crankcase and oil pan sub-assembly. Cut through the applied sealer and remove the oil pan sub-assembly.
Note
Do not damage the contact surfaces of the cylinder block or oil pan sub-assembly.
-
-
REMOVE OIL SEPARATOR ASSEMBLY
-
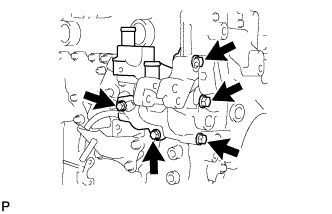
Remove the 5 bolts and oil separator assembly.
-
Remove the 3 O-rings.
-
-
REMOVE TIMING GEAR CASE
-
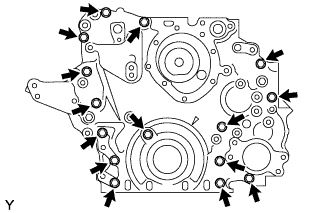
Remove the 15 bolts.
-
Using a screwdriver with its tip wrapped in protective tape, pry out the timing gear case.
Note
Do not damage the contact surfaces of the timing gear case or cylinder block.
-
-
REMOVE TIMING CHAIN OR BELT COVER OIL SEAL
-
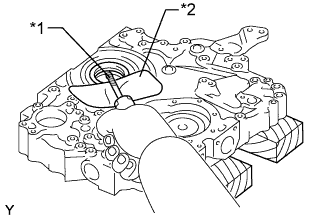
Text in Illustration *1 Protective Tape *2 Cloth Using a screwdriver with its tip wrapped in protective tape, pry out the timing chain or belt cover oil seal.
Tech Tips
Use a cloth to prevent damage to the timing gear case.
-
-
REMOVE CAMSHAFT
-
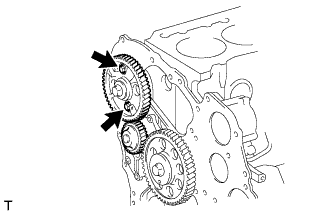
Remove the 2 bolts and camshaft.
-